This week is sponsored by Akzentz and the theme is "All Fun & Games". We were asked to recreate our favourite board game on a set of ten nail tips. They wanted to see 3D art but we could only use gel. I chose chess just simply because it is my absolute favourite board game and my dad taught me it when I was a kid. I have played it on my Amiga (people born in the 80's or before knows what I'm talking about, the whole board game was basically just one big pixel ;) but it still was a lot of fun!), I've played it on my phone, on every computer I've ever owned and of course used the real "live" ones. ;)
As soon I decided to recreate chess I started to get ideas on doing it with a Tim Burton / Alice in Wonderland twist! Just because I'm a huge Tim Burton (and Alice in Wonderland) fan! I love to create creepy "cute" things and chess is can absolutely be creepy cute! ;) It was my first time ever doing 3D with gel and I learned so much on the way! I really hope you enjoy it and don't forget to vote, starting Monday September 14 until September 17 on http://www.nailsmag.com/nexttopnailartist/2015/challenges/week-2-akzentz.
Step-by-Step Nail Art Tutorial
1
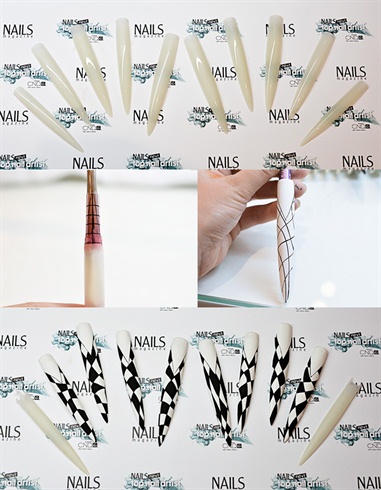
Picture 1. I started off with a new fresh set of nail tips and buffed them up.\n\nPicture 2. (left) I first placed a form on to a brush and then placed the smallest tip over it. Then I created a shape to look like the top of a shield using gel. When it was fully cured I used my e-file to perfect the shape.\n\nPicture 3. (right) Then I started to draw the chess pattern using a small hand cut striping brush and black acrylic paint. To get that creepy Tim Burton / Alice in wonderland look I made sure not to draw straight lines but tried to make them “flow” more.\n\nPicture 4. I filled in all the black squares and buffed the gel parts of the two shields to prepare them for gel.
2
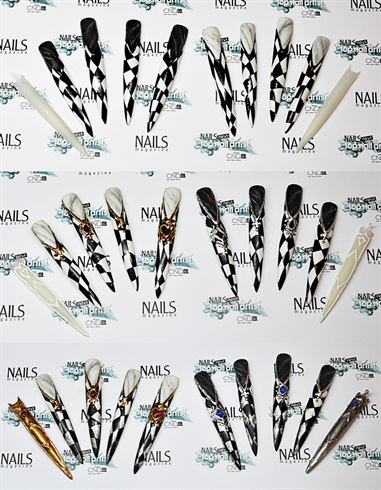
Picture 1. The next step was to create the marble area, so to make sure that the gel wouldn’t “spill over” on to the checkered part I first added bonder to set the paint, cured and then took some 3d gel paint and created a small wall around the smile line. That way I could easily remove gel if needed without removing the checkers. The marbled area was made with a white or black base and then without curing, adding black or white gel and dragging it around to create a marble stone look.\n\nPicture 2. Then I added more details around the smile line using my gel 3D paint, cured it for about 20 seconds and then dabbed on some transfer foil. I made sure not to make it even to get an “old worn out” look to it. For the shields I added some white 3D gel paint to create the shape I wanted and cured.\n\nPicture 3. For the liquid stones I added some red and blue glitter at the base, then Filled it up with some clear builder gel and cured. The shields were painted with some silver and gold chrome gel and at the end I also added a small liquid stone to each shield. To really push that creepy/worn out/ Alice in wonderland look, I finished the base of by sponging on some black acrylic paint to the chessboard.
3
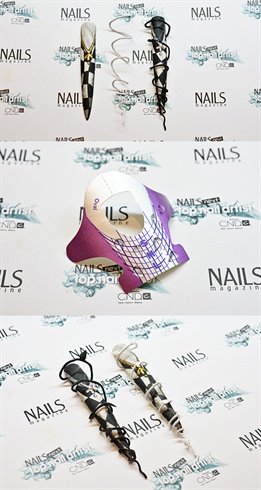
Picture 1. For the ring fingers I wanted a vine to twist around the tips so I took a piece of wire and bent it to the shape I wanted. Then I painted it white/black with some acrylic paint and attached it to the tip on the back using gel.\n\nPicture 2. To make the little leaves I simply just placed some gel on to a form and cured it. \n\nPicture 3. I painted them white/black and attached them using gel (it was a little bit tricky but the real trick is to cure them for just a couple of seconds at the time and set them in place after each cure, because they will slide off if you don’t.)
4
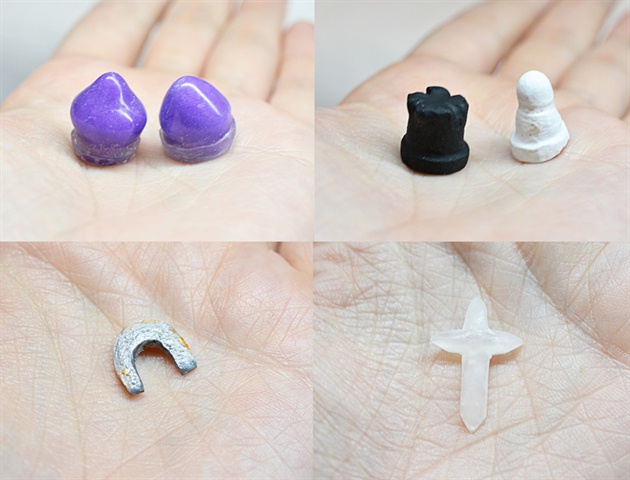
Picture 1. (top left) Time to get 3D gel advanced! To create my king’s and queen’s crowns I took some clay and shaped it to the shapes I wanted. Then I placed them on a form, poured A LOT of gel over it, cured and then perfected the shape using a hand- and e-file.\n\nPicture 2. (top right) The tower and the pawn was both made in the same way as the crowns, then I painted them with some acrylic paint.\n\nPicture 3. (bottom left) The horse shoe (representing the knight/horse) was made with builder gel on a form, then shaped with the e-file. To make it look old and worn out I used a mix of different acrylic paint colors (bright silver, dark silver, white and bronze).\n\nPicture 4. The cross (representing the bishop) was made in the same way as the horse shoe, only using gel on a form and then filing it to the right shape.
5
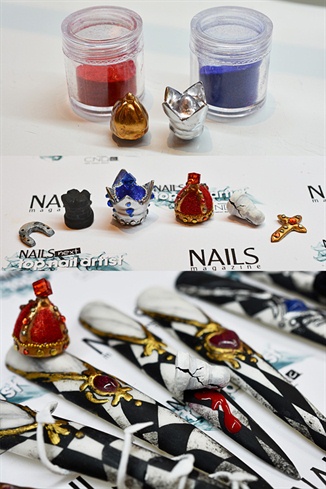
Picture 1. Time to pimp up the crowns! I finished the shape by building it up using builder gel and filing it. Then I added some gold/silver chrome gel to the whole crown. The velvet parts where made by red and blue flocking powder (placing some gel where you want the flocking powder to go, pouring it over the crown, dusting off the excess powder and curing it): And what it a crown without some serious bling? I finished off the crowns by adding A LOT of embellishments using gel of course.\n\nPicture 2. Here you have all the 3D pieces ready. The horse shoe got some black spots made with acrylic paint, the tower got some hand painted bricks, the pawn got some dimension and shadows and I crack going straight though it. The cross was painted with some gold chrome gel and pimped with a couple of stones and studs.\n\nPicture 3. The last thing I needed to do was to make all the tips matte using a matte top gloss, adding the large 3D pieces to the tips using gel and what it a Tim Burton Alice in wonderland set without some creepy blood (using red 3d gel paint of course).
23 Artists like this Photo
Write a Comment
Submit