This week was sponsored by Swarovski Crystals. We were asked to created Halloween nail art, inspired by our favourite witch on 5 tips using a mix of hand painting, 3d elements and Swarovski Crystals. I chose to do an old child hood favourite of mine, Hazel witch from the Looney Toones. I was drawn to her strong witty sense of humour and her hysterical cackling laugh. I hope you enjoy my tutorial.
Step-by-Step Nail Art Tutorial
1
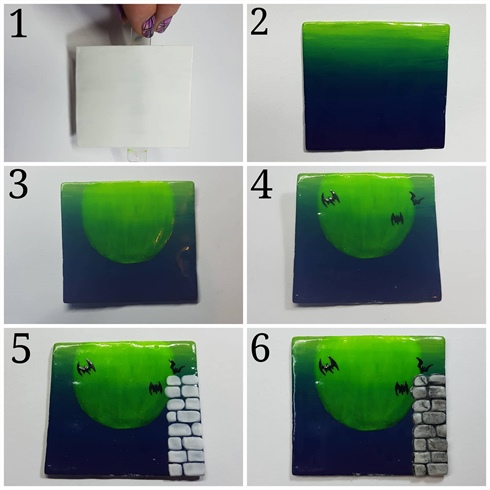
Back ground. 1. I built the back ground with white Acrylic on plastic film. 2. Hand paint the back ground with an ombre brush blending different shades of blue green and yellow with acrylic paint then coat in gel top coat. 3. Hand paint the moon with yellow gel paint. 4. Paint bats with black gel paint. 5. To create the bricks individually sculpt with white acrylic. 6 paint bricks detail with black and grey gel polish and finish with gel top coat.\n
2
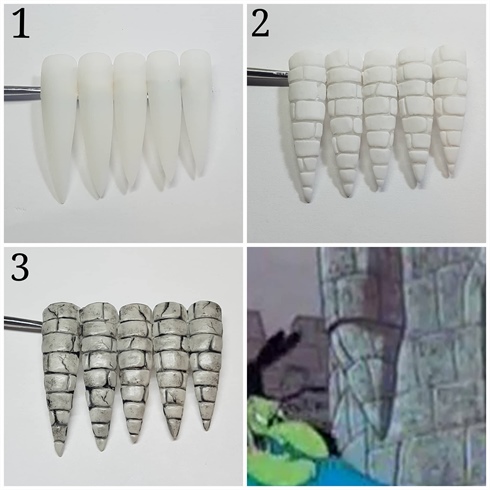
Tips. 1. I glued 5 tips together with nail glue. 2. Using white acrylic individually sculpt bricks leaving a small gap between each one. 3. paint bricks detail with black and grey gel polish.\n
3
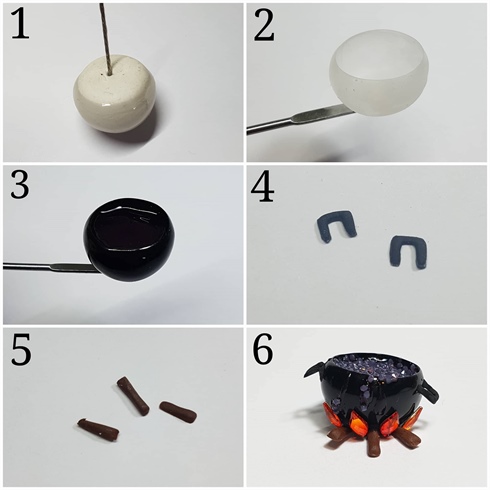
Cauldron. 1. I moulded the shape with sticky then dipped into LED Builder Gel twice. 2. Remove the sticky tack and cleanse. 3. Paint with black gel polish and finish with gel top coat. 4. Sculpt the handles with black acrylic. 5. Sculpt the wood logs with brown acrylic. 6. Using nail glue i attached the pieces and used Fire pool swarovski crystals for the flames, To create the witches brew i filled the cauldron with gel and Blossom Purple edge crystalpixie.
4
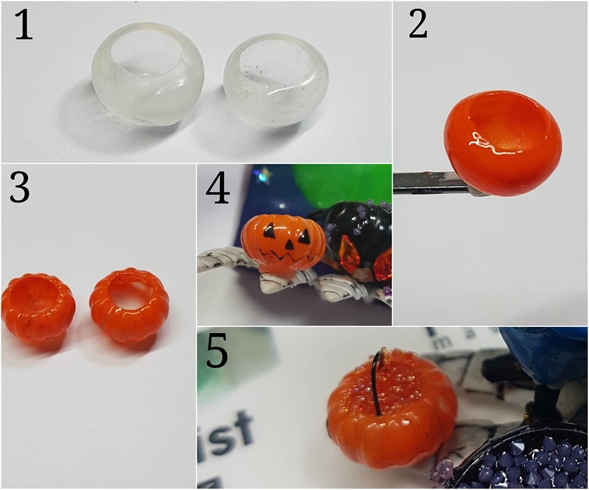
Pumpkins. 1. I created the pumpkin shape the same way as the cauldron. 2. Paint the outside with purple gel paint. 3. Using LED Builder Gel i individually built out a raised effect like a pumpkin. 4. Hand paint the face with black gel paint. 5. Fill the pumpkins with gel and Fruity orange crystalpixie then attach the handles with thin wire and nail glue.\n
5
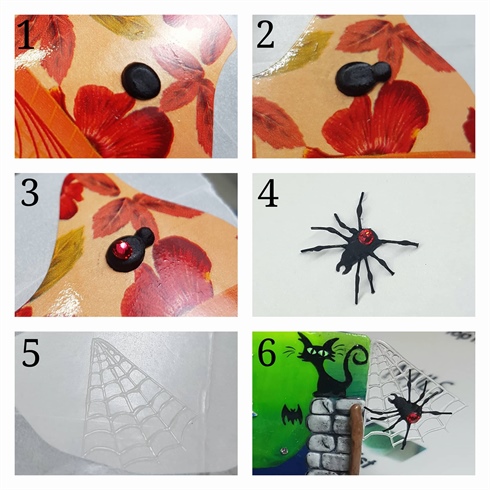
Spider. 1. On a nail form i sculpted the black body using black acrylic. 2. sculpt the head to the body with black acrylic. 3. Glue Scarlet Swarovski crystal to the body. 4. using thin wire i attached the spiders legs with black acrylic and added acrylic detail to the joins and nippers. 5. On a nail form using LED Builder gel i thinly drew the spider web shape and cured in an LED Lamp between lines. 6. I then glued the spider onto the web and to the back ground. Here i also decided to paint a cat over top of a bat above the bricks.
6
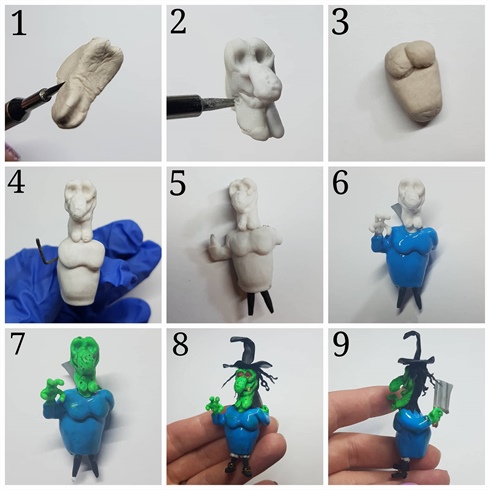
Hazel Witch. 1. Using modeling clay i shaped the witches head. 2. Sculpt acrylic over the modeling clay. 3. Shape the body with modeling clay. 4. Attach the body to the head with wire then continue to apply acrylic over the body. 5 Insert wire for the arms an legs and continue to cover in acrylic. 6 I left an opening at the back then removed the clay and covered the gap in acrylic, here i also started to hand paint the body with gel polish. 7. Continue to hand paint the witches skin with green gel polish and finer details. 8. Here i attached the hat and hair, i also sculpted shoes with black acrylic out from the wire and added some under pants with white acrylic. 9 Attach the knife and sculpt the hand over the handle with acrylic.
7

Hazel's Broom Stick. 1. Sculpt the handle on a nail form with brown acrylic. 2. Sculpt the bristles and indent lines with a metal tool. 3. Paint details with different shades of brown gel polish then finish with gel top coat. \n
8
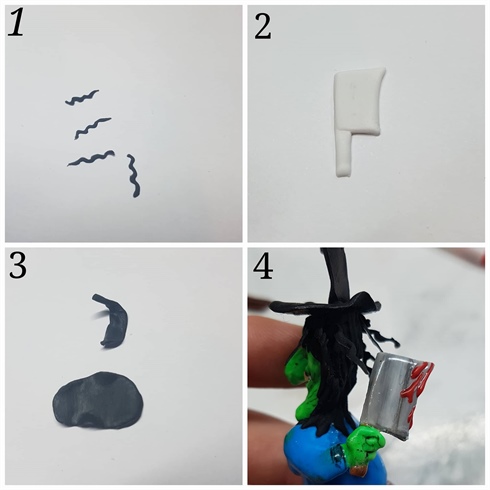
Accessories. 1. On a nail form i sculpted the curly hair pushing black acrylic in different directions. 2. I created the knife the same way on a nail form using white acrylic. 3. I sculpted the hat on a form with black acrylic and bent into shape before the acrylic hardened. 4. Here you can see the pieces attached. I hand painted the knife with gel polish. I then attached all of my pieces with nail glue and added star Swarovski crystals to the back ground.\n
9

Eye Balls. 1. sculpt the eye balls on foil with acrylic. 2. Hand paint the eye balls with the lighter shade. 3. Blend a darker shade from the out line towards the centre then paint a faint black boarder. 4. add red detail with gel paint and top coat. here I have glued them into the cauldron and added more red details. I created the finger the same way.
6 Artists like this Photo
Write a Comment
Submit