"Bewitching Hour" Sponsored by Swarovski Crystals
We were asked by Swarovski to create Halloween nail art inspired by our favorite witch. We were sent a lovely package from Swarovski with crystals to include in our design. They also asked that we mix in the techniques of hand painting, and 3-D elements. This design was to be done on five nail tips of any size. Just tips, not on a hand.
I had to think for a couple days about this one. I love every witch character imaginable. I am attracted to the darkness and mysterious, and whimsical characteristics. I wanted to stay true to a dark, witchy, Halloween vibe for this one, so I chose a character that I love for many reasons.
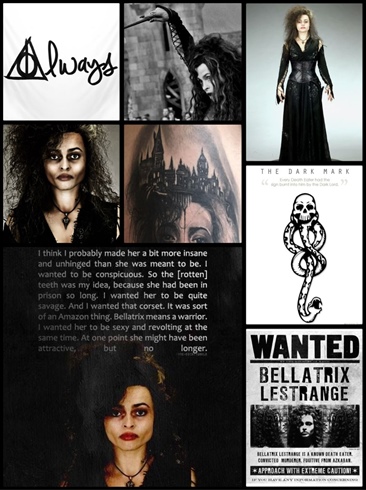
.Bellatrix Lestrange.
A pureblood witch, who is played by one of my favorite actresses(this is a main reason for designing my challenge around Bellatrix), Helena Bonham Carter.
One of Voldemort’s most loyal Death Eaters, sent to Azkaban for her crimes which included taking part in the torture of the Aurors Frank and Alice Longbottom (parents of Neville Longbottom) driving them insane. Bellatrix is pure evil and embodies everything a witch is known to be. She shows no remorse for anything that she does, and is Lord Voldemort's most loyal and pure evil Death Eater. She finds torturing her victims before killing to be the most satisfying.
Bellatrix comes from an extremely wealthy family, so the swarovski challenge was a great fit for her.
I chose Bellatrix because she is a terrifying and powerful witch, who puts her black heart into her wicked ways..........
Step-by-Step Nail Art Tutorial
1
Take to the internet in search of just the right inspiration.
2
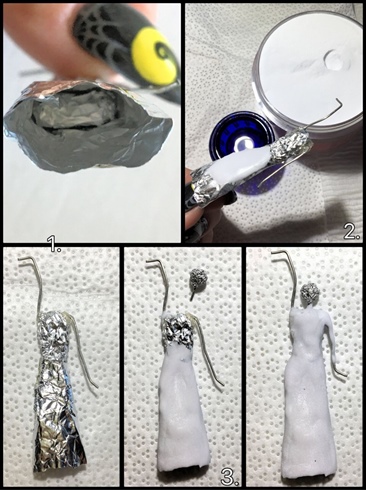
1. Start with molding a piece of foil into your basic body shape. Place pieces of wire into the foil for arms. I used 20 gauge here.\n2. Begin covering with acrylic.\n3. Now place a small ball of foil onto a straight piece of wire, and place it into the top of your body shape for a head and neck. Continue covering with acrylic, making sure to fully cover the foil.
3
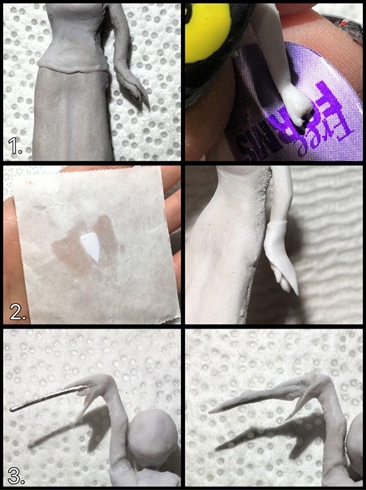
1.Form the hands with acrylic. I used the middle sticker of a form to sculpt out this hand.\n2. Using a piece of form paper, create the end of the sleeve. while it's still curing, you can lift it off of the paper gently and wrap it around the arm to create this look. You'll then want to blend it in with a ball of acrylic.\n3. Beore creating a hand on the wand arm, you will place a piece of wire into the end of the arm where foil is still present. Then begin sculpting your hand and wand using your acrylic. Do not use too wet of a bead, or it will be a mess!
4
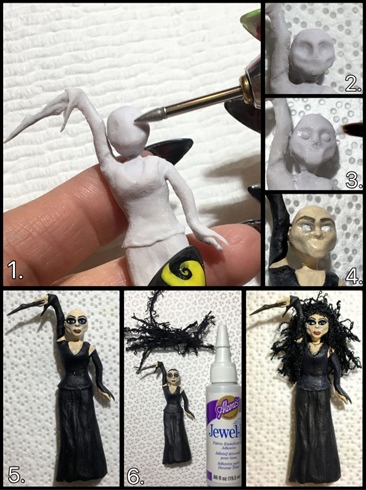
Now it's getting really fun!\n1. Using your e-file and a small pointed bit, start to carve the face.\n2. Make sure the eye sockets are pretty deep.\n3. You'll then want to place a small bead of acrylic in each socket to start the shape of the eyeballs.\n4. After sculpting out all of the features, you can start bringing your Bellatrix to life with acrylic paint! Start by painting her flesh, then begin the details.\n5. Continue on to paint the dress, and other parts of your sculpture.\n6. Hair time! I found this amazing crazy yarn that is absolutely perfect for Bellatrix. I cut random pieces of it and used a jewelry glue to adhere it. You can attempt hot glue, but it can be extremely messy. However, it will be a faster adhesion.
5
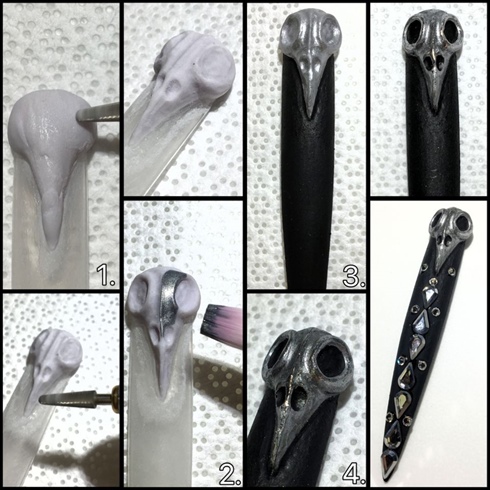
Bellatrix wears a metal bird skull necklace, so I had to sculpt this one to represent it.\n1. Begin with your tip and sculpt acrylic into the basic shape of the bird skull. Get your e-file and small bit back out to carve the details after the skull form has cured.\n2. Using silver metallic acrylic paint, put a couple layers over the skull.\n3. Paint the rest of the tip with black acrylic paint.\n4. Using the same black paint, fill in your details. To add a more metal effect, I highlighted this skull with chrome powder.\n\nFinish by adding your sparkling Swarovskis in a simple pattern using nail glue, and glue dryer spray. \n Crystals used are as follows:\n2058 SS5 Crystal\n2300/l 8x4.8MM Crystal Lt. Chrome
6
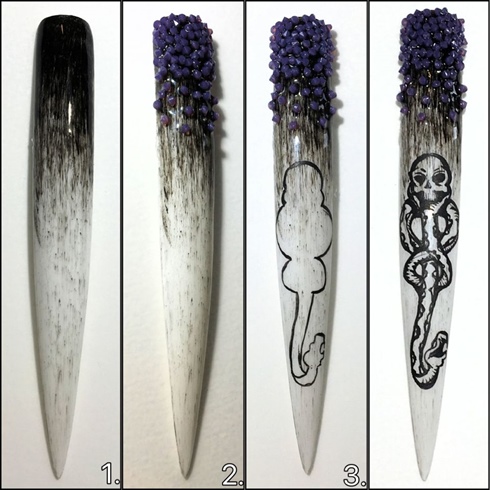
Dark Mark Nail\n"Every Death Eater had this sign burnt into him by the Dark Lord" Bellatrix was a Death Eater.\n1. Begin by painting your tip with white gel polish. After two coats and curing, add black CND additive, and work into a streaky ombre with a not so fancy brush of any kind.\n2. Use a tack free topcoat and place Swarovski Crystalpixie Edge in Blossom Purple, at the top of the ombre. Manipulate these crystals into place to flow with the additive. Cure.\n3. Begin the outline of your Dark Mark using black acrylic paint. Finish by adding the details, and shading.
7
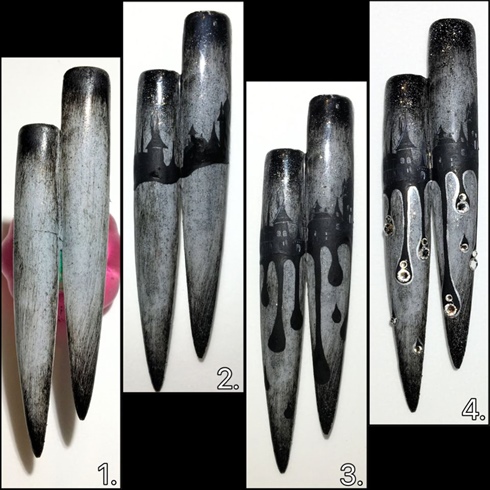
The backdrops in the Harry Potter movies are spooky, yet beautiful.\n1. Glue two tips together at different heights. Paint with white gel polish. Two coats and cure. Then get your black CND additive back out to create the vignette look. Tap your brush out a little bit, ove the nail to get the added grungy effect. Use your fingertips to blot it into place. \n2. Using black acrylic paint, start your backdrop design. \n3. Add your details using a grey acrylic paint, then start painting drips down. Make them long but different lengths.\n4. Use a silver metallic acrylic paint to outline the drips. Add your swarovski crystals to the big drips, and you're done!\n\nSwarovki Crystals Used:\n2058 SS5 Crystal\n2058 SS9 Crystal
8
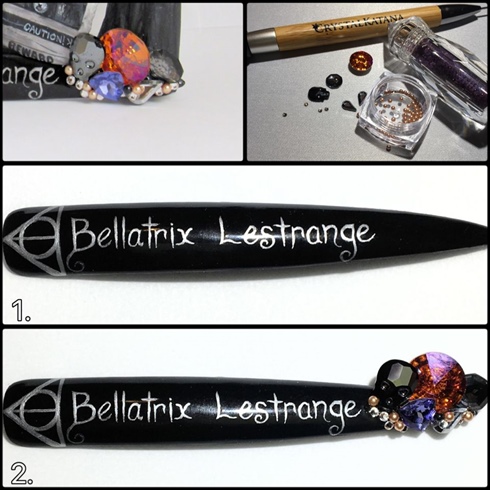
I could not get out of the project without adding my witche's name to one nail! It is a magnificent name, don't you think? \n\n1. Paint your tip using black gel polish. After curing two coats, remove your tacky layer, and use your silver metallic acrylic paint to paint the Deathly Hallows Symbol & scroll her name across the nail.\n2. Using a randome mix of Swarovski Crystals, place them how you would like using nail glue.\n\nSwarovski Crystals used:\n1681 12MM Crystal Astral Pink\n2856 10x7.5MM Jet Hematite\n2611 8MM Crystal Silver Night\n2300/l 8x4.8MM Crystal Lt. Chrome\n2058 SS5 Crystal\n5809 2MM Rose Gold\n5809 2MM Mystic Black\n4706 7MM Tanzanite\n
9
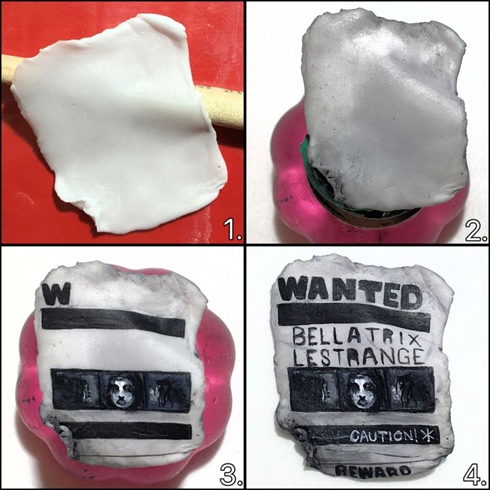
The Wanted Poster\n1. On a flat surface, sculpt a rectangular shape out of acrylic. Mold it into shape as it cures.\n2. Once cured, you can use watered down grey acrylic paint to wash over the piece. Adding in darker colors for shading as you go. Just work with it, and you'll see it come to life!\n3. Using black acrylic paint, start your design.\n4. Once you are finished, you can top it with a matte topcoat.
10

Once you have all of your pieces, you can begin to add crystals to your whole design. Have fun with it! \nCrystals in this image that have not been mentioned yet are:\n2058 SS9 Scarlet\n2078 SS 16 Scarlet
7 Artists like this Photo
Write a Comment
Submit