When I discovered that the first pre-competition challenge required my favorite witch, Swarovski crystals, 3D nail art, and hand painted nail art, I decided in a matter of 3 minutes that I would be executing the Evil Witch from Disney's 1938 film, Snow White. Being the first and earliest Disney animated feature film, what could be more classic? I decided to go with this particular witch above all of the others because she's the one I most vividly remember from childhood. I wanted my 5 nail tips to stay separate so I could challenge myself with having to create 5 different nails that exude cohesiveness and balance. From left to right, I wanted them to tell the story of how the Evil Queen questions the magic mirror, uses spellbinding enchantment, and the transformation to the Evil Witch. Since this is a Swarovski Challenge, I wanted to make the crystals a very essential part of the design by using a cheeky amount to balance out the 3D and hand painted elements. I take pride in my clean line work and acrylic sculpting, and I aspired to showcase my talent in these areas by rendering beautiful, precise work consistently from nail to nail. Since there are 24 of us, I knew that The Evil Witch would be chosen by other contestants- but as long as I accomplish various nail art techniques, my plan to stay safe in this competition was to hit the mark with accuracy on this one.
Step-by-Step Nail Art Tutorial
1
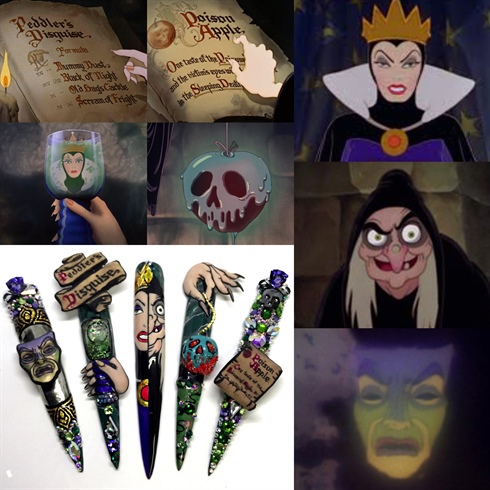
INSPIRATION PHOTOS to compare accuracy and likeness of characters/objects.
2
![[1] Magic Mirror on the wall-\n\nAll colors used are gel polish unless stated otherwise. NWTC = No Wipe Top Coat. Cure time according to product. \n1. Start with two coats of a forest green, curing between each coat. Paint the center of the nail black. Cure.\n2. Top with a NWTC. Cure. Rub chrome powder into the black portion of the nail with a cosmetic sponge.\n3. Paint the frame of the mirror and a line on top and bottom to separate the mirror from the frame. Cure. Fill in the frame with gold. Cure.\t](http://s3photo.nailartgallery.nailsmag.com/halleyfbabyy_555933_355549_l.jpg)
[1] Magic Mirror on the wall-\n\nAll colors used are gel polish unless stated otherwise. NWTC = No Wipe Top Coat. Cure time according to product. \n1. Start with two coats of a forest green, curing between each coat. Paint the center of the nail black. Cure.\n2. Top with a NWTC. Cure. Rub chrome powder into the black portion of the nail with a cosmetic sponge.\n3. Paint the frame of the mirror and a line on top and bottom to separate the mirror from the frame. Cure. Fill in the frame with gold. Cure.\t
3
![[2] Who is the fairest one of all?\n1. Sculpt the mask in the mirror with white acrylic on top of plastic.\n2. Paint a gradient from purple to green and yellow. Cure. Top with a NWTC. Rub in white chrome powder with a cosmetic sponge.\n3. Paint definition to the face with black. Cure. Top with Matte top coat. Cure.\n4. Paint details into the frame. Cure. Top with a NWTC. Cure. \n5. Attach the mask with a bead of acrylic. Using a thick gel, using a Crystal Katana, place Swarovski crystals over the forest green. Cure.](http://s3photo.nailartgallery.nailsmag.com/halleyfbabyy_555933_355550_l.jpg)
[2] Who is the fairest one of all?\n1. Sculpt the mask in the mirror with white acrylic on top of plastic.\n2. Paint a gradient from purple to green and yellow. Cure. Top with a NWTC. Rub in white chrome powder with a cosmetic sponge.\n3. Paint definition to the face with black. Cure. Top with Matte top coat. Cure.\n4. Paint details into the frame. Cure. Top with a NWTC. Cure. \n5. Attach the mask with a bead of acrylic. Using a thick gel, using a Crystal Katana, place Swarovski crystals over the forest green. Cure.
4
![[3] In a disguise so complete, no one will ever suspect.\n1. Start with two coats of forest green, curing between each coat. Apply a thin even layer of a NWTC, then begin marbling black and white. Cure. Top with a NWTC.\n2. With an electric file, create a glass shaped hole in the center of the nail.\n3. Shape two clear nail tips for either side of the glass.\n4. Using a hard gel, attach the nail tips to either side of the nail, curing on each side. Be sure to leave an opening to insert future contents.\t](http://s3photo.nailartgallery.nailsmag.com/halleyfbabyy_555933_355551_l.jpg)
[3] In a disguise so complete, no one will ever suspect.\n1. Start with two coats of forest green, curing between each coat. Apply a thin even layer of a NWTC, then begin marbling black and white. Cure. Top with a NWTC.\n2. With an electric file, create a glass shaped hole in the center of the nail.\n3. Shape two clear nail tips for either side of the glass.\n4. Using a hard gel, attach the nail tips to either side of the nail, curing on each side. Be sure to leave an opening to insert future contents.\t
5
![[4] Peddler's Disguise\n1. Using the same process as the mask, sculpt a two banner scroll.\n2. Sponge on tan, and light brown around the edges, curing between each coat.\n3. Paint the edges black and the writing. Cure. Top with a matte top coat. Cure.\n4. Directly onto the nail, sculpt the base of the glass with white acrylic.\n5. Sculpt the Evil Queen's hand. Don't forget her nails! \n6. Attach the scroll, and paint the base of the glass a deep blue/purple. Cure. Outline the edges with black. Cure. Paint apricot shade onto the hand, and her French tips. Cure. Outline the hand and nails with black. Cure. Top the base of the glass with a NWTC and the hand with a matte top coat. Cure.\n7. Insert various sizes and shapes of green glitter. Using a syringe, insert baby oil. Wipe away excess oil with a lint free wipe and isopropyl alcohol. Using a hard gel, seal off the opening. Cure. Paint a black outline around the glass. Cure. Top with a NWTC. Cure. Place Swarovski crystals.](http://s3photo.nailartgallery.nailsmag.com/halleyfbabyy_555933_355552_l.jpg)
[4] Peddler's Disguise\n1. Using the same process as the mask, sculpt a two banner scroll.\n2. Sponge on tan, and light brown around the edges, curing between each coat.\n3. Paint the edges black and the writing. Cure. Top with a matte top coat. Cure.\n4. Directly onto the nail, sculpt the base of the glass with white acrylic.\n5. Sculpt the Evil Queen's hand. Don't forget her nails! \n6. Attach the scroll, and paint the base of the glass a deep blue/purple. Cure. Outline the edges with black. Cure. Paint apricot shade onto the hand, and her French tips. Cure. Outline the hand and nails with black. Cure. Top the base of the glass with a NWTC and the hand with a matte top coat. Cure.\n7. Insert various sizes and shapes of green glitter. Using a syringe, insert baby oil. Wipe away excess oil with a lint free wipe and isopropyl alcohol. Using a hard gel, seal off the opening. Cure. Paint a black outline around the glass. Cure. Top with a NWTC. Cure. Place Swarovski crystals.
6
![[5] To age my voice, an old hag's cackle.\n1. Start with two coats of white, curing between each coat. Paint a line directly down the center of the nail.\n2. Paint the Evil Witch. Cure.\n3. Paint the Evil Queen. Cure.](http://s3photo.nailartgallery.nailsmag.com/halleyfbabyy_555933_355553_l.jpg)
[5] To age my voice, an old hag's cackle.\n1. Start with two coats of white, curing between each coat. Paint a line directly down the center of the nail.\n2. Paint the Evil Witch. Cure.\n3. Paint the Evil Queen. Cure.
7
![[6] To whiten my hair, a scream of fright.\n1. Using apricot and a little peach, blend two colors together to give dimension to the Evil Witch's face. Blend a little green in her wart. Fill in her mouth with burgundy, grey around her eye, and green around her pupil. Cure.\n2. Using the same colors, fill in the Evil Queen's face. Use gold for her medallion and crown. Livin her lips up with red and deepen her eyes with purple. Paint her dress purple, and green in her iris. Fill in the background with forest green. Cure.\n3. Create a marble in the background. Top with a NWTC. Place Swarovski crystals.](http://s3photo.nailartgallery.nailsmag.com/halleyfbabyy_555933_355554_l.jpg)
[6] To whiten my hair, a scream of fright.\n1. Using apricot and a little peach, blend two colors together to give dimension to the Evil Witch's face. Blend a little green in her wart. Fill in her mouth with burgundy, grey around her eye, and green around her pupil. Cure.\n2. Using the same colors, fill in the Evil Queen's face. Use gold for her medallion and crown. Livin her lips up with red and deepen her eyes with purple. Paint her dress purple, and green in her iris. Fill in the background with forest green. Cure.\n3. Create a marble in the background. Top with a NWTC. Place Swarovski crystals.
8
![[7] Look! Understand, the symbol that lies within.\n1. Begin with two coats of forest green, curing between each coat. Paint one third of the nail with a mixture of different light greens. Create the rim of the cauldron. Cure.\n2. Marble the top portion of the nail. Add bubbles and lines in the cauldron. Cure.\n3. Directly onto the nail, sculpt an apple and the Evil Witch's hand.\t](http://s3photo.nailartgallery.nailsmag.com/halleyfbabyy_555933_355555_l.jpg)
[7] Look! Understand, the symbol that lies within.\n1. Begin with two coats of forest green, curing between each coat. Paint one third of the nail with a mixture of different light greens. Create the rim of the cauldron. Cure.\n2. Marble the top portion of the nail. Add bubbles and lines in the cauldron. Cure.\n3. Directly onto the nail, sculpt an apple and the Evil Witch's hand.\t
9
![[8] Now turn red, to tempt Snow White. To make her hunger for a bite.\n1. Paint the hand with the skin tone color and a taupe for the nails. Use a minty blue/green to create the skull on the top portion of the apple. Cure. Paint the rest of the apple red. Cure. \n2. Top with NWTC, and place Swarovski Crystals and Crystal Pixie. Cure. Top the hand with matte top coat.\n3. Add a drop of gel to the stem of the apple, place the chain and cure. Repeat at the point between the index and thumb.\t](http://s3photo.nailartgallery.nailsmag.com/halleyfbabyy_555933_355556_l.jpg)
[8] Now turn red, to tempt Snow White. To make her hunger for a bite.\n1. Paint the hand with the skin tone color and a taupe for the nails. Use a minty blue/green to create the skull on the top portion of the apple. Cure. Paint the rest of the apple red. Cure. \n2. Top with NWTC, and place Swarovski Crystals and Crystal Pixie. Cure. Top the hand with matte top coat.\n3. Add a drop of gel to the stem of the apple, place the chain and cure. Repeat at the point between the index and thumb.\t
10
![[9] One taste of the Poison Apple, and the victim's eyes will close forever in the Sleeping Death.\n1. Start with two coats of forest green, curing between each coat. Top with NWTC. Using gel, place Swarovski crystals to about one third of the nail (to leave room to place the scroll.) Cure.\n2. Sculpt a long, thin rectangle on a piece of nail extension form backing. As the acrylic cures, begin rolling the ends in opposite directions.\n3. Using the same technique as the double banner scroll, add the inscription to the scroll. Apply the scroll to the nail with a bead of acrylic.\n4. Continue placing stones symmetrically across the nail. Cure.\t](http://s3photo.nailartgallery.nailsmag.com/halleyfbabyy_555933_355557_l.jpg)
[9] One taste of the Poison Apple, and the victim's eyes will close forever in the Sleeping Death.\n1. Start with two coats of forest green, curing between each coat. Top with NWTC. Using gel, place Swarovski crystals to about one third of the nail (to leave room to place the scroll.) Cure.\n2. Sculpt a long, thin rectangle on a piece of nail extension form backing. As the acrylic cures, begin rolling the ends in opposite directions.\n3. Using the same technique as the double banner scroll, add the inscription to the scroll. Apply the scroll to the nail with a bead of acrylic.\n4. Continue placing stones symmetrically across the nail. Cure.\t
8 Artists like this Photo
Write a Comment
Submit