For the second week of NTNA, I was inspired by vintage Korean accessories. Primarily focusing on traditional hairpins (binyeo) and keychains/tassels (norigae). These symbolic pieces signify ones social and marital status, depending on how fine the materials and colors are to make it. Although they’re not commonly worn in present day, they’re still reserved for special occasions like weddings, Lunar New Year, Annual Ancestral Rites, or the birth of a child. When I initially think about “Vintage Couture”, mainly western fashion came to mind. When I thought further, I asked myself, “What else have I seen that’s considered vintage?”. On occasion, I watch Korean dramas with my family and seeing these beautiful accessories holding and adorning braided hair, and they always seem to have me in a trance. Because I like shiny things, and shiny things like me because we were meant for each other. Growing up, my mom and aunt had old red tassels hanging off of vintage mother of pearl furniture. The people that create these accessories are called ‘Master Artisans’, which is essentially the designers of Korean couture. Since couture literally means - having to do with fashion or sewing, it’s most commonly used to describe something high end and luxurious, especially if it’s made to fit or suit a specific client. All gel used in my design is from Akzéntz, and all crystals are from Swarovski. When I see these hairpins and tassels it brings me back to the Korean dramas that show life in Korea decades ago.
Step-by-Step Nail Art Tutorial
1
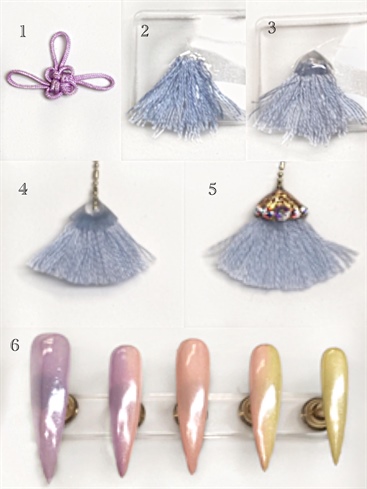
1. using nylon cording, tie a Korean knot (youtube - norigae) Cut off loose ends.\n2. Place a small amount of Trinity Clear on semi-hard plastic. Form into a triangle. Lay strands of light blue embroidery floss, making sure that they come to a point at the top of the triangle. cure.\n3. Layer on another bead of Trinity Clear to seal the tassel. Cure.\n4. With a nail file, smooth the edges of the triangle. Flip over and add a small bead of Bling On and place one end of some gold chain inside it with tweezers, holding securely under the lamp until cured.\n5. Paint the triangle with Gel Play Golden Nugget, cure. Topcoat with Shine On, cure. Embellish with small Swarovski crystals.\n6. Create a verticle ombre with Options Lilac Flourish, Options Strawberry Cream, & Luxio Peaceful. Apply 2 coats, curing between each coat. Topcoat with Shine On, cure. Rub in Pearlescent Silver with a cosmetic sponge, dust off excess, and topcoat again with Shine On, cure.\n
2

1. Create 2 squares with Trinity Clear on plastic, cure. Shape sides with nail file. Paint two coats of gel, one with Golden Nugget and the other with Peaceful, curing between each coat. Top with Shine On, cure. This is to match the one below, except with a different type of flower.\n2. Attach squares with Bling On, cure. With Gel Play Black Paint, paint 3 organic circles.\n3. Add leaves, cure.\n4. Fill in flowers with Options Berry Elegance, Strawberry Cream,and Lilac Flourish, and the leaves with Luxio Wink, cure. Embellish with small Swarovski Crystals.\n5. Attach knot, tassel, and gold chains with Bling On, cure.\n6.Attach 3-flower squares and Swarovski Cubes with Bling on. Paint a circle with Gel Play White Paint, cure.\n7. Paint 3 horizontal lines, outline the circle, and divide the circle into 3 evenly spaces tear drop shapes with Golden Nugget, cure. This is called a taeguki.\n8. With Peaceful, Strawberry Cream, and Options Glitter Snow Blue, fill in the tear drops, cure. Top with Shine On, cure. Embellish with various sizes of Swarovski crystals.
3

1. Mix 1 part Options Glass White to 2 parts Gel Art Powder on a tile.\n2. Mix carefully with spatula, making sre not to vigorously stir to avoid air bubbles. Add a little more powder or gel until consistency resembles a thick paste.\n3. On plastic, create a petal shape. Be sure to keep a dappen dish with IPA (to keep Art brush clean) as well as the Gel Art Powder close by (to dip brush in before sculpting to avoid sticking) Cure.\n4. Create 3 large petals and 2 smaller petals. Topcoat with Shine On.\n
4
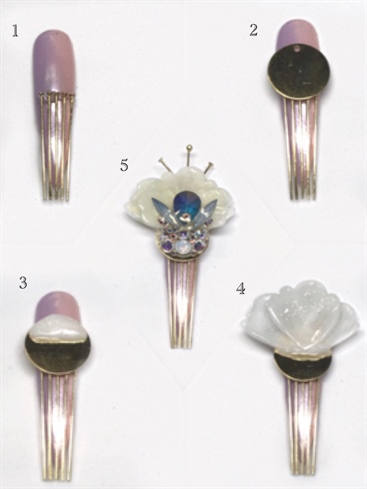
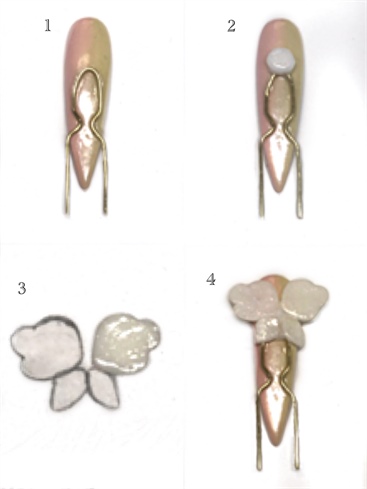
1. Apply a band of Bling On across the nail and evenly place gold headpins to resemble a hairpin, cure.\n2. Place a bead of Bling On and secure a gold disc, cure.\n3. Sculpt a half circle at the top of the disc, the petals will be cured into it.\n4. Place the petals in a fan shape into the uncured gel, cure.\n5. Add the two smaller petals on top of another bead of the Gel Art Powder mixture, cure. Lightly brush on a wash of Peaceful to the petals, cure. Topcoat with Shine On, cure. Embellish with various sizes of Swarovski Crystals, and add 3 headpins to the top with Bling On, cure.\n
5
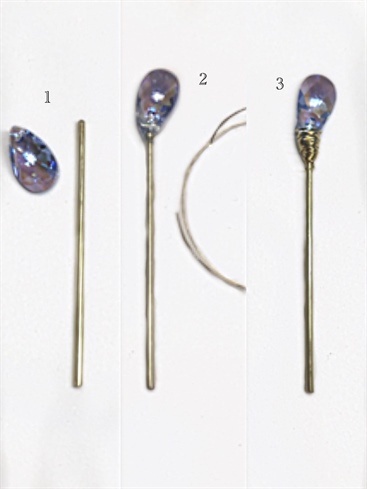
1. Cut a thick piece of gold wire.\n2. Dip the Swarovski crystal into Trinity Clear, and hold together with the stick under the lamp until cured.\n3. Wrap thin beading wire around the stick and crystal. Paint the stick with Golden Nugget, cure. Topcoat with Shine On.
6
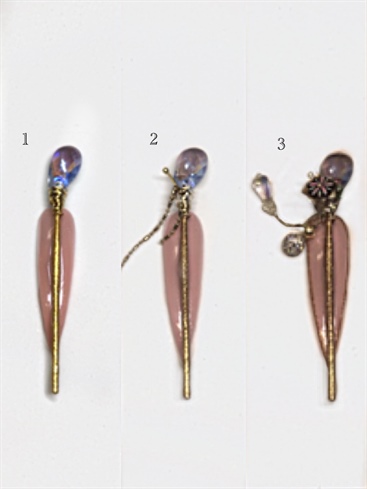
1. Attach hairpin to nail with Bling On, cure.\n2. Insert headpin into wire and attach two gold chains to the wire with Bling On, cure.\n3. Connect beads and squares with Bling On, and outline the perimeter of the nail with Golden Nugget, cure. Topcoat with Shine On, cure.
7
1. Bend wire into a U-shaped hairpin. Attach to nail with Bling On, cure.\n2. Using the same Gel Art Powder mixture, place a bead on the nail at the top of the hairpin, the butterfly wings will cure into this.\n3. On a piece of paper, draw a stencil of the butterfly wings. Cover the paper with plastic, and use as a guideline for the wings. Sculpt and cure.\n4. Stick wings into uncured gel and cure.\n
8
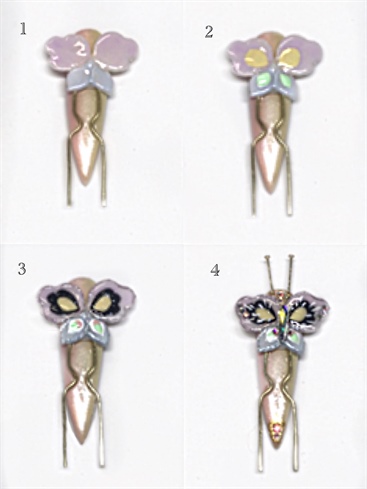
1. Paint top wings with Lilac Flourish, and bottom wings with Berry Elegance, cure.\n2. Add Peaceful and Wink inside the wings, cure.\n3. Outline Peaceful with Black Paint, adding curves to mimick the shape of the wing. Outline Wink with White Paint and add a dor of Strawberry Cream to each bottom wing, cure.\n4. Stroke lightly through the top wings with White Paint. Outline cuticle area and add a diamond hape to the tip, cure. Topcoat with Shine On, cure. Embellish with small Swarovski crystals, and add 2 headpins as antennae with Bling On, cure.
9
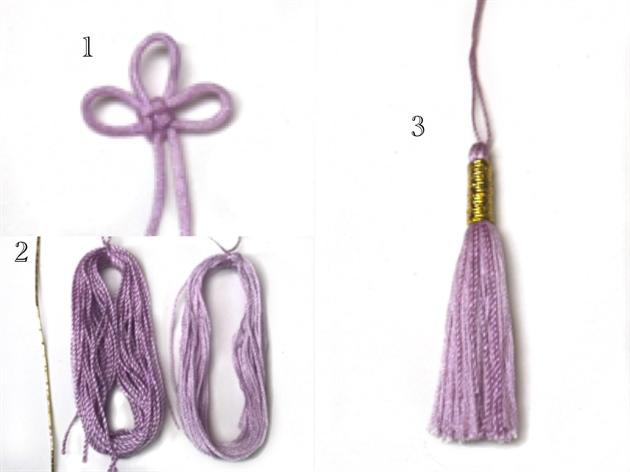
1. Tie a more simple Korean knot.\n2. Take 2 slightly different embroidery flosses, and wrap each around an object that is equivalent to the size of tassel preffered. Tie loops together with a separate piece of string.\n3. Cut bottoms, combine, and wrap together with gold cording. Trim ends evenly.
10
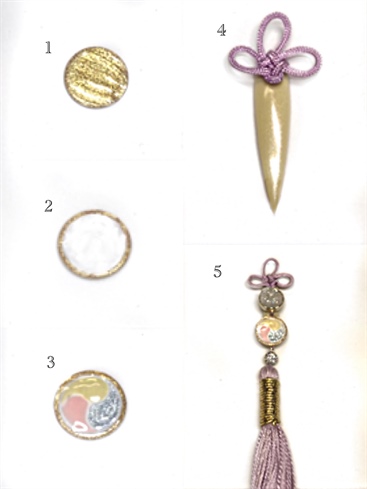
1. Create a circle with Trinity Clear on plastic, cure. Shape edges with nail file. Coat with two layers of Golden Nugget, curing between each coat.\n2. Paint smaller circle with White Paint, cure.\n3. Using Strawberry Cream, Peaceful, and Glitter Snow Blue, create another taeguki with evenly spaced teardrops, cure. Topcoat with Shine On, cure.\n4. Attach knot with Bling On, cure.\n5. Attach crystals and beads, taeguki, and tassel with Bling On, cure.\n
6 Artists like this Photo
Write a Comment
Submit