For this week’s Orly Pastel City challenge inspired by street art, I decided to go back to my root, Korea. My favorite area in Seoul is called Jongno, and it’s where the royal palaces are located along with many traditional buildings and fixtures alongside of modern buildings and high rises.
I always loved how traditional buildings in urban city coexist while keeping its timeless beauty. And the ancient venerable buildings of Seoul are what makes the streets of Seoul unique and special.
I was particularly inspired by Hanok, which means traditional Korean building in general, and while there are many different forms of buildings, I wanted to focus on what makes these buildings artistic. The roofs are generally curved because the Korean ancestors emphasized on harmony within nature. Underside of buildings of temples or palaces are uniquely painted with bright colors, and each end of cross beams are decorated as well as end of shingles. Also the walls of buildings have been carefully decorated when it’s built.
My design is showcasing what these sometimes neglected components of buildings can also become a form of art that makes streets enchanting, as well as create innovative design on the nails.
Used products:
All pastel shades are mixed 1:2 ratio (color:white) and lighter pastel shades are mixed 1:3 ratio
Step 2) Orly Gel FX White tips, Orly EPIX Vintage, Orly Lacquer Lilac City, Naughty, Hook Ups and White Tips.
Step 3) Orly Gel FX White tips and Cool in California
Step 4,5) Orly Lacquer Electric Jungle, Cyber Peach, Powder Pastel, Country Club Khaki, Vintage, Naughty, Skinny Dip, Pink Noise, Hook Ups, Hollywood Endings and White Tips.
Step-by-Step Nail Art Tutorial
1
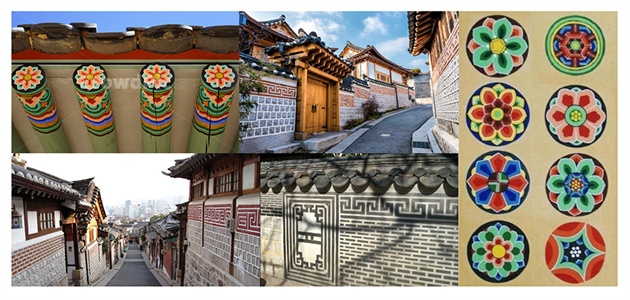
Inspiration - My design was particularly inspired by traditional Korean buildings, called Hanok. I was particularly inspired by the decorations on crossbeams on temples and royal palaces.
2
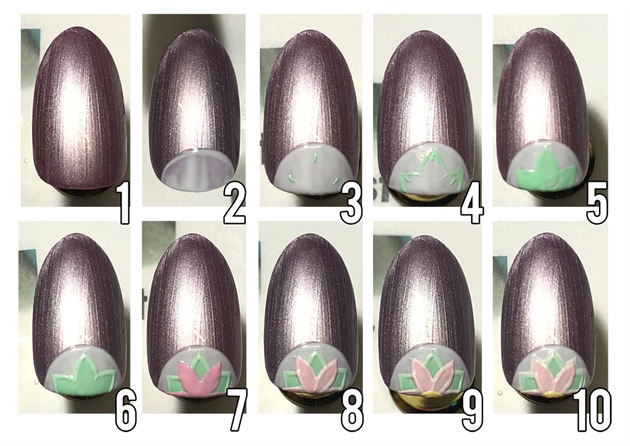
**(1)** After applying Orly Bonder on the tip, paint it with Lilac City two coats, then drop Orly Flashdry to let airdry faster. After the lacquer is completely dry, apply Orly Gel FX Base Coat, then cure. **(2)** Using Orly Gel fx White tips, paint a moon at the cuticle area, cure and repeat as needed, and then wipe the tacky layer off. **(3,4,5)** Using pre-mixed pastel shade lacquer, paint 3 pointed star. Use small detail brush, wipe every stroke to prevent from clumping, and let airdry. Repeat as needed. **(6)** Use lighter shade, add outlines around the edges. **(7,8)** Repeating steps 3-6. Use contrasting color lacquer, paint flower petals, then outline. Let airdry each layers using Orly Flashdry. **(9)** Add half circle ovary where petals meet using same steps as 3-6. **(10)** After all lacquer is dried, add white outlines using Orly Gel fx White tips, and cure.
3
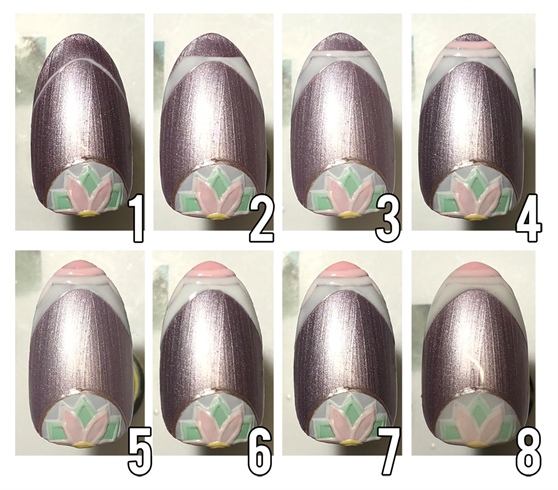
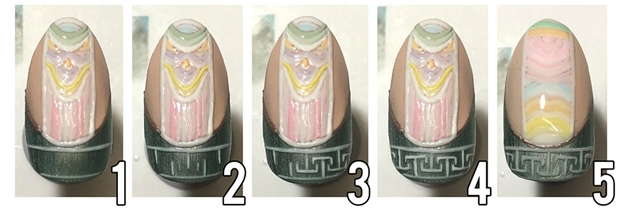
**(1)** Using Orly Gel fx in White tips and fine stripping brush, draw a thin smileline, and cure. **(2)** Start with creating roof outline, then fill the inside, and cure. **(3)** Mix Coral and White in 1:3 ratio, add outline following the previous step, and cure. Repeat as needed. **(4)** Mix coral and white in 1:1 ratio, add next outline, and cure. Repeat as needed. **(5)** Fill the rest the area with coral, then cure. **(6,7)** Touch up white as needed. **(8)** Paint entire tip with Orly Gel Fx Bodyguard to smooth out grooves and protect lacquer layers.
4
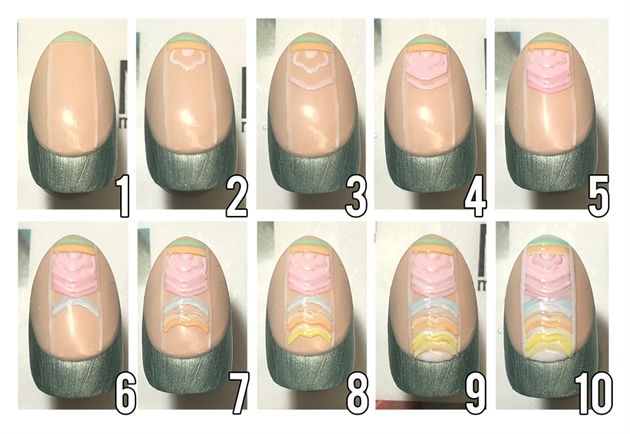
**Tip is painted with lacquer, then applied Orly Gel FX Base Coat after completely air dried. **(1)** Add two thin white stripes to section out the design. Start with very top, draw a vertical stripe. **(2)** After adding another stripe using different color, draw a petal using another color. **(3)** Section where the petal design ends. **(4,5)** Start adding outlines around the petal. Fill the inside of petal as well. Let each outlines to dry before adding adjacent outlines. **(6,7,8)** Add reversed outlines, keeping it colorful. **(9)** Fill the gaps using white. **(10)** Outline the section again, and touch up as needed.
6
**(1)** Start with two stripes across the tip using Orly Gel Fx in White tips, and cure. **(2)** Add little pegs in the same distance. **(3,4)** Start with making T shapes, then add legs on each end. Cure and add more layers as needed. **(5)** Paint entire tip with Orly Gel Fx Bodyguard to smooth out grooves and protect lacquer layers.
7
All tips are finished with a layer of Orly Gel Fx Bodyguard to smooth out grooves and protect lacquer layers. Then added Orly Gel FX Top Coat for ultimate shine.
8
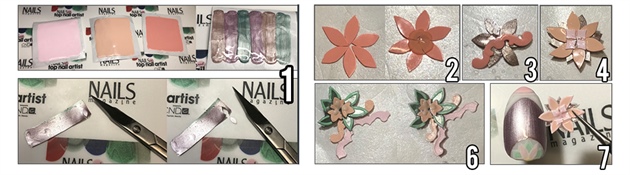
**(1)** On form backing papers, paint Orly Lacquers, apply Flashdry drops. Repeat 3 times for the thickness of thick form paper. After its completely dried, peel off from the form papers, and cut to petal shapes using scissors. **(2)** On a form backing paper, gather pre-cut petals to the shape of flower pattern. Drop a small bead of Orly Gel Fx Bodyguard over the middle, then cure. **(3)** Add decorative piece cutouts from the back side, or add more petals from the back side of the flower using Orly Gel Fx Bodyguard. **(4)** Add front petals if needed. **(6)** Outline each pieces of flowers using similar shade color and white. Also add detail on the very middle of the flower. **(7)** Add Top Coat if needed. It’s now ready to be assembled on the nail tips using Orly Gel Fx Bodyguard.
9
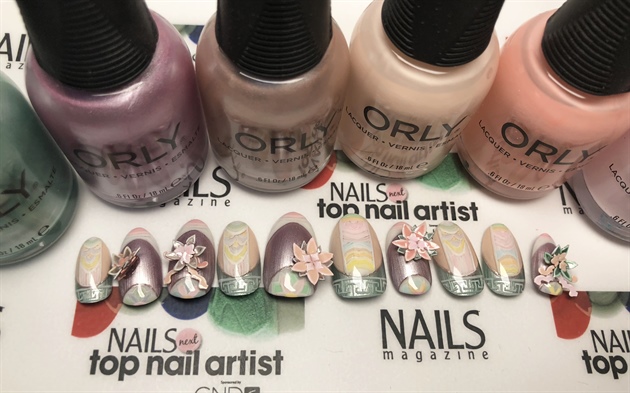
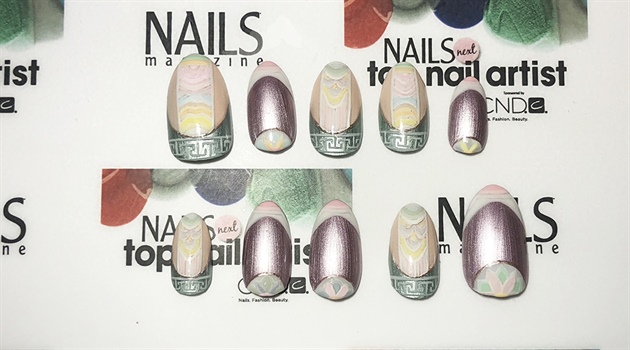
Finished nail tips with the Orly Spring Collection, Pastel City. (All used colors are listed on the description)
6 Artists like this Photo
Write a Comment
Submit