“Vintage Couture” sponsored by Akzentz
Akzentz challenged us to make a nail design based on a vintage fashion piece or period.
I took inspiration from a victorian cameo and the victorian era with their beautiful keys and mirrors. What made me drawn to the victorian period is the amount of handcraft and details there were used to everything back then, like the cameos where handcarved out of shells, corals or ivory - how awesome is that! For me couture means something extravagant, big and outrageous, so I wanted to go all in on my victorian design.
From the side the nails are picturing keys. These keys open the doors of creativity and endless possibilities in life. In Danish the word for nails is “negle” and the word for key is “nøgle” so I thought that would be cool to make “nøgle negle”
From the top the nails are picturing nailbeds as real mirrors, looking like handheld vanity mirrors, to always have the possibility to check if your makeup is on point. Decorated with stones and a cameo on the thumb. The cameo that is picturing myself, is turned upside down for the wearer to enjoy it and symbolize to always face yourself.
I hope you enjoy it as much as I enjoyed making them.
Step-by-Step Nail Art Tutorial
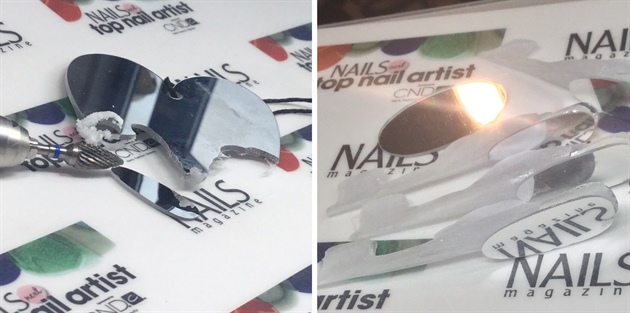
1

1: Apply fullcover nailtips with doubleside tape to protect the natural nails. 1.1: Apply long forms, make them end in 0 degrees. The forms need to be on the same level as the cuticle area. 2: Sculpt with Akzéntz Trinity Clear gel, watch and count the lines/squares on the form, so all the keys are approx the same shape. Cure. 3: Carefully remove forms and build apex and a little more strenght to the nails
2
1: Gently remove the artificial nails, so they don't break while working on the rest of the design. 1.1: Drill acrylic mirrors into 4 nailbeds and an oval shape for the cameo. Measure each nailbed with the fingernail to match. Refine with a 240 grit file or higher. Important! If you're not good friends with your E-file, use a handfile for this. 2: Refine and finish the sculpted nails with 180 grit file. Don't buff afterwards, as the keys need a vintage look
3
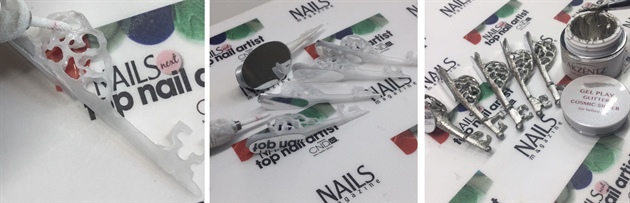
1: Drill holes in the keys using a small bit for the E-file. Be very careful not to drill into your hand holding it. The holes don't have to be the same, as it give more dimension by making them different but similar. 2: Attach the mirrors with nailglue or clear gel. 3: Cover the nails with a thin layer of Akzéntz Gel Play Glitter in the shade "Cosmic Silver" Paint and cure 1 side at a time.
4
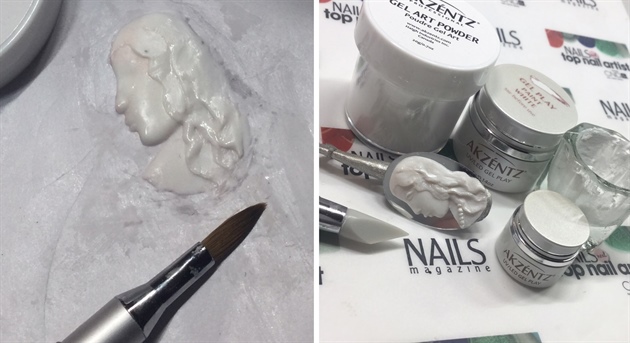
1: Mix Akzéntz Gel Art Powder with Akzéntz Gel Play Paint in the color white in a dappendish or similar to create a gel-paste for making 3D nailart. This is a very good method if you don't work with acrylic. Take a a pea-sized amount of the gel-paste and apply to a form-paper. Flatten it with a 3D brush washed in Isopropyl Alcohol. Shape with your brush till it look like a cameo. I first started shaping the outline and then the jawline. I played a lot with the material, so it didn't look anything like it was supposed to until the very end. To make a soft appearance and not having strokes from the brush use Isopropyl Alcohol on the brush. Gently brush very little amount of Akzéntz Pearlescent Silver Powder over and cure. 2: Apply to the mirror with nailglue
5
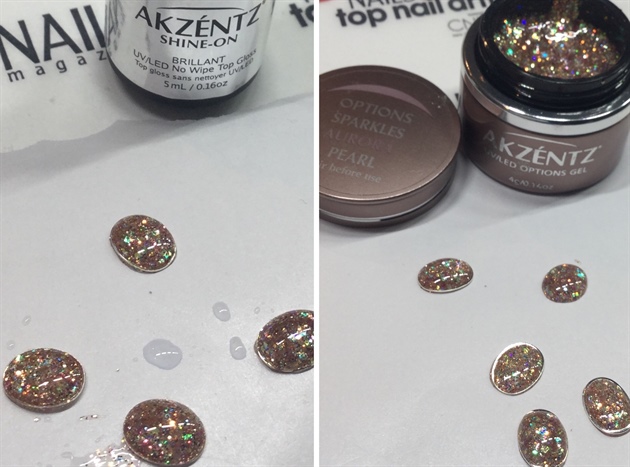
1: Take a form paper and 4 nailart rings. Can be done without the rings. 1.1: Apply Akzéntz Shine-on topcoat for the rings to stay in place. Cure (Leave this step if you're doing it without the rings) 2: Apply a dot of Akzéntz Options Sparkles Aurora Pearl glitter-gel in the ring. Wait til it's leveled a bit, so the glitter don't stick up. Cure. 3: Finish with Akzéntz Shine-on topcoat \n
6

1: Apply the liquid stones underneath the mirrors using nailglue or clear gel. 1.1: Paint with Akzéntz Gel Play in the color white outside the lines of the keys and around the mirrors, to connect the design and give more dimension. Cure. 2: Paint over the white areas with Akzéntz Gel Play Glitter in the shade "Cosmic Silver" Paint. Cure. 2.1: Apply Akzéntz Shine-on topcoat for ultimate shine and no need to remove sticky layer as this brilliant topcoat don't leave that.
5 Artists like this Photo
Write a Comment
Submit