MIRROR MUERTOS
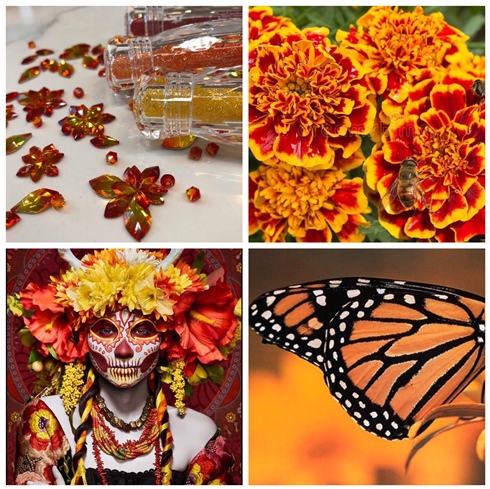
Day of the Dead recognizes that death is a natural part of life, so that’s why I created a skull to mirror the lady with the sugarskull makeup to represent both life and death and their connection to one another.
In Mexico, monarch butterflies are believed to be the spirits of their deceased loved ones, returning to Earth, so I fused that in my design totaly bedazzled with CrystalPixie.
To complete my Day of the Dead design, i painted marigolds and created 3D marigold-like clusters of Fireopal Swarovski crystals. The strong aroma of the marigolds are believed to attracts the spirits, helping them to find their way back to Earth.
Step-by-Step Nail Art Tutorial
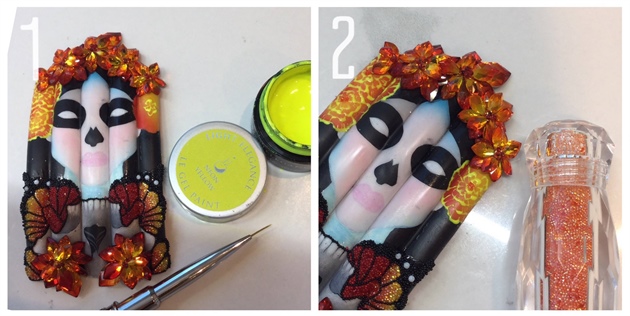
1
Read into the theme and collect pictures online for inspiration. I was very inspired by the symbolic sense of the Monarch Butterfly and Marigolds as well as the beautiful colors in these. It gave me the idea to use the Swarovski Fireopal crystals.
2
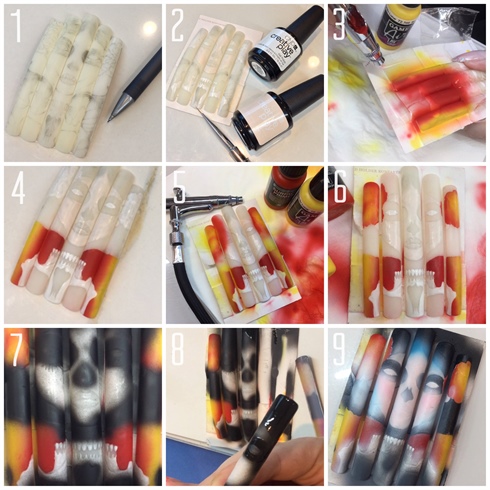
Let's begin! 1: Find 5 long tips and place them next to eachother on a cardboard with doublesided tape. Sketch your design with a 0,3 mm pencil. 2: Using Lecenté D3 brush and CND Creative Play Gel Polish "I Blanked Out" paint the skull and teeth. Using CND Creative Play Gel Polish "Life's a Cupcake" and paint the face and lips. Cure and remove sticky layer with Isopropyl Alcohol 3: Airbrush with red and yellow Airbrush-paint to create ombré background for the butterfly. 4: Clean up with a gelbrush saturated in Isopropyl Alcohol and wipe away the unwanted color. 5: Airbrush the base of the flowers. 6: Apply Matte Gel Polish Topcoat where you want the flowers to be and on top of the butterfly base. 7: Airbrush with black airbrush paint where you want precisely on top of the airbrushed areas where the black should be. Cure and remove sticky layer and the excess paint. 9: Airbrush the base of the face and skull with white, grey, babypink and blue. TRICK: Blowdry the tips on low heat and bend them, in order to to be less curvy, before you paint.
3
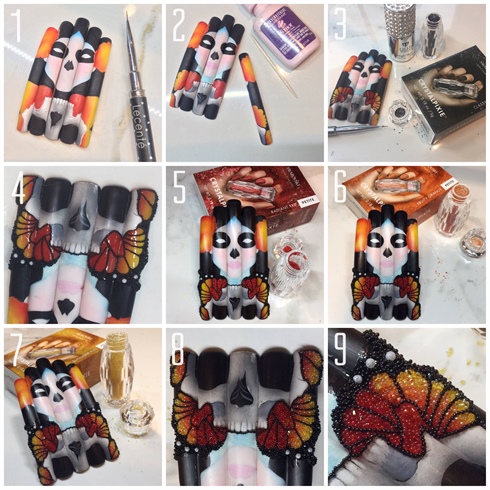
1: Clean up with Creative Play Gel Polish "Black & Forth" 2: Paint the rest of the black details and add the neck and details in the skull with Creative Play Gel Polish "Not to be Mist". Glue the tips together with Backscratchers glue. 3: Apply CrystalPixie "Classy Sassy" as the border for the butterfly with no sticky Topcoat. Cure once satisfied with the result. 4: Apply more black CrystalPixie and Tiny Treasures - White Caviar. 5: Fill out the red inner part of the butterfly with CrystalPixie "Radiant Red" 6: Fill out the orange part with CrystalPixie "Fruity Orange". 7: Fill out the yellow part with CrystalPixie "Sunshine Kiss" 8+9: Close up of the butterfly.
4
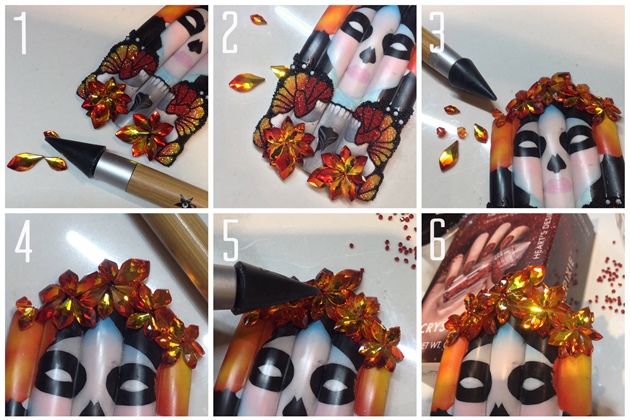
1: Apply Swarovski Fireopal in Flame shape with builder gel in thick viscosity. Be careful not to touch the top of the stones. First apply the petals side inside in different sizes 7mm, 10mm and 13mm, to create the bottom of the flower. 2: Then place the Swarovski-petals on top of them. 4: At some of the flowers you can add 3 layers. I also added a Swarovski Fireopal 4mm bead. 5: Apply CrystalPixie "Heart's Desire Edge" in the middle of the flower clusters using the Crystal Katana. 6: Here we go.
5
1: Paint the marigolds with Light Elegance Gel Paint "Neon Yellow" with Lecenté D3 brush
6
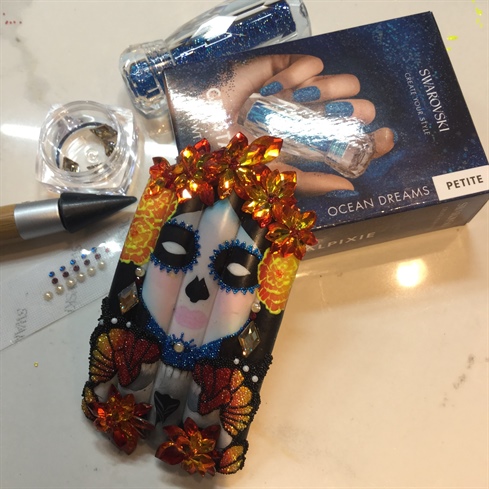
Apply CrystalPixie "Ocean Dreams" to the neck to create the illusion of a shadow and decoration around the eyes. Apply Swarovski as the earrings and to detail the chin.
7
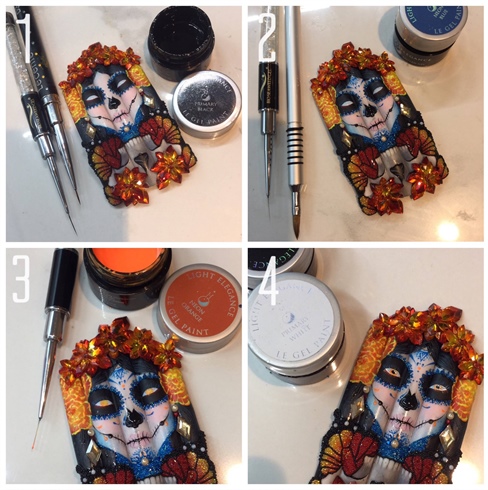
Time to add the details of the face! 1: Paint the black details in the mouth and nose with fine liners using Light Elegance Gel Paint "Primary Black" 2: Paint the blue details in the face and shadow the jawline using Light Elegance "Neon Blue" To create the shadow in the jaw i tapped with the 3D brush. 3: Paint all the orange details in the face, eyes and flowers with Light Elegance Gel Paint in "Neon Orange. 4: Paint the dots in the eyes with Light Elegance Gel Paint in "Primary Black" and "Primary White"
8
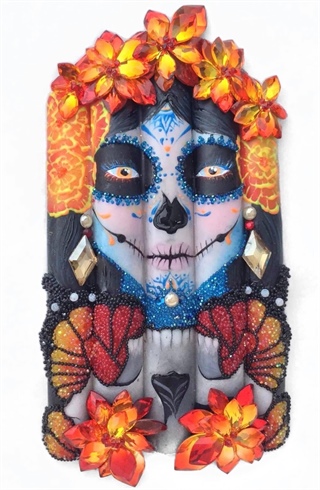
Here we go! Then we have the final design. It was so much fun and peaceful to create. HAPPY HALLOWEEN & Day of the Dead.
7 Artists like this Photo
Write a Comment
Submit