Nail next top artist pre challenge 1 2016
katey laurenson
Well! first pre challenge here we are!! For the first challenge we were only allowed to use gel polish, polish, and acrylic paint, handpainted only no embellishments to complete our set of nails, on or over five nail tips. This challenge sponsor was CND in line with their latest release of polishes “creative play” encourages nail professionals to "Play outside the box." We were asked to present ‘a work of art unlike anything we have seen before.’ and MAN is that hard when you REALLY over think it. Such an open brief I went one direction first, another second and then clicked…. You’ve never seen ME, a kiwi before Ta da!! so I present to you some unique parts of my heritage and kiwi culture ‘kiwiana”
I love NZ and I’m really grateful for this opportunity making top 24. My inspiration really comes from the love of how unique we are as kiwis, It was hard to narrow over just 5 tips as we have a HUGE assortment of kiwiana but I’ve included the most cherishing parts and memories of my younger years growing up in NZ. what would Kiwis be without Jandals and paua, our flag and tiki, mr 4 square man (extremely kiwi), a kiwi and maori art and our world famous buzzy bee.
The biggest inspiration is a piece of advertising that even our youngest generation today know, the kiwi burger song. please do watch the song, i promise you’ll get it stuck in your heads.
"Kiwis love Hot pools, Rugby balls, McDonald's, Snapper schools, World peace, Woolly fleece, Ronald and Raising beasts. Chilly bins, Cricket wins, Fast skis, Golf tees, Silver ferns, Kauri trees, Kiwi Burger love one please... Mcdonald's KiwiBurger. The classic New Zealand burger. Cause We love All blacks, Thermal daks, Egg & Cheese, Walking tracks, Beef pattie, Marching girls, Tomato, Lettuce and Paua shells, Gumboots, Ponga shoots, Floppy hats, Kiwifruits, Beetroot, Buzzy bees, Moggy cats, Cabbage trees, Onions, Kakapos, Kiaoras, Cheerios, Jandals, Sandals, Ketchup, Coromandel's, Swanndris, Butterflies, Mustard, Fishing flies, Hokey pokey, Maori haka, Kiwi burger. That's our tucker!!!"
https://www.youtube.com/watch?v=Z5CX_NCf8Ow
Step-by-Step Nail Art Tutorial
1
Kiwi - 1. After tip prep (all tips are buffed and dust wipes away) , I apply my white gel polish x 2 coats and top cure, & buff. I always like to roughly sketch in pencil any design on my nails you’ll see this through my set, this all comes off after design is cured and use of gel cleanser before top coating. 2. I begin my outline, I like to use a thick designer gel opposed to a gel polish as my lines don't bleed. My favourite brush used is a size 0 detailer. 3. I use the same designer gel and fill outside of my kiwi design and cure. 4. I finish off my designs, cure and I like to do 2 cast of gel polish top coat to level out my finished nail. I remove sticky layer and buff before the 2nd top coat.
2
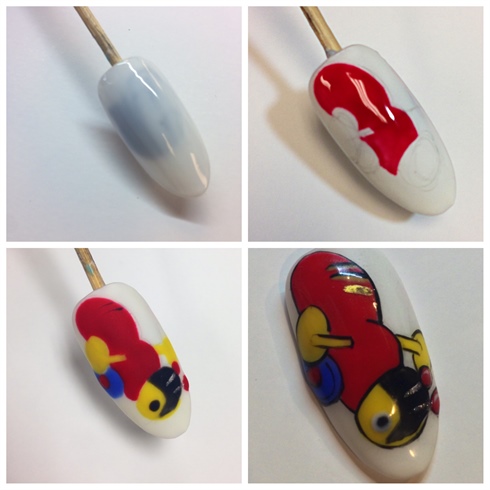
Buzzy bee - 1. After tip prep, I apply my white gel polish x 2 coats and top cure, & buff. 2. Buzzy is done all with gel polish, i lay my largest area down first, red then cure. 3. I finish laying out his colours, cure and top coat with gel polish top coat. I like to do this before I lay down my black outline as I then have a smooth surface to draw on. 4. All final details are added, cured and again I’ve top coated twice
3
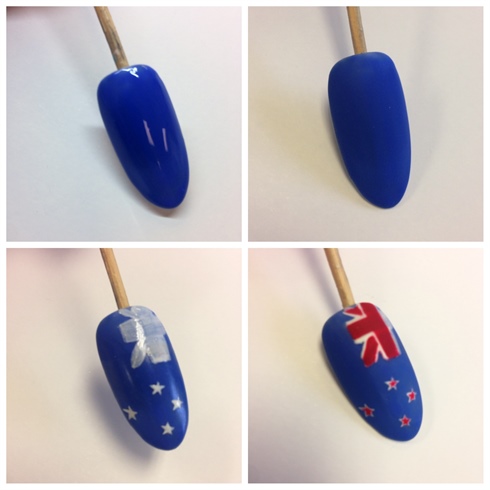
Flag/Tiki - 1. After tip prep, I’ve applied blue (NZ FLAG COLOURS) as my base layer, 2 coats cure, top coat and buff ready for the next area of flag design. 2. Ive used a white gel and laid out our NZ flag area, along with stars and cured\n3. Laid in my red detail and cured, at this point I top coat and buff ready for my overlaid top design
4
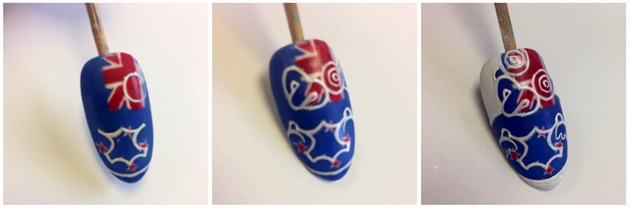
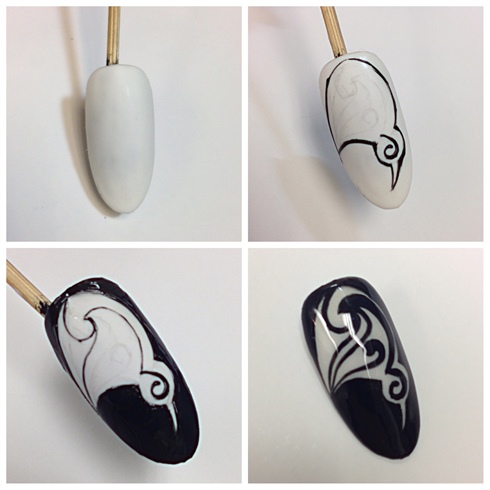
4. I use my designer gel and start detailing my Tiki down. 5. Always curing as I go with areas I’m happy with. 6. I fill my outer design with white gel paint, cure and 2 coats of gel top coat\n
5
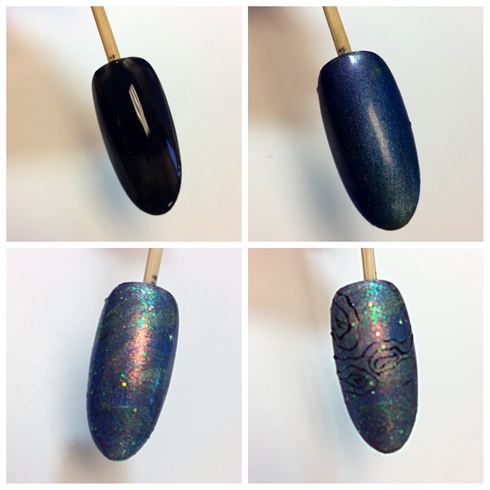
Paua/Jandal - 1. After tip prep, I’ve applied black as my base layer, 2 coats cure do not remove or top coat. 2. Paul is such a pretty shell, I press into my tacky layer of gel some blue, green, purple and yellow/gold, and blue glitter and press in 3. Then I’ve laid one layer of gel top coat down NOT cured, taking a small detailer brush I dip into my pigments and marble into wet top coat, I do this to get added depth and papa colouring, I then cure when happy and you got it, I buff. 4. I use my designer gel and start detailing paua shell designs and curing as I go.
6
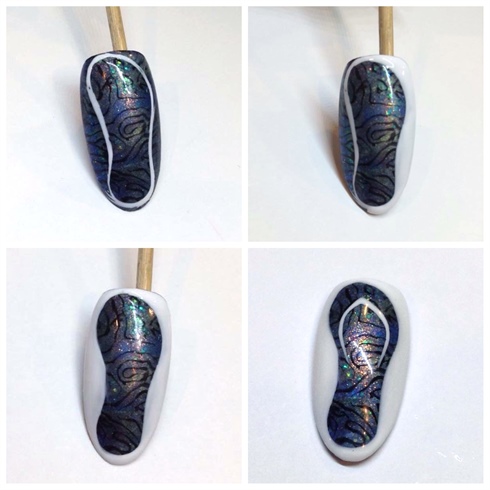
5. Using my designer gel and detailer brush I outline my Jandal down & cure 6. I fill my outer design with white gel paint, cure 7. Ive done 2 layers to get it bright. 8. Draw in my Jandal straps, cure and again 2 coats of gel top coat.
7
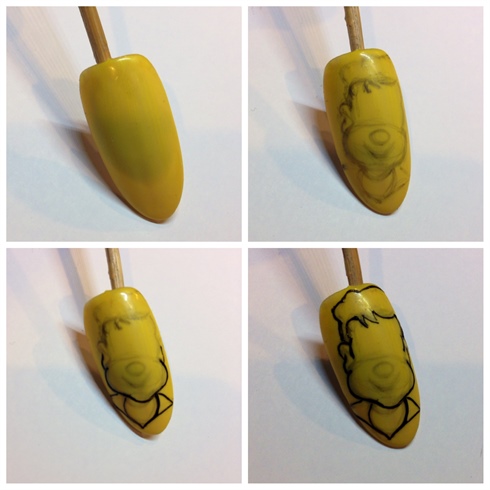
Mr 4 Square man 1. After tip prep, I’ve applied yellow gel polish as my base layer, 2 coats cure, top coat and buff ready for the next area of design 2. Stetch out my deign area 3. Start my outline area in black designer gel 4. Curing as I go
8
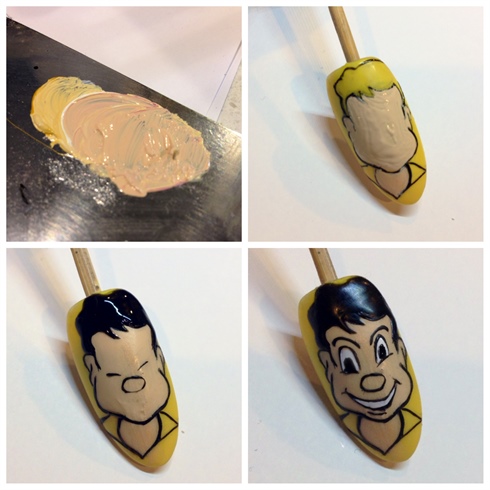
5. Ive mixed together yellow, white and pink acrylic paints to give me a skin tone colour. 6. I’ve removed any tacky layer and I lay in my skin area, wait until its completely dry, gel top coat, cure and buff 7. I then come back in with my designer gel and tidy up my outline adding facial features 8. Finish off final details and cure, and 2 coats of gel top coat
9
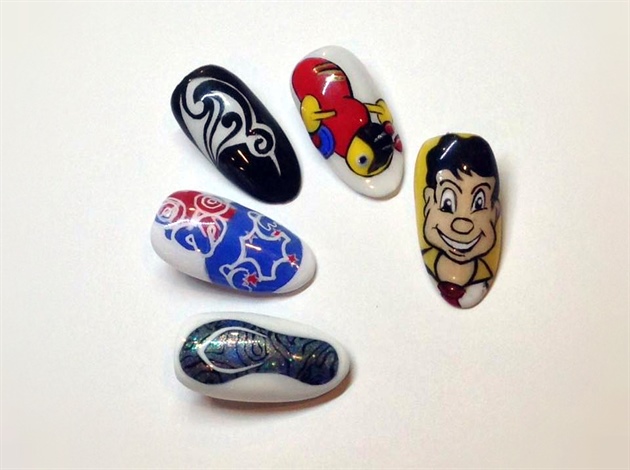
Final designs all laid out, I'm really happy with my Kiwiana collection, something just a little bit different.
14 Artists like this Photo
Write a Comment
Submit