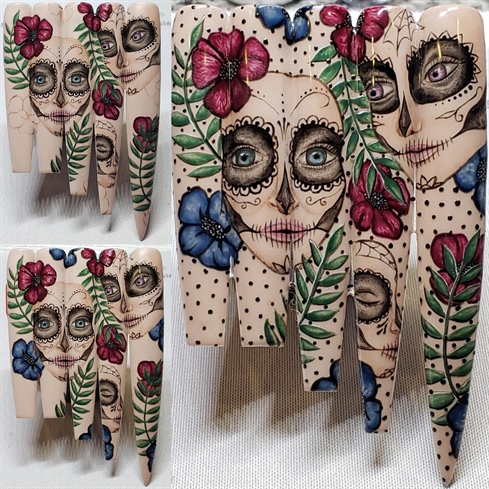
The Day of the Dead is a time to honor and celebrate loved ones who have passed on. Death isn't seen as the end of one's life, but as a natural part of the life cycle; the dead continue to exist much as they did in their lives, and are said to come back to visit the living every year during this time. I wanted my design to capture the merging of the living with the deceased, which is why I chose to paint living faces with skull makeup. I learned while researching this holiday that flowers symbolize life and spider webs symbolize death so I painted a floral design around the faces and created a crystal pixie spider web for balance. This holiday is also known for its vibrant colors, which I chose to portray through the use of Swarovski crystals. To allow the colors of the crystals to pop I kept my hand painting palette neutral with nudes and jewel tones.
Step-by-Step Nail Art Tutorial
1
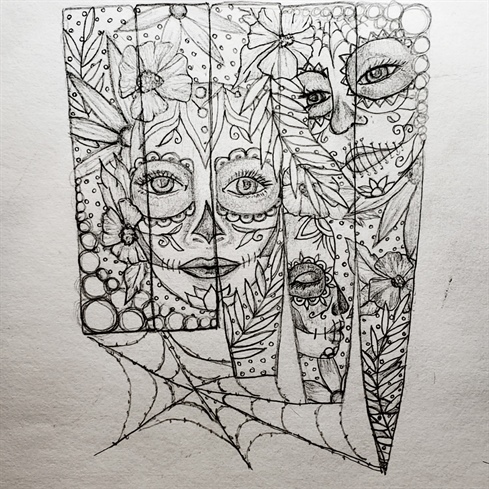
For this challenge, I wanted my design to be completely original, so rather than pulling inspiration from pictures I decided it would be best to sketch whatever came to mind after researching the topic. This is what i came up.
2
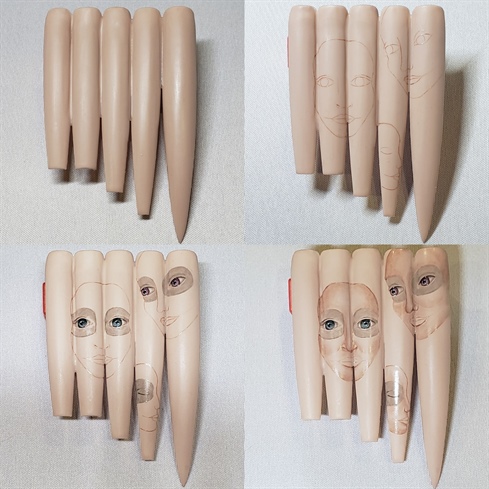
Start by cutting the nail tips into the desired lengths and shapes and glue the tips together. Paint them with a nude gel polish and cover with a matte top coat. Next paint a rough outline of the faces with a light brown gel polish. When doing this, be sure to look at the tips from the angle they will be photographed to avoid distortion in your final look. Paint the irises using blue and purple gel polishes and add highlights with white gel polish. Next use black gel polish to outline their makeup around the eyes and lightly add shading around and in the eyes. Add structure to the faces by lightly shading them with a brown gel polish (I like to start with the noses to help keep proportions more accurate.)
3
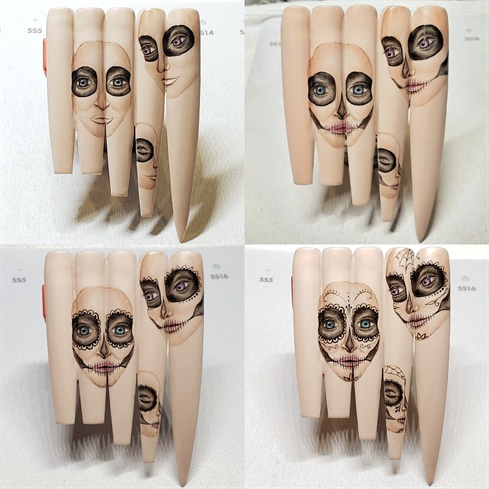
With a second coat of brown gel polish deepen the shadows around the face. Use black again to darken the makeup while maintaining the shapes of the eyes. Also use black gel polish to add more shadows around the nostrils and under each lip to help them stand out. Paint along the center of the lips with a pink gel polish and blend the color out to the edges of the lips to contour their shape. Because their makeup is meant to resemble skulls, trace the crease of their lips out and along the jaw bones, and paint diamonds over the noses with black gel polish. Shade in these areas. Paint black lines over the lips to represent the skulls teeth and paint various symbols across their faces to complete their makeup.
4
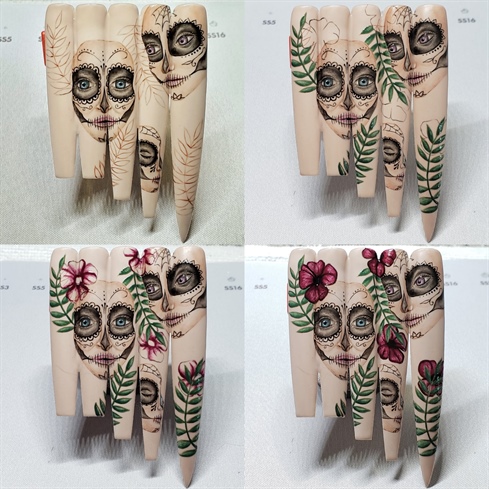
Using brown gel polish paint a rough outline of the leaves and fill them in with two coats of green gel polish. Paint the first coat lightly, and only apply a second coat of green to part of the leaves to add shadows. Next paint the outlines for your red flowers, and with a dark red gel polish paint the sides of the petals, outline the centers, and then drag the color outward. Next outline the edges of the petals with the same red gel and blend inward so the petals are left with a natural highlight. Outline each petal and fill in the centers with black gel polish.
5
Follow the same steps to paint the blue flowers. Then use a dotting tool to fill in the centers of the flowers with tiny dots of white gel polish. Using a larger dotting tool evenly fill in the rest of the canvas with black polka dots. Outline the faces with black to help them stand out from the background. Finish with a matte top coat.
6
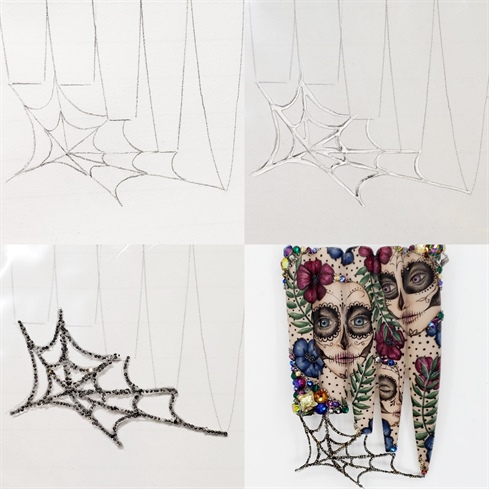
Trace the shape of the nail tips onto a piece of paper. Draw a spider web that connects all of the tips together, and then put the piece of paper into a plastic bag. Paint over the spider web with jewelry gel, and individually place each crystal pixie into the gel until the entire web is covered. Cure and carefully peel the web from the plastic bag. Using jewelry gel again, attach the spider web to the nails. Glue crystals and crystal pixies into place around the border of the design, and add smaller clusters throughout to complete the look.
10 Artists like this Photo
Write a Comment
Submit