The theme was "Pure Diva" and we were asked to select a favourite diva and create the perfect set of nails custom designed just for her. The completed set must be done on 2 hands and must reflect the diva’s personality and what she is known for. We can use a mix of mediums to create this set.
*******
I was very excited about the first challenge and I was happy to see the theme. I always wanted to create a nail design for a real Diva, so this is a great chance to do it finally, even just virtually. I love good music and I love almost all kind of music. One of my favourite singer is Beyonce. She is incredibly talented, beautiful, she is a great visual artist and she has a unique style.
About the nails:
Beyoncé usually wears almond shaped natural nails or very short almond nails, so I do a quite short, sculpted nails for this challenge. I wanted reflect her style perfectly. I just cannot imagine Beyonce with long stiletto nails.
I really love her style. She is always daring, sexy but elegant at the same time. I love her performance costumes too, which is usually plain base layer covered with lace or glittery top layer. She prefer black, white and gold colours, glitters, crystals. I wanted give back this style, so I chose a greyish base colour and did some black lace nail design. I wanted to create a perfect match with her performance and evening dresses. I think this colour combination reflects her style.
About the design:
It was obvious I’ll choose Beyoncé as a Diva, just I had a little hesitation about and what she is known for. Everyone knows her music videos, but I wanted to show a bit of her whole personality. She is one of the most successful singer and she is called “Queen B” by her fans. She is unique and strong like a Queen Bee. She won already 16 Grammys and many other awards. She deserves every one of them, she is a real diva, legend, wonderful, hardworking, beautiful and perfect.
I really enjoyed doing this nails and I hope you will like it as well. If you have any question, don't hesitate to contact me. :)
You can find here my video about this challenge:
https://www.youtube.com/watch?v=DUSnP0QfI54
If you liked it, please leave a comment... :)
I created a Pinterest board about my favourite Diva's style:
https://www.pinterest.com/kormonfont/nails-ntna/
More behind the scene potos:
INSTAGRAM: instagram.com/nailartinlondon
FACEBOOK: fb.com/nailartinlondon.co.uk
If you liked my work please SHARE and VOTE! Thank you for your time!
:)
Step-by-Step Nail Art Tutorial
1
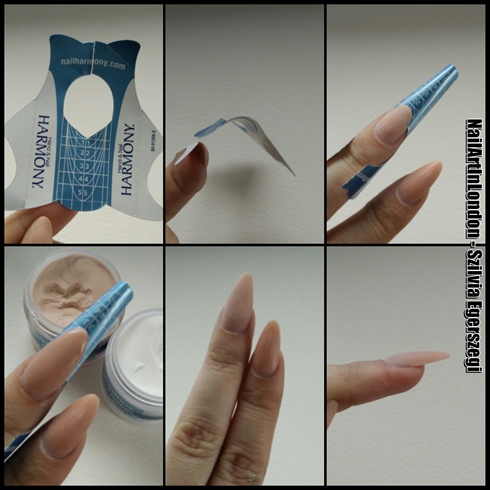
I sculpted almond nail shape. The nails were made using Prohesion acrylic system from Nail Harmony. The process: 1. Cut the paper form if it's necessary. *** 2. Blend the form before the application *** 3. Apply the form. It's very important that the form need to fit perfectly at the stress points. If doesn't, no worries at all, just remove it and cut a little bit deeper and apply again. *** 4. Sculpt the nails with cover pink and clear/soft pink acrylic powders. *** 5. File it. *** 6. Buff the surface. It's important if you would like apply gel polish, you don't need to buff a very smooth surface. Under the gel polish you need a little bit "rough" surface. Clean the dust before you start applying the colour.
2
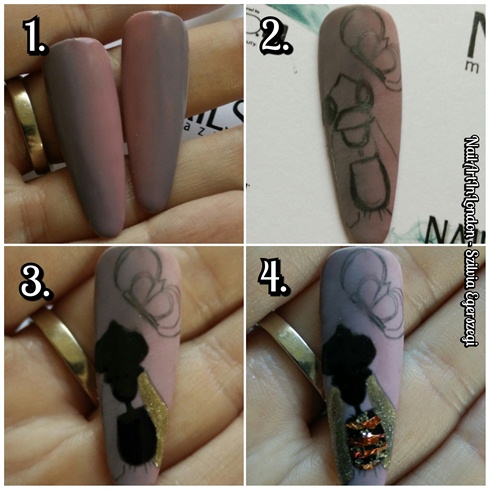
How to do the design? Painting method of the BEE: 1: On these tips I created a nice ombre base but on the nails I used only just the greyish colour. The ombre bases were painted using gel polish. Use a flat brush or the brush of your gel polish. Cure it, wipe it and buff the surface. *** 2. If you need just do a quick sketch about your design *** 3. The base of the Bee was painted using black (for the head and body) and gold (for the wings) gel polish. Cure it and do not wipe the sticky layer *** 4. Apply the copper foil and some gold glitters. Flash cure it ((5-10 sec in LED, 30 sec in UV lamp)
3
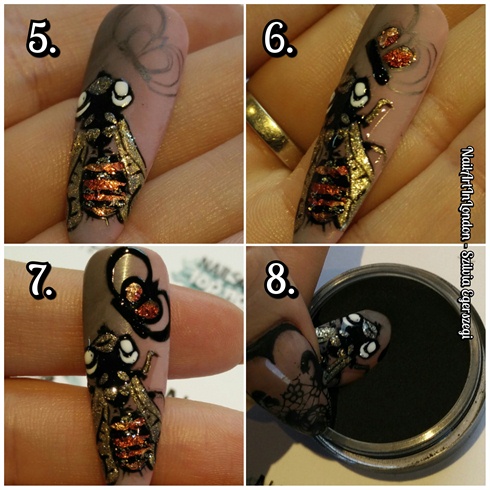
5. The contour lines were painted using a very fine detail brush and black gel polish. The eyes were painted using white gel polish Close the whole tip/nail with finishing gel or gel polish top and wipe it. *** 6. With the same technique paint the crown. Painting method of the CROWN: Start with the middle of the crown. *** 7. Crown was painted using black gel polish. Flash cure it (5-10 sec in LED, 30 sec in UV lamp) *** 8. Dip into black acrylic powder. Cure it completely. Clean the surface with a brush and wipe it with alcohol. You'll get a very thin 3D effect with this technique and a matte "velvety" surface. But if you prefer than you can cover with finishing gel. It's totally up to you. :) I chose the matte surface.
4
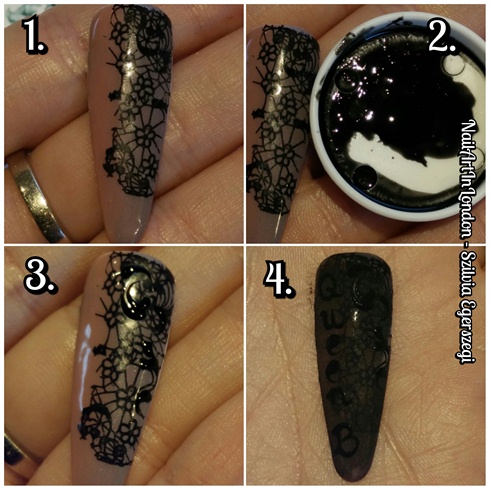
How to do the lace design and the Queen B sign? Method of the LACE BASE: 1. The lace were made with stamping technique. I used Moyou London plate (Bridal collection) and black regular polish from Moyra. Painting method of "QUEEN B": 2. The letters and small swirls were painted using black gel polish. I used a very fine detail brush *** 3. If it's comfortable and easier for you, you can do it in a few more steps. Just do 2-3 small swirls. Flash cure it. And do again a few in as many steps as you need. :) *** 4. Lightly pour with black acrylic powder and cure id completely. Clean the surface.
5
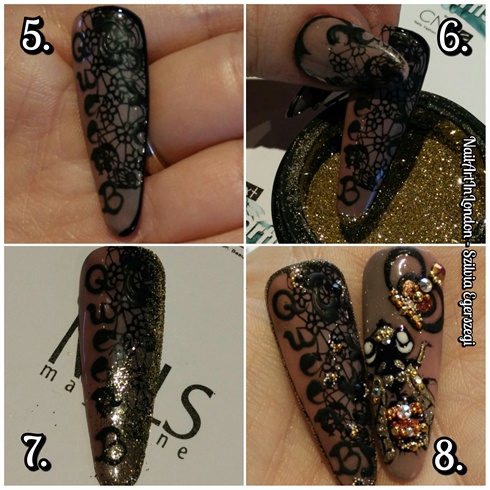
5. Paint a very thin line, like a frame with gel polish and fine detail brush. Flash cure it. *** 6. Dip into very fine gold glitters and cure it completely. *** 7. Clean the surface with brush.*** 8. Some crystals, pearls and tiny studs, pearls were added to complete the design.
6
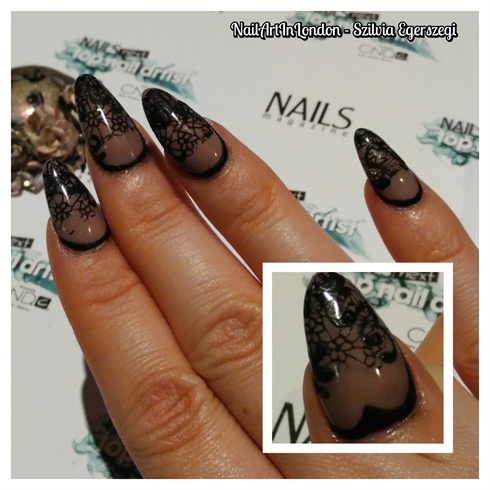
You need to everything on exactly the same way as we did on the tips. :) LEFT HAND: I applies gel polish, cured it and buffed the surface. The lace pattern was made using stamping plate and black nail polish. I closed with gel polish top and wiped it. The swirls were painted over the shiny surface, because I wanted a soft and velvety 3D finish. I painted the swirls with fine brush and flash cured it. Slightly poured the nails with black acrylic powder. Cured is completely and cleaned the surface with brush and wiped with alcohol. I apologize, but I made this design with my less component hand. :)
7
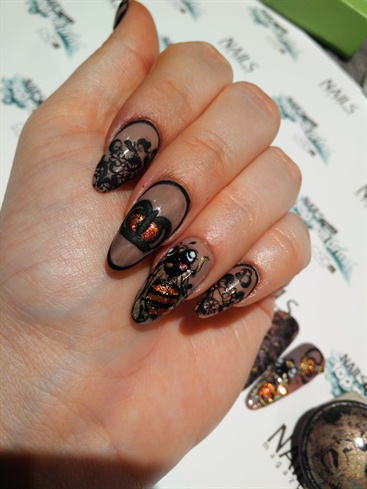
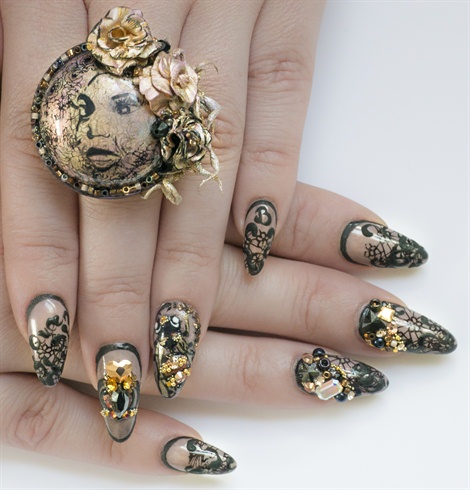
And here is my RIGHT HAND. :) I made every steps on the same way how I did it on tips. Some crystals, pearls and tiny studs, pearls were added to complete the design. Like before on tips.
8
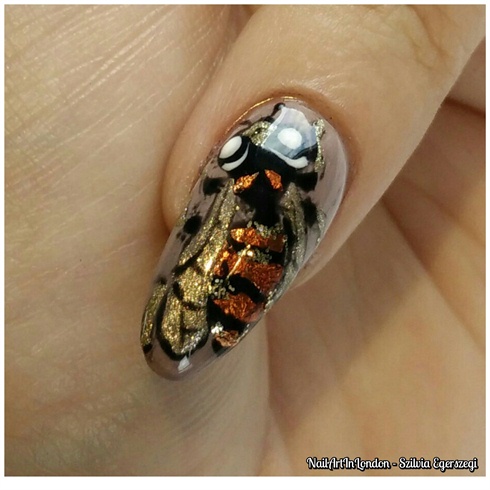
Close up from my favourite part of this set... :)
9
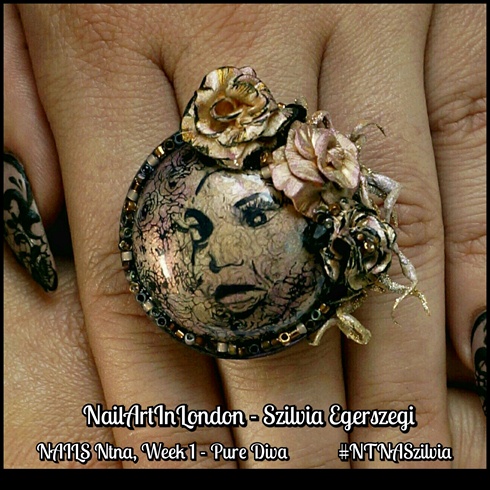
I made a little additional item as well to these Beyonce inspired customized nails. :) The ring was made sculpting from acrylic powder. All part is handmade. Don't forget to follow me on instagram.com/nailartinlondon to see the whole process. I hope you'll like it. :) And you can see there more Beyonce inspired nail designs as well...
10
Close up from the finish. I used Swarovski crystals, Japanese beads and small pearls to complete my design.
5 Artists like this Photo
Write a Comment
Submit