Upon receiving our first pre-challenge I spent many days researching imagery and symbolism relating to Mexican culture and the 'Day of the dead' celebrations. the title of the challenge 'Drop Dead Gorgeous' made me envisage a beautiful woman suspended between two worlds, the living and the dead. Of all the beautiful Swarovski crystals supplied to us I was particularly captivated by the crystal eye and decided to use this as the starting point to my piece. I have always had a morbid fascination with skulls and the single eye seemed to tie perfectly with my concept of half alive/ half dead and set the path towards my half-faced lady. I played around with my nail tips many times, rearranging them until just like deciphering shapes in clouds I saw pointed teeth at the bottom and tall, imposing altar candles at the top. I used a traditional colour scheme of hot pink and orange and included native Mexican flowers in the form of a headdress. The skeletons on the altar candle either side are built from a combination of Swarovski crystals are symbolic of two of the seasons most notable icons, Santa Muerte (the personification of death) and Guadalupe (The virgin Mary) After carefully hand painting my piece I embellished it with patterns and crystals in the style of a traditional sugar skull.
Step-by-Step Nail Art Tutorial
1
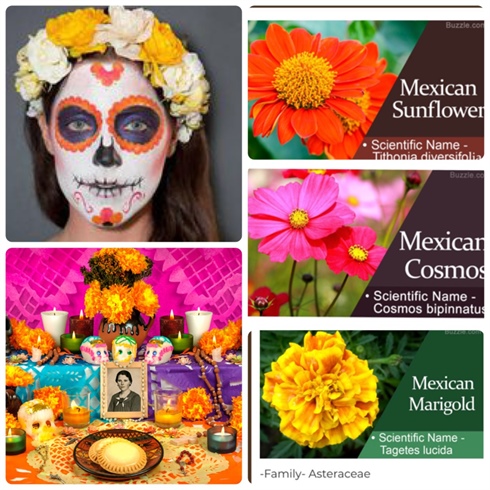
On receiving my brief i decided to spend a good few days researching ideas, I was particularly drawn to the shrines or altars built for individual loved ones and the symbolism behind the offerings left to the departed. Marigolds, sugar skulls and bright colours were a recurring theme and something I was eager to include in my design.
2
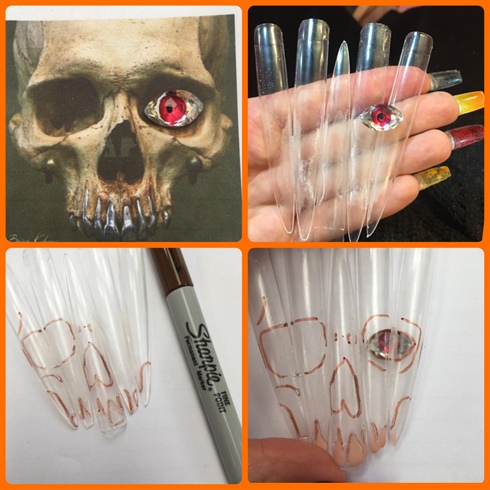
Once I had settled on the layout of my piece I attached my tips together using nail glue. I found an image of a skull online to use as a reference and after scaling it to size I printed it out so that I could trace the important details onto my tips using a plain old sharpie!
3
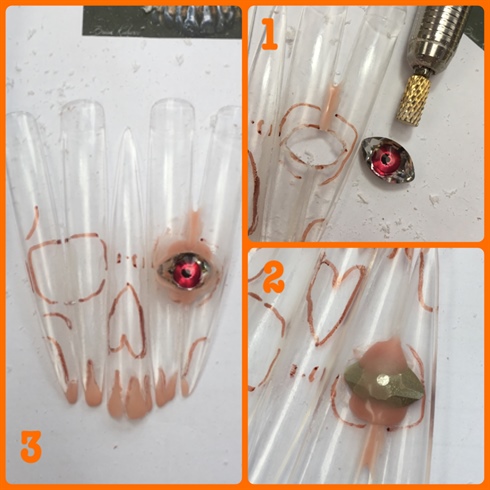
Once I had traced the crystal eye I cut out a hole using my efile so that The crystal could sit flush against the surface of my mural. I held the crystal in place from behind by applying acrylic around the seams.
4
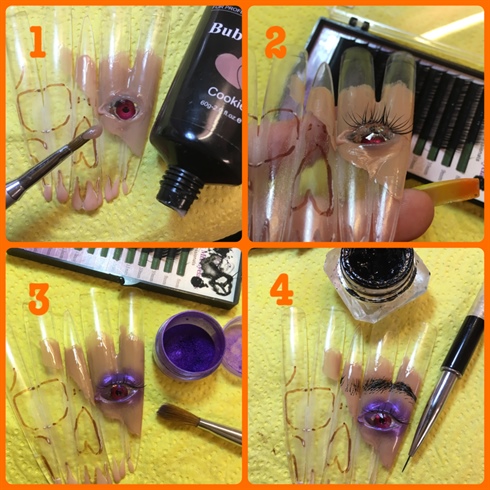
\nI began to paint the front of my mural with a beige colour gel polish but was unhappy with how awkward and unnatural my eye looked. I decided to remedy this by creating an eyelid using acrygel, I pressed a few synthetic individual eyelashes into the gel to add to the realism. Once this was cured in the lamp I applied another layer of beige gel polish and used the sticky inhibition layer to add some purple pigment powder using a small fluffy acrylic brush. Once I was happy with the blending I added some eyebrow hairs using black gel paint and a fine detailer brush as a nod to famous Mexican artist Frida Kahlo's famous monobrow then sealed with matte gel top coat.
5
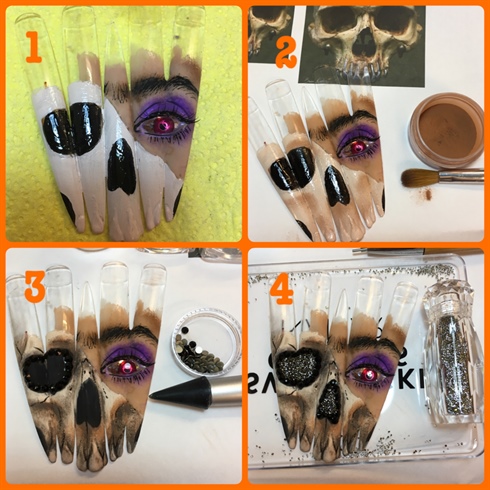
For the following step I began to build up the base of my design using a combination of gel polishes and pigment powders regularly observing my printed skull as reference. I wanted the nose and eye socket to be very dark in contrast to the 'live' part of the face so outlined the area in black jet swarovski crystals using nail glue and my very handy Crystal Katana kindly supplied by Crystal Ninja. I then filled the area with a generous layer of no-wipe top coat before sprinkling with Swarovski crystal pixie in 'Rock Shock' before curing under a UV lamp.
6
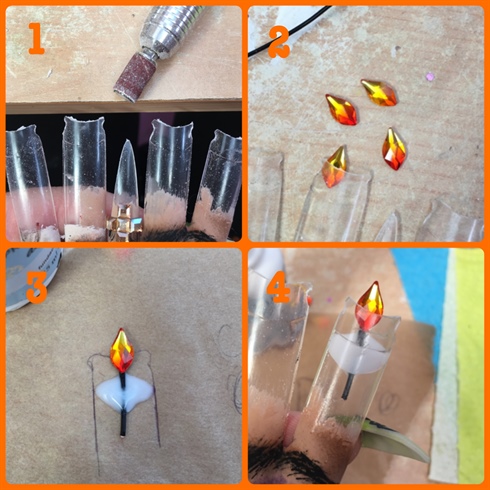
I wanted to make the flames look as though they were inside the glass of the candles which meant applying them from behind, Simply gluing them on from behind looked messy and caused the clear tips to fog up from the glue fumes so I applied small pieces of wire to the back of the crystals in the form of a candle wick and fixed them in place using a small bead of acrylic.
7
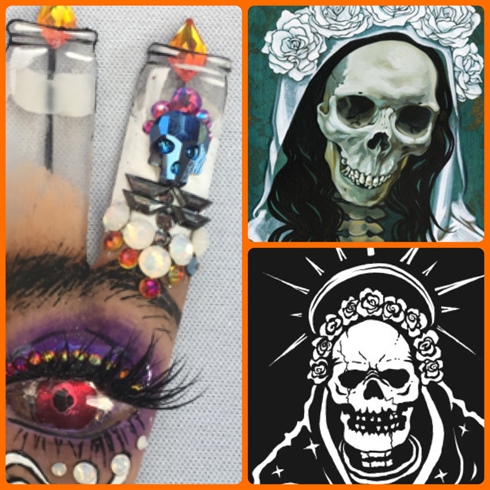
I like symmetry and decided to use more of my Swarovski crystals to create a tribute either side of my piece to icons such as Santa Muerte, the Saint or personification of death.
8
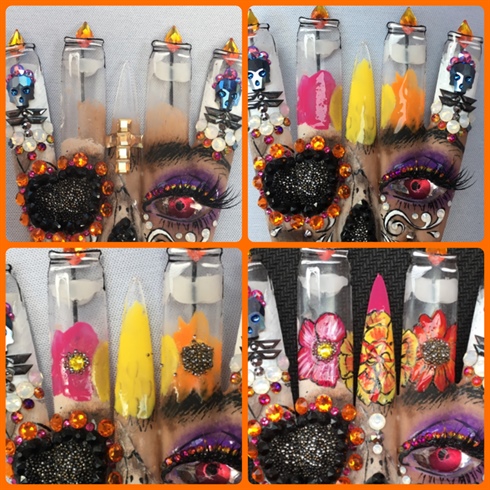
The flowers I had chosen for my headdress (Mexican Sunflower, cosmos and marigolds) fitted perfectly with my colour scheme. I built them up in layers of gel polish adding more and more detail as I went and making sure to cure in my UV lamp between each one, I applied a combination of Swarovski crystals and crystal pixie to the centre of each flower to add detail and sparkle!
9

Taking inspiration from religious prayer candles I painted further details onto my candles and applied a layer of matte top coat with I think worked well in contrast to the sparkle of the crystals.
10
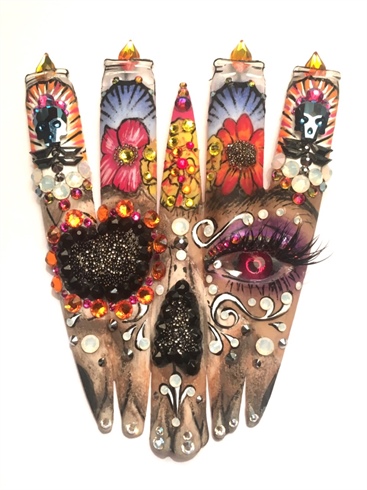
Lastly I spent time perfecting my piece, adding more flourishes and crystals in places where I felt it was lacking until I was happy with my design. :)
9 Artists like this Photo
Write a Comment
Submit