For this challenge, Akzentz asked us to create 3D gel designs chosen from our favourite decade.
A tough choice, and with us now into the 21st century, I thought it best to choose from a period I could directly relate to.
Granted, it's almost a century ago, but my choice was the 'roaring' 1920's. To me, this decade gave birth to many many things - new inventions, fashion ideas, jazz music, vintage cars and art deco.
I used to study fashion design, and it was always a desire to go back to visit the 1920s. I've always been transfixed by the transition of fashion back then - more fitted flapper dresses and head pieces. With a passion for fashion (I'm a poet and I didn't know it!!) I thought I'd try and create the fashion on the nail to form the first part of my design.
Music also plays an important part in my life. I played piano from 9th grade and once upon a time, harbored a dream of being a jazz pianist. Relating this to the grandeur of the 1920's, I formed the second part of my design to combine music notes, piano keys and also a Gramophone to highlight how music was played back then.
I'm a great believer in taking on all feedback from judges in NTNA and it's been asked for me to step outside my 'comfort zone'. I really wanted to challenge myself, and, since we have to create 3D using gel, I thought to myself 'why not create a vintage car to show the appreciation to the amazing invention'. Watching all the old gangster movies the car was the means of transport in the 20's.
With the intricacy of line work in Art Deco, this was pivotal to the era of the 1920's and this is perfect for me to form the final part of my design.
I am grateful to have all the things around me today, which were all brought from the past. People with creative minds, inventions and many more things we should be appreciative of. Without the past there is no now, and without the now, there is no future, so this art work is to show appreciation of a wonderful decade, and to all the great things that the past has given to us.
Step-by-Step Nail Art Tutorial
1
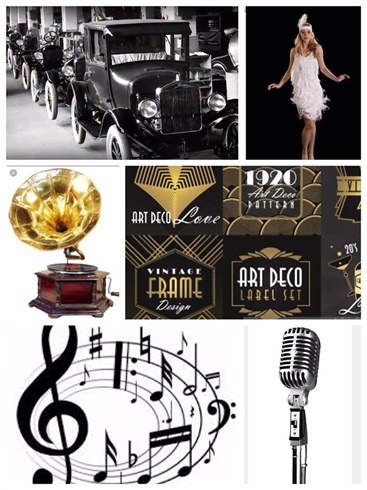
Step1. For this week challenge I decided to create nail designs base on the 'Roaring' 1920s. Here are some pictures of the inspiration for my art work. \n
2
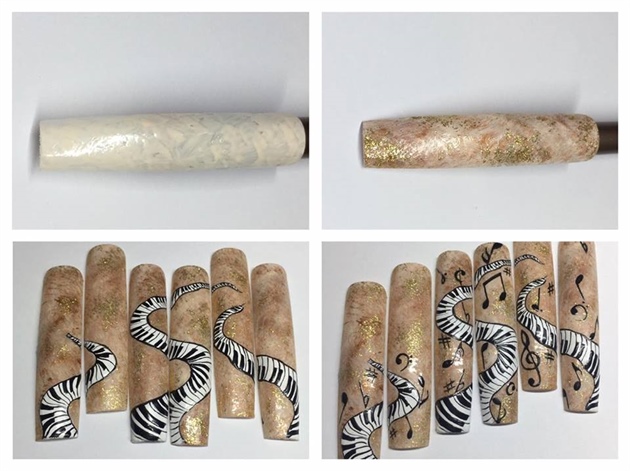
I began by prepping the nails, and buffed the shiny layer off the nail tips. I then painted the base of the nail using a cream gel polish, and cured for 30seconds. I then dabbed brown and gold gel using a Pan Pan brush to give the nail a vintage look, and then cured again for 30seconds. Once I was happy with the background, I began to draw the piano keys by using an oval and a short gel liner brush. I also cured in between to avoid smudges or mistakes. This was followed by adding some musical notes for detail and then finished with a matte top coat.
3
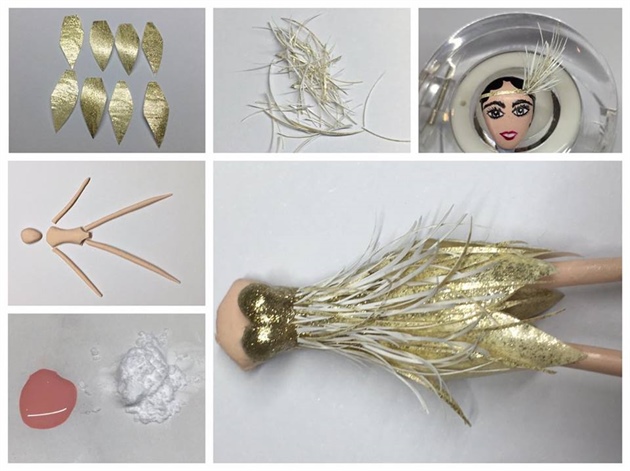
For the 1920s Lady, I mixed a fleshly tone gel polish and Akzentz 3D powder. It was a little tricky coping with the consistency so I would advise adding a small amount of gel with powder . Once I achieved the right consistently, which is when it is almost like a clay mould, I manipulated it into the different body parts as shown in the pticure and cured it for approximately 3 and a half minutes. A point of note. Wear gloves to avoid irritation and for safety. For the flapper dress, I painted several layers of gold gel polish to allow it to be flexible enough for me to work with. I trimmed it into tiny little strands and then attached them using Akzentz Options Gel. I also painted the main dress with a gold glitter gel polish. I added the details - the\n eyes and mouth - to the face by using black, white & red gel polish and short gel liner brush. For the nose I used a small amount of flesh tone gel, mixed with Akzentz 3D powder to add dimension. \nI then attached all the body parts together using Akzentz Options Gel. it work a treat and easy to use!!!
4
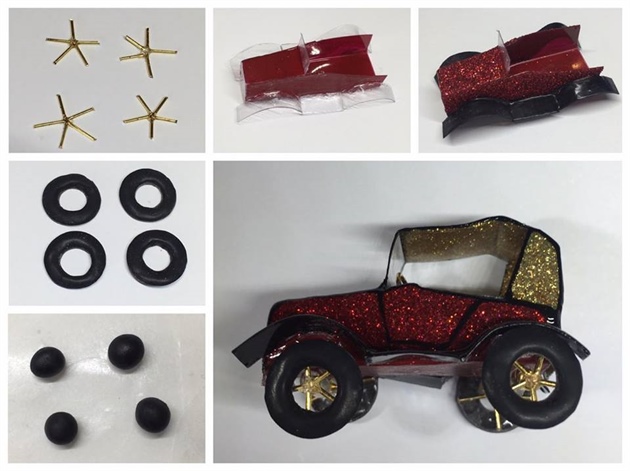
For the vintage car, i used red and black gel, red and gold glitter, wire and some tiny clear plastic sheet . I began by mixing black gel polish with Akzentz 3D powder to a mouldable consistency, then I created four balls and shaped it to make the tyres. I used a small C curve stick to carve out the center and cured it for 3-4 minutes. I cut out a small piece of wire and adhered it together using Akzentz option gel for 30 seconds. For the body of the vintage car, I cut out the shape, glued it together, and painted the body car using red and black gel polish for the first coat. For the second coat I painted red glitter and for the roof, gold glitter. I then applied two layers of top coat and then added the finer details to finish the vintage car off. I should add, that I did cure each layer for 30seconds.
5
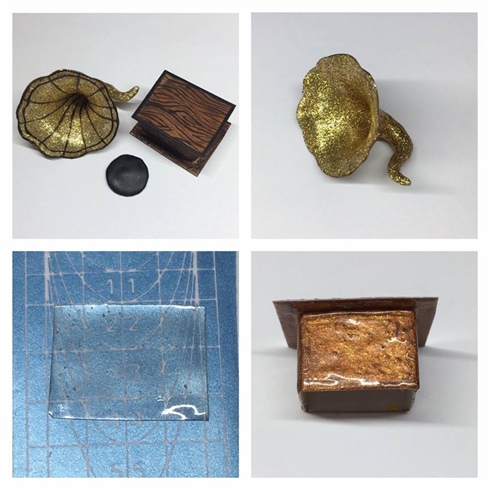
To create the Gramophone, I used Akzentz option gel, 3D powder, gold, black and brown gel Polish and that friend of the nail tech, blu tack!! For the top half of the gramophone, I used the blu tack to form the shape, then applied 3 coats of Akzentz options gel, curing each layer for 30seconds. I then wiped off the sticky layer and peeled the blu tack away. I then painted it with gold gel and added details. For the base of the gramophone, I used Akzentz options gel and created several small squares and rectangles, curing each, and attached them, then added the details. For the disc, I used black gel,polish and Akzentz 3D powder.
6
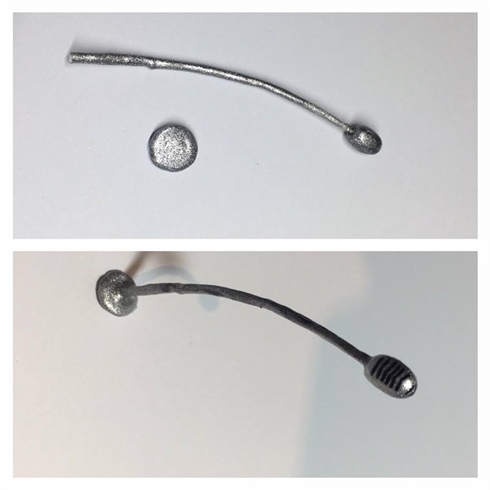
To create the 1920 vintage microphone, I used silver gel polish with Akzentz 3D powder and mixed them to a good consistency. Very carefully, I created the body of the microphone and cured for 3 minutes, and then applied the same technique with the top and base of the microphone . I then added the details with black
7
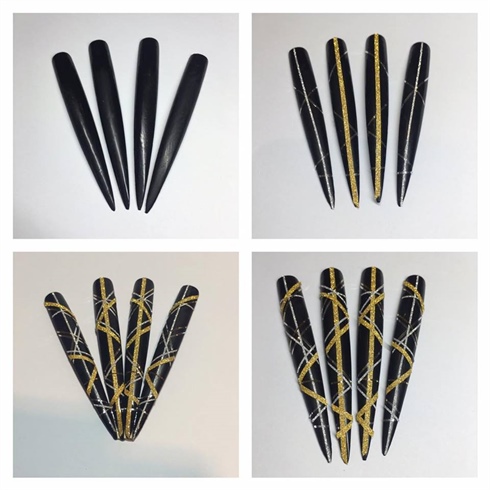
For the remaining four nail tips, I wanted to create an Art Deco Stage and background. I painted the nails with two coats of black gel, curing in between layers for 30seconds. I wiped off the sticky layer with isopropyl alcohol. I then used different nail striping tape to achieve the Art Deco effect .
7 Artists like this Photo
Write a Comment
Submit