For this challenge we were asked to create a set of nail design on 10 tips showcasing the neighbourhood that had the most influence on our artistry .
I'm learning all the time in NTNA. I take all critiques and look to see how I can embed them in my work. This week I really wanted to 'dig deeper' to bring out my unusual side - a side of me that people may think - "where did that come from"? Maybe it's about time I surprised you a little!!
Well, would you believe that I'm actually a bit of a surfer dude??
Bondi Beach. A neighbourhood that I often visit and a world famous area located here in Sydney. Culturally unique, and a place where you can never have the same day twice, Bondi is a place that has weekend markets, where you can buy hand made interesting things, to the different graffiti art along the wall near the beach, produced by many great artists, to the white sands, crystal blue ocean, and permanently tanned surfers, riding the waves, whilst others kick off their sandals and just enjoy the endless sunshine.
This neighbourhood is vibrant and full of life. I often go there on the weekend, not only to chill or ride the waves, but it's a place where I draw a lot of inspiration from the hand crafted market items. The graffiti art also inspires some of my ideas. Art comes is many different packages - from graffiti walls to painted nails - and the iconic beach who's pictures adorns many a wall across the world. Bondi inspires ideas. Ideas inspire art. Art inspires people. People from all over travel to Bondi - and Bondi inspires me.
Sharing Bondi beach with you all is sharing one of my constantly evolving inspirations. It is a wonderful place - bright, sunny, happy and truly truly unusual. Who would have thought that a white sandy beach, graffiti art and a crystal clear blue ocean, would inspire a man from Vietnam.
Told you I could surprise you !!
I hope you all enjoy my creation for this week
Step-by-Step Nail Art Tutorial
1
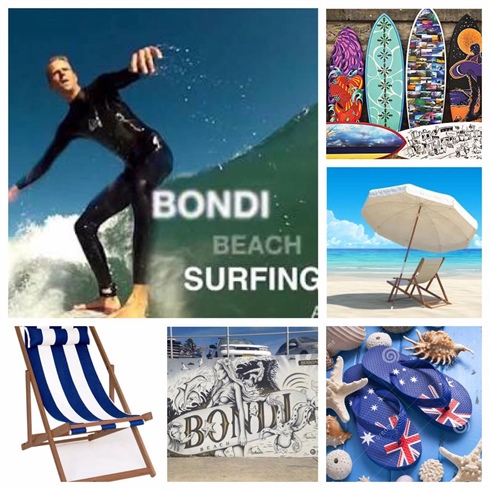
My inspiration pictures for Bondi neighbourhood and Bondi Beach.
2
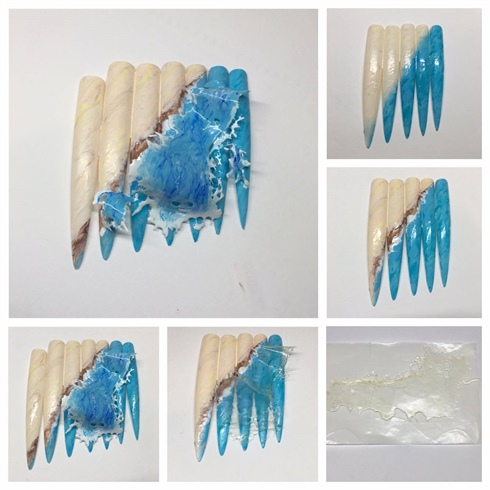
The base \n1. I started out with buffing the tips and gluing 5 nail tips together for the base.\n2. Using different shades of 'sand like' colour gels, I painted one half diagonally to create the sand effect. I painted the other half using different shades of blue to create the beach. \n3. I then used brown and white gel to paint extra effects to show the sand in water. \nThe waves were created using gel.\n1. I painted two coats of clear gel on a piece of form and cured in between layers. \n2. I attached the waves to the base with a small amount of gel. \n3. I then painted the waves with white and different shades of blue gel polish. \n4. I then finished this off with a non sticky gel top coat .
3
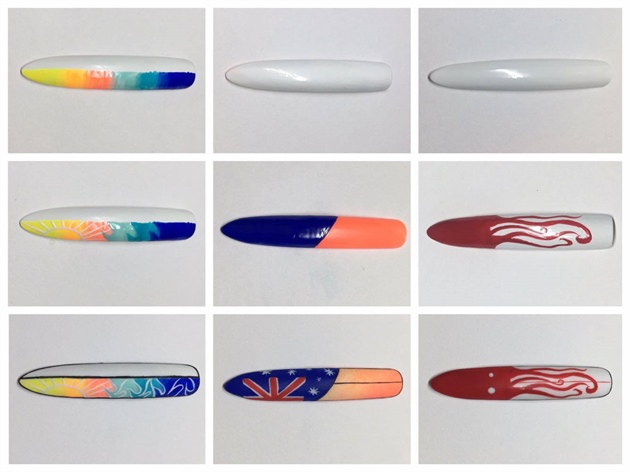
The big surf board \n1. I cut and filed the nail tips into the shape of a surf board.\n2. I buffed and painted two coats of white gel polish, curing in between\n3. For the sun and waves surf board, I painted the gel colour as shown in picture provided, and blended it with a flat brush before curing, the added the detail.\n4.For the octopus surf board.\nI used a small amount of red gel polish, and painted the shape of the octopus. I cured for 30 secs, then added the eyes using a small dotting tool. I finished it off with black board using gel polish. \n5. Australian flag surf board\nI started by painting one half diagonally with orange gel polish, and the other with dark blue gel polish. I then cured for 30 seconds. From there, I used white and red gel polishes, and added the details to complete the flag and surf board as shown.
4
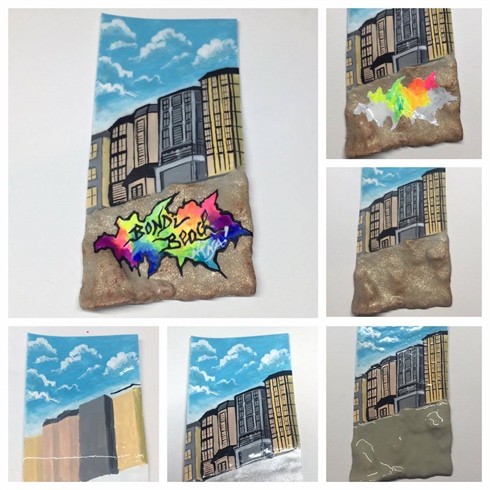
The Bondi neighbourhood backdrop\n1. To create this backdrop, I painted three coats of clear gel on a piece of form, curing in between layers and cutting it into rectangle shape. \n2. I painted the sky using blue and white gel polish. \n3. I painted the silhouette of the buildings and cured for 30 secs.\n4. Using black gel polish, I added details to complete the building. \n5. For the wall, I built it up (yes, I built a wall!!) with several layers of hard gel. \n6. I added the details to the wall using different shades of cement like gel polish.\n7. I then created my own graffiti art on the wall.
5
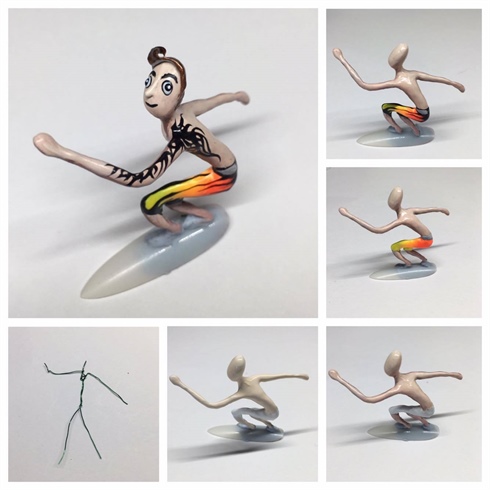
The surfer and small surf board\n1. I used wire and twisted it to form the basic shape of the body. \n2 . I then use a small amount of blu tac and covered it in gel for added volume .\n3. I then painted the body white different shade of skin tone gel polish.\n4. I hand painted the shorts using orange and yellow gel polish and developed the outline with black gel for definition . \n5. I then added eyes, nose, lips and hair using black, white and brown gel polish. \n6. For a little bit of the 'unusual', I hand painted a tattoo print on the surfers back, shoulder and arm.
6
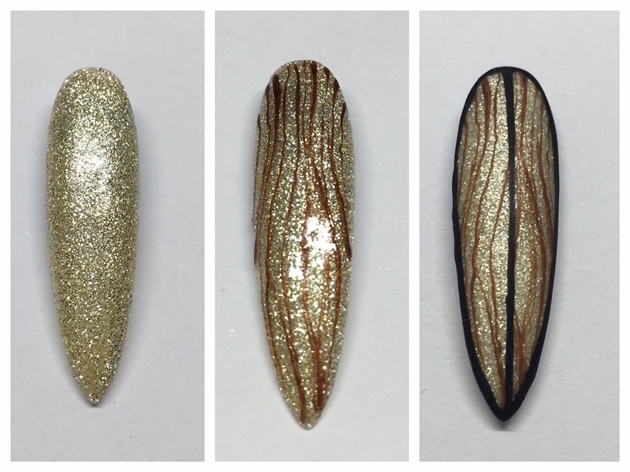
The small surf board \n1. I used a small nail tip, cut and filed it into the shape of a surf board.\n2. I painted two coats of champagne gel polish , curing in between layers. \n3. I painted the surf board with clear gel, without curing, I added lines to keep it nice and thin. \n4. I then cured it for 30 seconds and then added a matte top coat to finish. \n
7

The beach chair . \n1. I painted three coats of white gel, curing between layers to form the seat. \n2. Using red gel polish, I painted vertical lines on the seat. I also added a matte top coat. \n3. For the chair legs, I used four small wires and attached it to the seat with clear gel.\n4. I coated the chair legs with brown gel polish and top coat.\nThe beach umbrella \n1. I covered a polystyrene ball with two layers of hard gel, curing in between.\n2. I then scraped out the polystyrenes \n3. I painted the Beach umbrella with yellow and orange gel polishes, remembering to cure in between for 30secs. \n4. Using black gel, I added the finishing touches. \n5. I added a wire, and coated in brown gel for the stand.
8
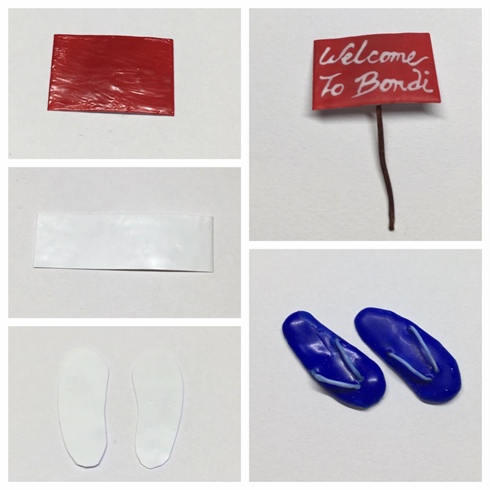
he Bondi sign and flip flops (sandals)\n1. I painted three coats of white gel for the base of the sign, curing in between layers.\n2. I then covered it with red gel polish.\n3. I wrote (Welcome to Bondi ) with white gel polish and added a small piece of wire for the stand, and covered with brown gel. \nFlip flops \n1. Using the remaining sheet of white gel I made earlier, I cut the sheet into a pair of flip flops. \n2. I painted the flip flops with dark blue gel polish and adding a small wire that I covered in light blue gel. I then added a matte top coat for finish.
4 Artists like this Photo
Write a Comment
Submit