The fifth and final part of the challenge is Toile - a challenging theme, but one which, after much thought, has made my creative juices flow again.
At first glance, the images that were given to us look somewhat simplistic in their creation, but on closer examination, the intricacy in the detail is there for all to see.
Toile is an early version or a mock up of designs using less expensive material e.g calico fabric. After much work, the design concepts and material is tested and perfected at a later stage .
To start this process, I wanted to utilise my fashion knowledge from the days of study, but more importantly, I wanted to move away from the norm and really push the envelope. I really wanted to take myself outside my comfort zone and show that I can be the next top nail artist.
For the Manus component of the challenge, I began by creating a bodice using acrylic that resembles a dress form. This will enable me to add a design and create a pattern on it. I can use my experience and passion in fashion and merge this with my passion for nails.
I then decided to cut the bodice into different parts - and this is also a metaphor. The different parts not only represent the toiling process but also represent the different stages of my NTNA journey. Each part of the journey is a complete process, but also when merged together, brings the overall journey and overall creation to life.
To show diversity in my techniques, i also decided to incorporate hand painting, gel blending, and taping. I also used hard gel and foils for structure, soft gel for flexibility to create different patterns and dress folds which I can plan to add to my design at a later stage.
For the Machina component, I wanted to incorporate different materials, ranging from fabric, boning material and mesh - all of which can be added to the toiling process.
I hope that you all enjoy my take on the theme. The toile process of NTNA is complete - and now, I am preparing for the merging of everything together, and final part of the journey in NTNA 2017
Step-by-Step Nail Art Tutorial
1
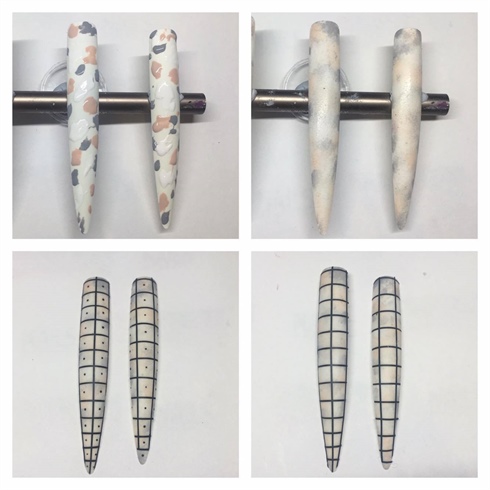
I buffed the surface of the nails to remove the shine from the tips. Using grey, white and nude gel polish, I randomly dabbed the gel colour and blended them together using small piece of sponge. I then cured it for 30 seconds. I then repeat the process. \n\nUsing a black striping tape, I carefully space out the tape horizontally and vertically to resemble graph paper. Once I am happy with the placing, I snip the excess tape with a small pair of curve scissors. I then applied a small dot in the centre of the square and cured it for 30 seconds follow by applying a matte top coat. \n
2
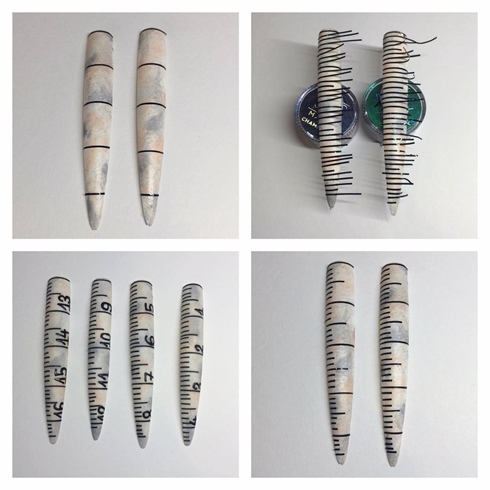
Measuring tape nails. \nThe base of the nails was created using the same method as in step one. Once the base is cured and the tacky layer is removed. I used the black striping tape to create my tape measure look. This time the tape is used horizontally. Once I finished taping, I then use a small amount of gel and a medium brush to draw the numbers. Once I am happy with everything, I then applied a matte top coat and cured for 30 seconds.\n
3
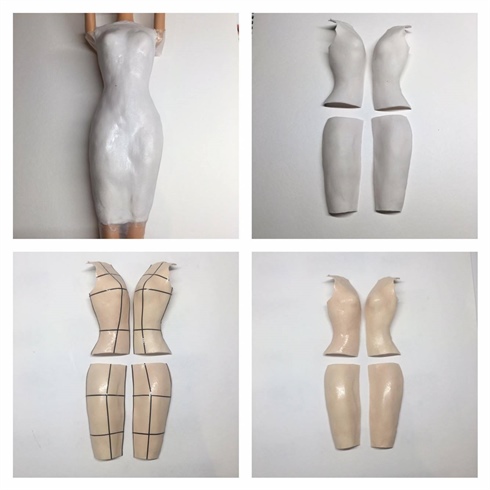
The bodice construction. \nUsing a small barbie doll, I wrap her body in cling film and follow this by applying acrylic to the torso. Once the acrylic is set, I then file, shape and buff before the next stage. \n\nI then cut the bodice into four parts using an e-file and a fine drill bit. Using a skin tone gel, I painted the bodice with two coats and cured each layer for 30 secs, and followed this by marking the bodice with black striping tape and a matte top coat.\n
4
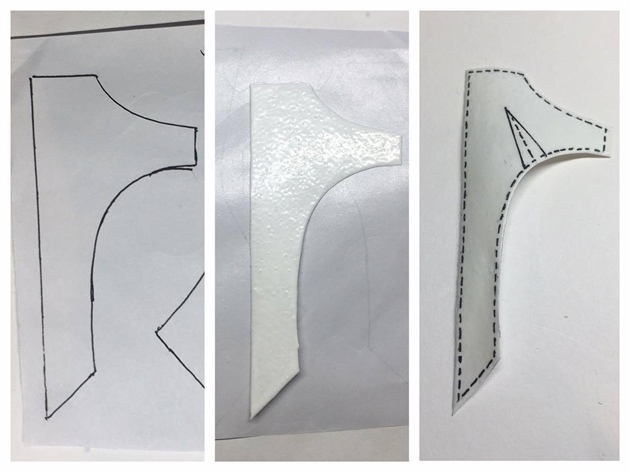
Dress fold and patterns.\nFor the dress fold, I drew the shapes of different patterns and dress folds onto the back of form paper, using LED hard gel. I painted one coat and cured for 30 secs. I then painted two coats of white gel polish and cured for 30 seconds each. Then using acrylic paint, i painted little stitch to complete my pattern.
5
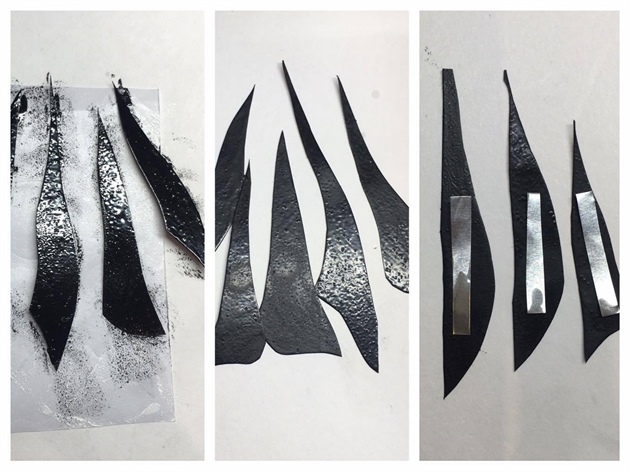
I used the same method as step four to create more dress folds. To make the pattern made out of gel even more flexible and bendable, I cut a small piece of foil, and glue to the back of the pattern so I can bend it at a later stage.
6
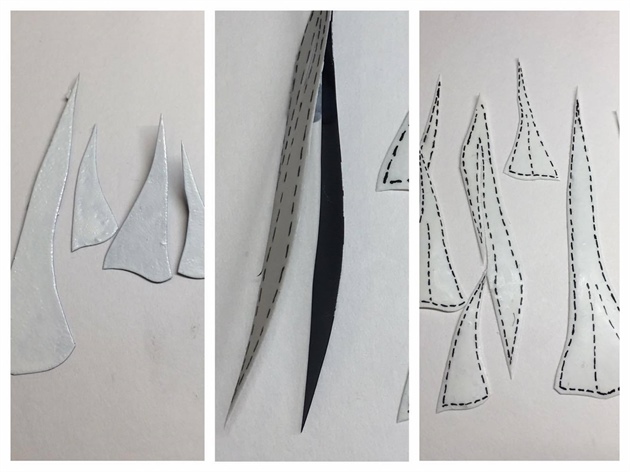
For the white dress folds/patterns, I repeated the same process as in step 4. I then hand painted the little stitch line using acrylic paint, letting it set, and then finished this with a matte top coat .
7
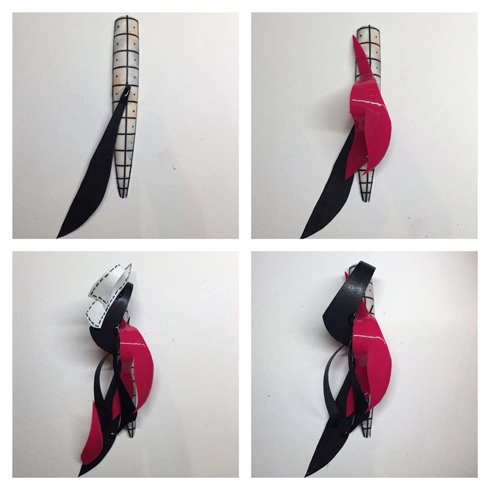
Once all the my design component were completed, I then attached them together using both gel and acrylic, as shown.
8
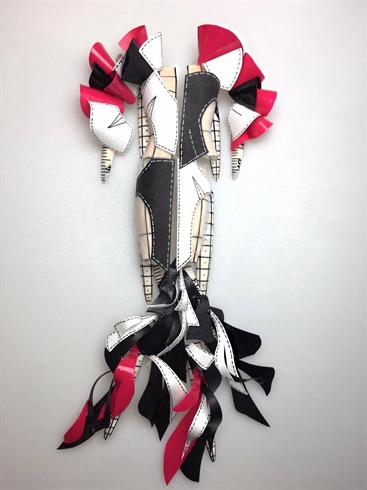
Here is the complete look when I put all the nails together. The whole toiling process becomes complete on whole dress. I hope you all enjoy my creative process!
6 Artists like this Photo
Write a Comment
Submit