This weeks challenge has been set by Canadian brand, Akzentz. We were asked to "dress up the nails" with the inspiration coming from a Vintage Couture piece OR period. We were to complete 5 nails, attach them to a real hand and photograph them on a white back ground with no props. My research discovered that the term "Vintage Couture" applies to high fashion designed prior to 1930 so I began searching through thousands of images and sketches of clothing designs, footwear and jewellery. I found an image of a vintage wedding gown and fell in love! It spoke to me particularly because 2018 marks the 10th anniversary of my own wedding. I began my research again. In my opinion, there is nothing more couture than a wedding gown. I found exquisite dresses made from lace and neck pieces of embroidery and crystals. When I looked at 1920-30 bouquets, I found arrangements that were "dressed" with vintage jewellery such as brooches and complimented with voile, netting and lace decorations. This was the main source of inspiration for the nails and I wanted to translate the angular style from that era. I chose to depict my nail interpretation of a bridal sleeve adorned with a beautiful bouquet. Asside from the crystals, pearls and bullion, all products are Akzentz.
Step-by-Step Nail Art Tutorial
1
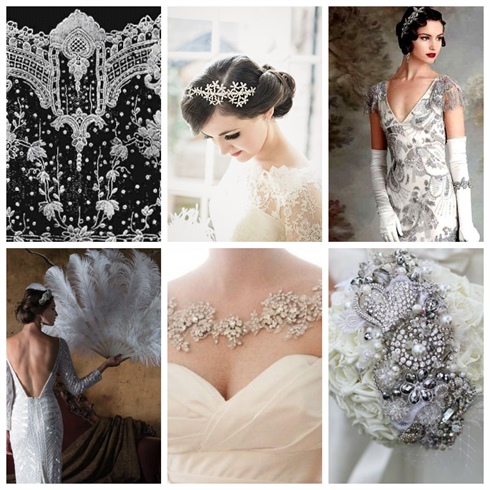
I created a mood board so that I could keep my vision on track. It includes some of the gowns that caught my attention, a vintage lace design, a bride holding a fan (which I thought was in interesting twist on bridal fashion) and a beautiful bouquet with cleverly arranged vintage jewellery
2
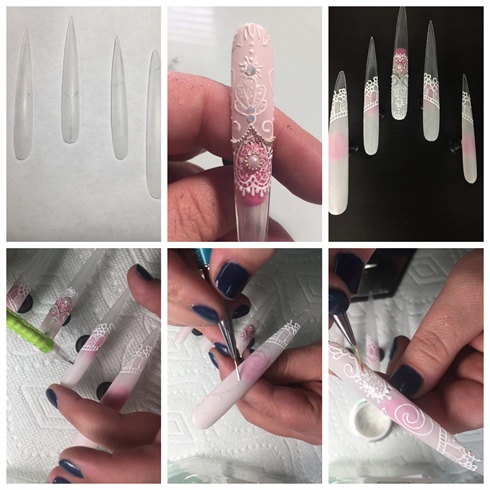
Start by buffing the surface of the tips, this gives the perfect canvas for mapping out your "sleeve" shape using a pencil. Paint from the cuticle to the pre mapped lines using Luxio Serenity. Apply in two thin layers and cure in between for the recommended time for your Curing Light. Apply Matte-On and Cure. Wipe the inhibition layer away. Take the tip that will be worn on the middle finger and draw out your design using a pencil, paint on the design using Gel Play in White. Complete the nail so that it is the starting point for the rest of the nails. This is so the design will flow outwards. Draw out and paint the "hem" of the sleeve to the rest of the nails. Align the nails in a similar formation to how they will be worn by your model and map out the rest of the lace design with a pencil, paint the design with Gel Play White and cure. Finally, fill in the spaces of the "embroidery" with Gel Play Lace and cure. Trace over those areas with Shine-On tack free top coat and cure.
3
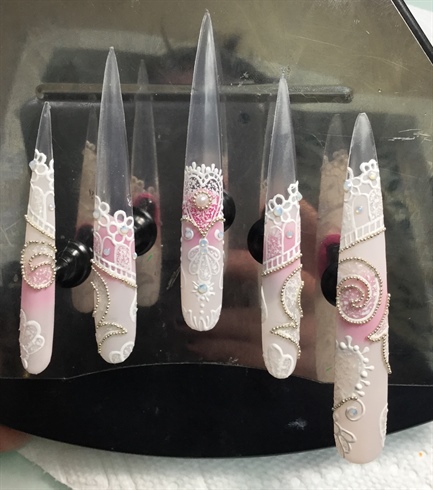
Arrange the nails and, using Shine-On and a detail brush, add bullion to parts of the lace design to make it pop. Be sure to keep this even and somewhat symmetrical for overall stability and flow. Add crystals and pearls using Trinity LED/UV Gel. I chose to add beads around the pearl in the centre of the heart to draw the eye in.
4
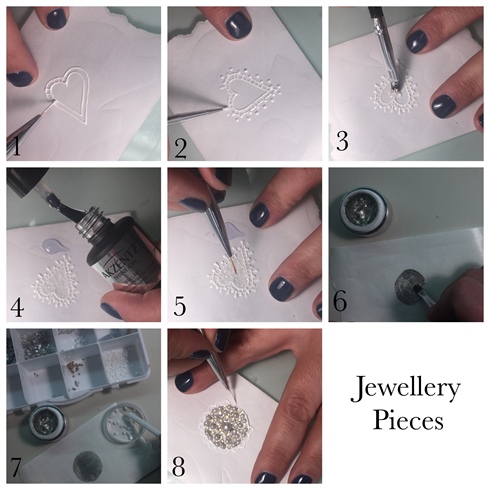
I made the decoration pieces in two ways for variety and used form paper for each style. Form paper is great because it hold your design while you create it but releases the finished product with ease. This made the making of my pieces much easier. Technique 1) using Gel Play White, begin painting your shape, I chose a heart. Only paint an outline and connect using small lines to create a "doily" effect. Add dots around the outside in alternate spaces, some touching your shape, some not. Use a striper brush to connect the dots that are furthest away to the boarder, now you can cure. Fill the middle of your shape with Gel Play Lace, cure, apply top coat and cure. Technique 2) Using Gel Play, Cosmic Silver, map out the shape of your brooch, do not cure. Apply pearls and crystals systematically so that the finished design has symmetry. Once you are happy with the placement, cure. Paint details around the the edge (I used White) and cure.
5
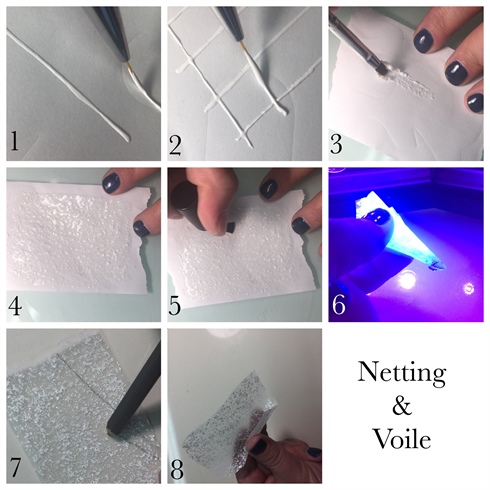
Use a thin detail brush and paint parallel lines onto form backing. Before curing, add more lines in an opposing formation to create a net and cure. Repeat this for additional netting. To create the voile, spread a very thin layer Lace Gel into a sheet on form paper, cure. Apply Matte-On top coat and cure. Repeat this for additional sheets of voile. Take one piece of voile and begin to curl it in on itself. Fix this in place with a small amount of Trinity Gel and cure. Curl it further and fix in place again. Using the other piece of voile. Draw fanned lines with a pencil and fold along each pencil line. Secure at the bottom with Trinity Gel to create a fan.
6
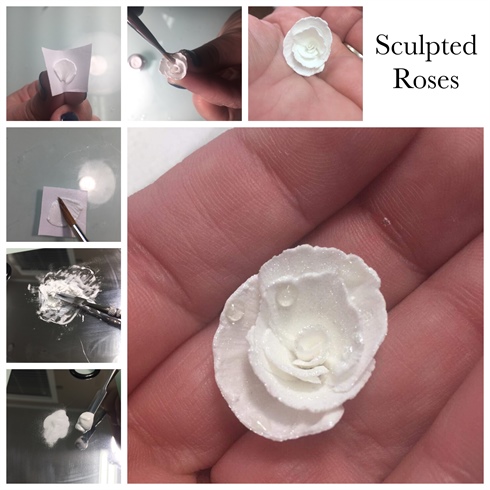
Gel Art Powder is a phenomenal product which gives the user creative freedom while using Akzentz products. Using a mix ratio of 2:1 (2 parts powder and 1 part Gel Play) blend the two products until you have a putty like consistancecy. Using small pieces, press out into petals with a sable brush and Isopropyl Alcohol, re dip your brush into the alcohol if you begin to lose workability. Pinch the piece of form paper at the base of the petal and cure. Continue until you have enough petals and attach one at a time using Trinity Gel. Dry brush on Pearlescent Silver powder and apply dew drops using small beads of Trinity Gel
7

Paint 2 large tear drop shapes onto form paper using Gel Play Glittering Silver. Bend the paper in half but don't crease it and cure. You will have created the swoops of your bow, attached these together with Trinity Gel. Make the ribbons in the same way. To make the spirals, apply the gel to a straight, round surface such as a straw or the base of a brush. Cure and then remove carefully from your mould. Define the bow by using Cosmic Silver and cure. Attach all the pieces using Trinity Gel
8
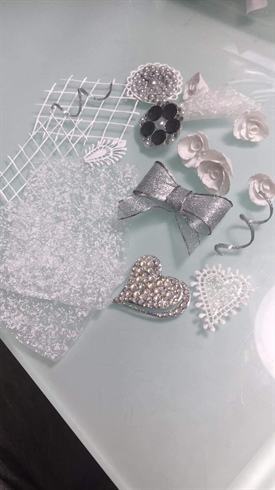
Assemble all the pieces of your bouquet and apply them to the nails while they are on your model
6 Artists like this Photo
Write a Comment
Submit