. Who would have ever thought that an entire shopping center could be created out of containers. “27 Boxes” is a shopping center that can be found in the heart of Melville, a trendy bohemian suburb of Johannesburg. I chose Melville as this was the suburb where I bought my first apartment. This is a melting pot for various cultures and through this, an interesting multicultural art emporium. I am inspired by Melville as an artist as one can only but be inspired by what other artists can create from the most basic items – wooden sculptures, African art, handmade furniture, souvenirs from the country itself and a whole lot more. Take a journey with me!
Step-by-Step Nail Art Tutorial
1
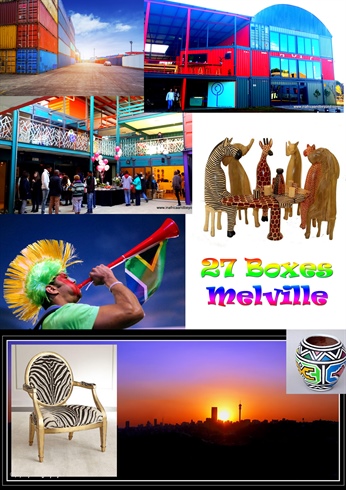
I have included these images to share my inspiration behind my design with you. Who would have ever thought that an entire shopping center could be created out of containers. “27 Boxes” is a shopping center that can be found in the heart of Melville, a trendy bohemian suburb of Johannesburg. I chose Melville as this was the suburb where I bought my first apartment. This is a melting pot for various cultures and through this, an interesting multicultural art emporium. I am inspired by Melville as an artist as one can only but be inspired by what other artists can create from the most basic items – wooden sculptures, African art, handmade furniture, souvenirs from the country itself and a whole lot more. Take a journey with me!
2
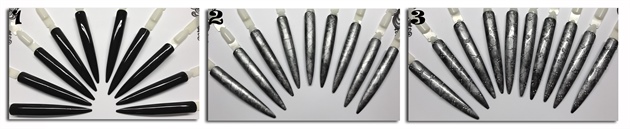
The colourful culture of Melville can be found at the foreground of Johannesburg. Johannesburg may sometimes come across as a concrete and metal jungle with all its skyscrapers. It is for this reason that I chose to place my piece on metal tips. 1. Paint the tips with black gel polish. 2. Using a sponge, sponge silver gel polish onto the tips. 3. Prior to curing this layer, use a dotting tool to create stripes in the tips, depicting the outlines of metal sheeting. Cure. Apply a layer of Top Coat and place metal studs at the intersections of the metal sheeting to act as rivets to hold them into place. Cure.
3
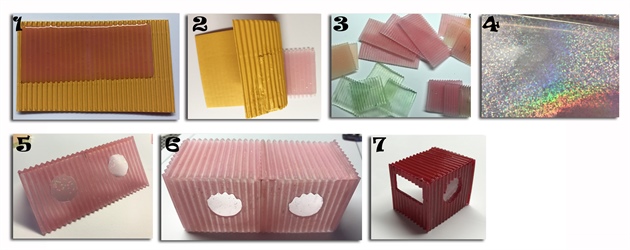
1. Create the structure of the containers using ribbed carton. Apply a generous layer of LED builder gel onto the paper and cure. 2. Gently remove the cured gel from the carton. 3. My work in progress. 4. Cut strips of holographic wrapping paper. 5. Using an electric drill, drill windows into the sides of the container and apply the holographic wrapping paper to the windows. 6. Attach the various parts of the container together with LED builder gel. 7. Decorate each container with is very own bold gel polish.
4
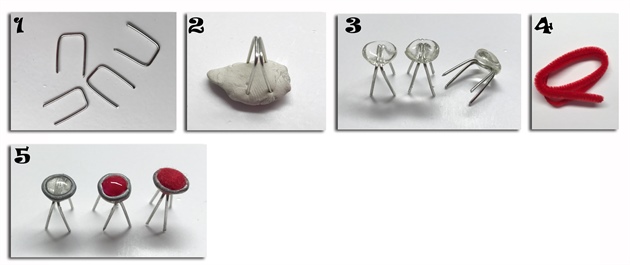
Time to create some stools for the café. 1. Bend some wire into a staple shape. 2. Keep them in place using blue tack and apply a drop of gel to hold them in shape. Cure. 3. Apply a bead of LED builder gel onto baking paper and hold the legs of the stool in place as you cure. 4. Cut the hairs off a pipe cleaner. 5. Create a rim around each stool using silver tube gel. Add a bead of LED builder gel into the center of the stool and hold it upside down to create a cushion. Cure. Color the cushion with gel polish and add the pipe cleaner hairs to create a funky, hairy finish.
5
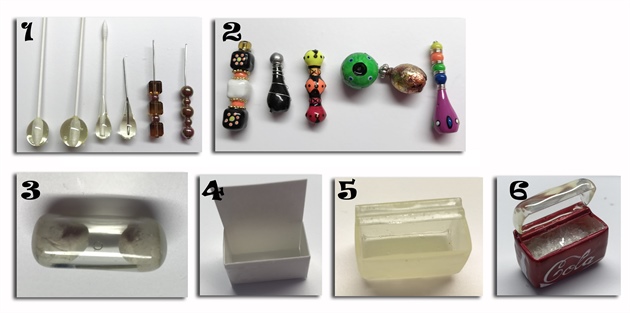
African pottery. 1. Using earbuds, dipped in LED builder gel, create the shape for various pots. Other pots were created using various shaped beads that were then dipped into white LED builder gel before curing. 2. The pots and jars are decorated with gel polish, metal wire, beads and metal foil. 3. To create a fridge for the restaurant I used a brush cap sealed on both ends with blue tack. This was dipped into clear LED builder gel to create the lid of the fridge. 4. Fold a piece of cardboard into a box shape. 5. Apply a layer of clear LED builder gel. Cure and file into shape. 6. Decorate with gel polish and insert crushed ice flakes into the fridge to represent ice.
6
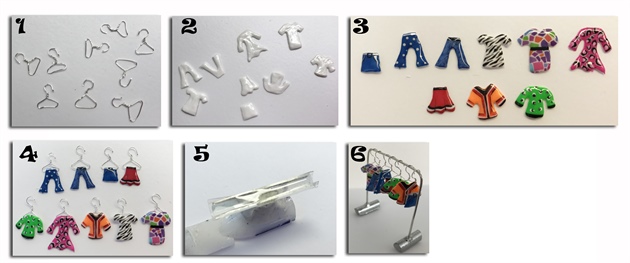
African Fashion. 1. Bend metal wire into shape to create hangers. 2. Using a white gel paste, create your outfits. Gel paste is easy to work with as it has a great consistency remains where you place it. 3. Add some color to the outfits using gel polish, striping tape and water transfer tattoos. 4. Hold the clothing in place on the hangers with a bead of LED builder gel. 5. Using half a brush cap filled with LED builder gel, create the legs of your clothing stand. 6. Drill a hole into the legs of the clothing stand and insert a metal wire held into place with LED builder gel.
7
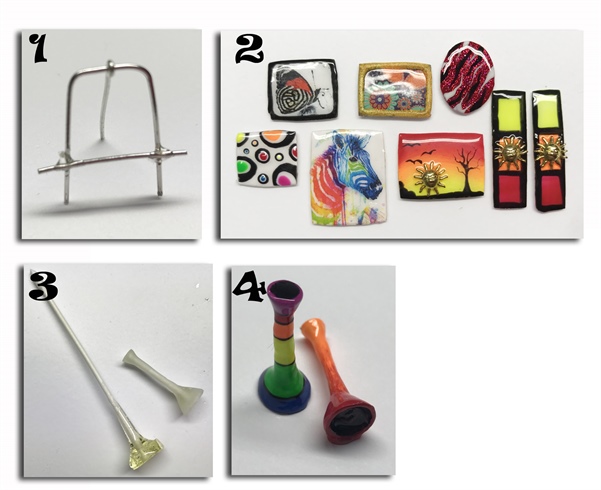
African Art. 1. Create an art stand by bending wire into shape and holding it in place with a bead of LED buildr gel. 2. On a background of LED builder gel, create various pieces of art using gel polish, water transfer tattoos and embellishments. 3. This unusual item is called a “vuvuzela” and became popular during the World Cup. It is created using earbuds and LED builder gel finished with gel polish.
8
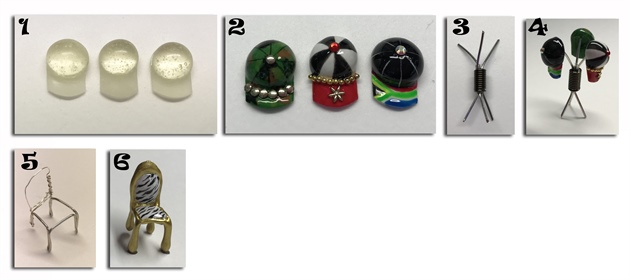
Souvenirs. 1. Create caps with big beads of LED builder gel. Cure. Create the peak of the cap with a thinner layer of LED builder gel. 2. Decorate the caps with gel polish, bullions and rhinestones. 3. Create a cap stand using three pieces of metal wire held together with a wire bead and LED builder gel. 4. Hold the caps in place on the cap holder with a bead of LED builder gel. 5. The chair structure is created with metal wire that is then dipped into white LED builder gel. 6. The cushions on the chairs are created by using beads of LED builder gel and the chair is decorated using gel polish for a real African feel.
9
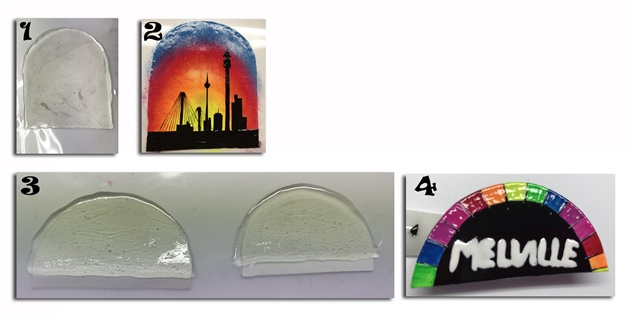
Background. Johannesburg is often called “City of Gold” as it was here many years ago that gold was discovered. Another reason is for the beautiful golden sunsets over the skyline of Johannesburg with hints of gold. Many thought this was caused by the dust of the mines. 1. The skyline was created on a plastic sheet using LED builder gel. 2. Using various colors of gel polish I sponged the colors through one another to create a real sunset. After curing I sponged a small amount of gold into the yellow and orange layers to create the “City of Gold” look that Johannesburg has become well known for. The skyline was created using black gel polish. Sign Boards. 3. The base of the sign boards were created using LED builder gel. 4. After filing these into shape I decorated them with gel polish.
10
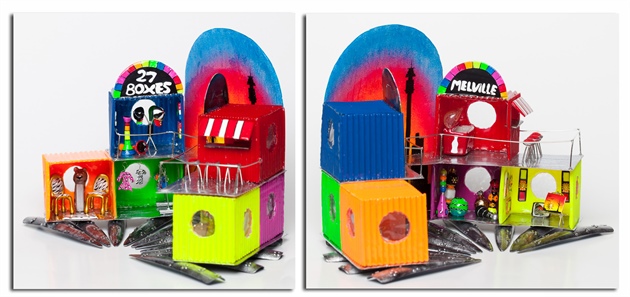
Here are the views of the shops from different sides. The floor of both levels of the buildings were created using LED builder gel and finished off using a silver gel polish.
3 Artists like this Photo
Write a Comment
Submit