CND Final Challenge Part 2 - Theme: Lace - Manus x Machina. Man-made vs machine made processes.
Quite honestly the first think I think about when I think about lace is a design that is sweet, feminine, sometimes even slightly seductive, however after looking at the images of inspiration for this design, I knew I could go a little bit more dramatic with it.
On that note, I have chosen to go for more drama in my lace look. I have incorporated dramatic colors in blacks and greens, enhanced with gold. I have worked with holographics in the chrome elements as well as in the lace elements. I wanted to create a look that is seductive, but not sweetly seductive! This is a design that may be worn by a strong, confident woman, someone not afraid to show that she can be feminine…in theboldest, funkiest kind of way!
I have chosen to incorporate flowers in the design as this is often seen in lace designs, however, not only are they incorporated into the design to create lace, but certain elements of the flower are created with lace too.
In order to create the lace elements in my design I have decided to use a combination of techiques to achieve the lace goal. I have created lace through:
1. Stamping lace designs with lacquer.
2. Dusting designs with chrome to give one a negative lace look over stickers.
3. Lace impressions created with the use of monomer and polymer.
4. Lace structure using 3D pen enhanced with Shrinking Plastic flowers.
5. Embossed lace using Foil Design Gel.
For unconventional items, I have used the following:
1. Netting used in packaging of fruits and toys.
2. Metal wire.
3. Beading caps.
For machine-made items I have used the following:
1. 3D pen to create a lace structure.
2. Shrinking Plastic to create flowers.
3. Pieces of lace to create the petals and for creating the impression in the polymer design.
Andrew Bolton, curator in charge of The Costume Institute mentioned in one of his interviews with the designers from the Manus X Machina exhibit, that it was essential that there should be a seamless integration of the two processes – man-made vs machine made. In order to do this I used machine made items (lace) in order to create an impression on the man-made design (acrylic polymer). I hope looking at this design that it evokes just that feeling within you. Where does the man-made process stop and where does the machine-made continue.
Wishing you great pleasure in viewing the design.
View my points of inspiration on: https://nl.pinterest.com/traceyleenails/ntna-cnd-challenge-2-manus-x-machina/
Step-by-Step Nail Art Tutorial
1
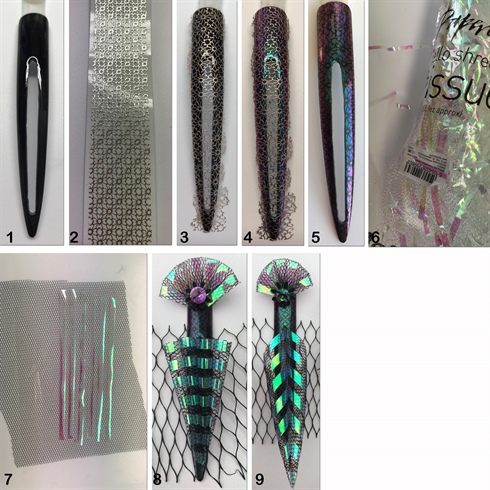
1. Using an electric file drill a hole in the tip. Cover with black LED gel. Cure. Seal with No-Cleanse Top Seal. Cure. 2. Select a lace design Filigree Strip. 3. Place Filigree Strip over the cured tip. 4. Dust with Holographic Chrome Powder. 5. Remove Filigree Strip to show off the lace design. Seal with No-Cleanse Top Seal. 6. For the holographic effect I used shredded Tissue Paper used in wrapping gifts. 7. Attach the shredded Tissue Paper strips to a piece of lace using glue. Allow to dry. 8. Fold the lace enhanced with shredded Tissue Paper and secure them into the hole in the tip with LED Gel. Enhance the design further with the same technique at the cuticle area and finish off with a rhinestone.
2
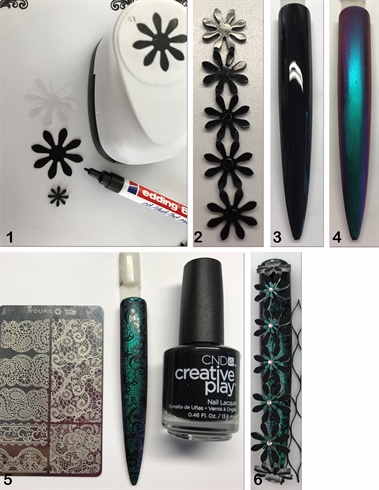
1. Using a paper punch with a floral design, cut out shapes on Shrinking Plastic. Color them in using a black Marker. Place in the oven for a few minutes and they shrink to 1/3 of the size and 9 times the thickness. 2. Attach these together with LED gel to make a lace string. 3. Cover a tip with black LED gel. Cure. 4. Dust on Holographic Chrome powder and seal with with a Top Gel. Cure. 5. Using a lace stamping place and CND Creative Play Black and Forth, stamp a lace design over the entire surface of the tip. Seal with No-Cleanse Top Seal. Cure. 6. Final design with lace stamped background and arched lace strip over the surface enhanced with rhinestones.
3
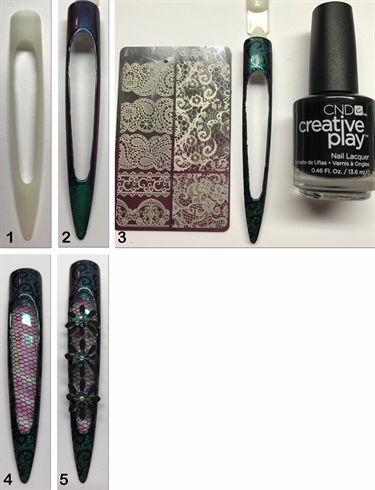
1-3.Using the same technique as the previous step, stamp a lace design over a tip that has a whole drilled through the center of it. 4. Insert a piece of lace enhanced with the Shredded Tissue Paper underneath the hole and secure into place with LED Gel. Cure. 5. Attached the Shrinking Plastic Flowers over the hole and secure into place with LED Gel. Cure.
4
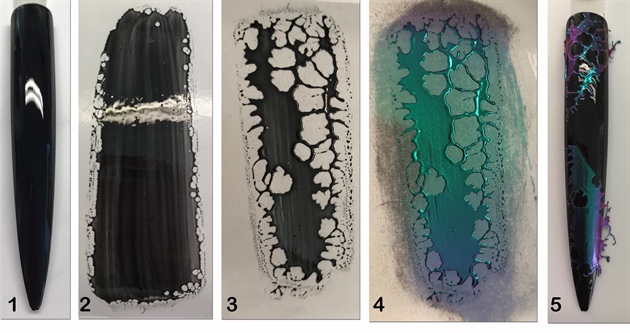
1. Cover a tip with black LED Gel. Cure. 2. Brush a thin layer of black LED Gel onto a piece of form backing or baking paper. Do not cure. 3. Wait a few minutes while the black LED Gel starts to shrink, creating a netlike/lace effect. When the desired effect has been created, cure. 4. Dust the netlike gel effect with Holographic Chrome Powder. Seal with a Top Gel. Cure. 5. Peel the netlike gel off the paper backing and place it onto the black tip. Seal with No-Cleanse Top Gel. Cure. This creates the background for two more of your design tips in a lace effect.
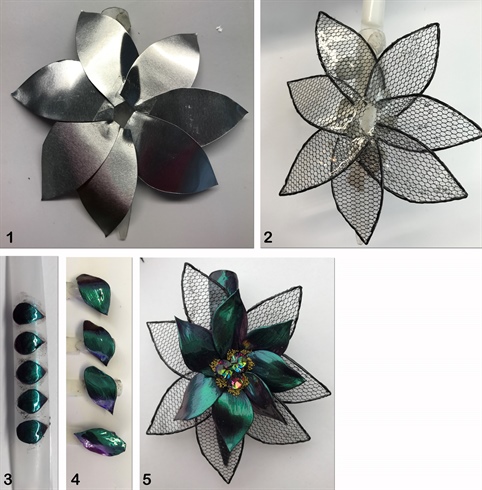
5
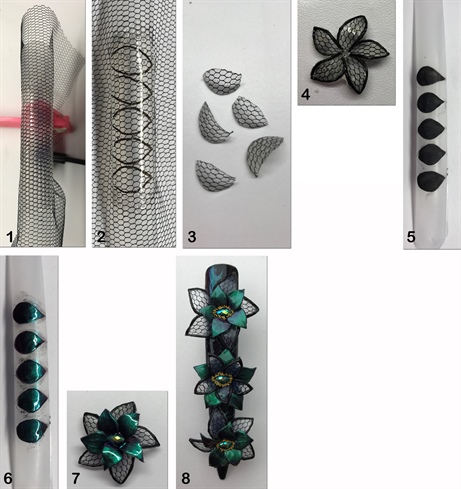
1. Using Arabella Forms to create a curved shape to petals of a flower, place a lace strip over the Arabella Form and hold it into place with pinching clamps. Apply a thin layer of Clear LED Gel over the lace. Cure and cleanse. 2. Draw out the petal shapes on the cured lace. 3. Cut the petals into shape. 4. Enhance the edges of the petals to resemble an embossed lace using Embossing Gel. Cure. Secure into the shape of a flower using Clear LED Gel. Cure. 5. Once again using Arabella Forms to create curved shapes of a petal, create more petals using Black acrylic polymer. 6. Apply a thin layer of Black LED Gel to the petals, cure and dust with Holographic Chrome Powder. Seal with No-Cleanse Top Seal. Cure. 7. Attach the petals on top of the lace petals using Clear LED Gel. 8. Enhance the flowers with matching holographic rhinestones and gold metal beads. Attach these ontop of the tip created in the previous step.
6
1. This particular flower has petals hanging off the edge of the tip and the other side lifting up above the tip so it is necessary to first create the shapes using foil strips to get the correct shapes. 2. Apply a piece of lace onto the metal petal and using the same technique as above, seal the lace with Clear LED Gel. Cure. Cut into shape and emboss the edges using Embossing Gel. Cure. 3. Create larger petals on the Arabella forms using Black LED Gel, however before they are fully polymerized, bend these into shape. 4. Cover the petals with Black LED Gel. Cure. Dust off with Holographic Chrome Powder and seal with a No-Cleanse Top Seal. 5. Attach the petals, rhinestones and metal beads into place using Clear LED Gel. Attach the flower to the second tip created with the netlike background.
7
1. Create two more tips using the stamping technique discussed above. 2. In order to enhance the lace effect even more, trace the lines of the lace using a Black Foil Design Gel. Cure. Press onto the design using Gold Transfer Foil which transfers the gold foil onto the tacky layer of the Black Foil Design Gel. Seal with No-Cleanse Top Seal. Cure. 3. I am using a rhinestone from an item of clothing. 4. Cover the rhinestone with Black LED Gel. Cure. Dust off with Holographic Chrome Gel. Seal with No-Cleanse Top Gel. Cure. Now the rhinestone is exactly the right color for my design. 5. Create two lace arches using the Shredded Tissue Paper strips as explained above. 6. Stitch the arches together to create a frame for the rhinestone. Attach the frame and rhinestone to the Gold Lace Embossed base using Clear LED Gel. Cure.
8

1. Attach two pieces of metal wire together using Clear Polymer to secure them. 2. Using a 3D pen, wrap the heated plastic filament around the arches to create a basic lace structure. 3. Enhance the lace structure by securing Shrinking Plastic Flowers to the filament with resin. 4. The final design from an angle to show off the lace arch. 5. 3D Pen used to create the lace structure.
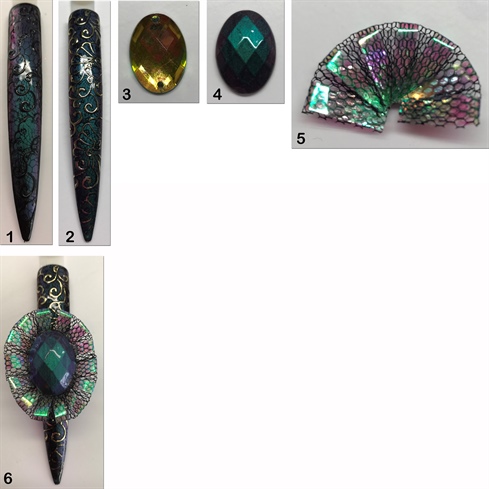
9
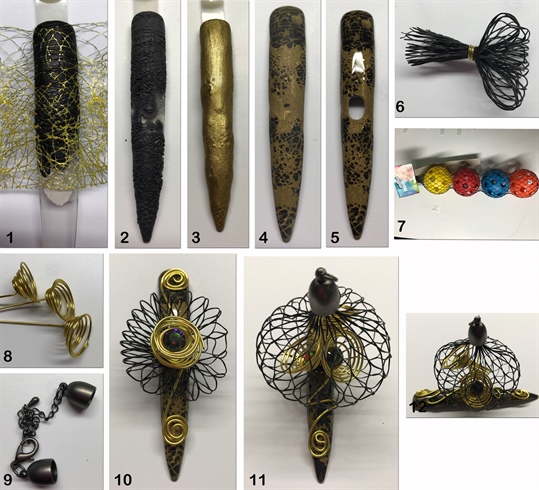
1. To create another lace effect, apply a bead of Black polymer to the nail tip. Once the polymer bead starts losing its shine, impress a piece of lace into it. 2. This tip shows off the lace impression in the polymerized nail. 3. Seal the entire tip using a Gold polymer. 4. File the entire nail into shape, filing through the Gold polymer to show off the impressed design underneath. 5. Seal the design with a No-Cleanse Top Seal. Cure. Using an electric file, drill a hole through the center of the tip. 6. Fold a piece of packaging netting in two and secure it with a piece of metal wire. 7. The item I finally found with the black net I was looking for. 8. Bend three pieces of wire into circular shapes to imitate flowers. 9. Beading clasps used for the top of the design. 10. Insert the wire net and metal flowers into the hole created in the tip and secure into place with Clear LED Gel. Further enhance the design with Filigree curls created from metal wire and insert a rhinestone. 11. Using the netting, create a lace bulb. Hide the ends of the net at the top with the beading clasp shown in picture 9. 12. The view of the tip from the side angle. I used the same package netting to attach the four fingers on each hand together. The netting is flexible and stretches as the fingers are spread apart.
7 Artists like this Photo
Write a Comment
Submit