The meaning of toile is a prototype or test garment/item. From the inspirational images we received, toile (the linen fabric) is used to determine the right flow, fit, and finish of the garment. So with that in mind, I have interpreted toile in this set of nails as a prototype for a design I envision. I have used some fabric to create flow, but have also used the very basics of nail products to create the prototype. I have decided to take a risk and adjust my color palette to the basics (nudes and white) as one would do in clothing, to focus on the design itself, its movement, its flow. This would be the test design, the color selection would come later. I hope you enjoy the flow of my toile and experience the various possibilities it offers within the elements of layering and movement.
Step-by-Step Nail Art Tutorial
1
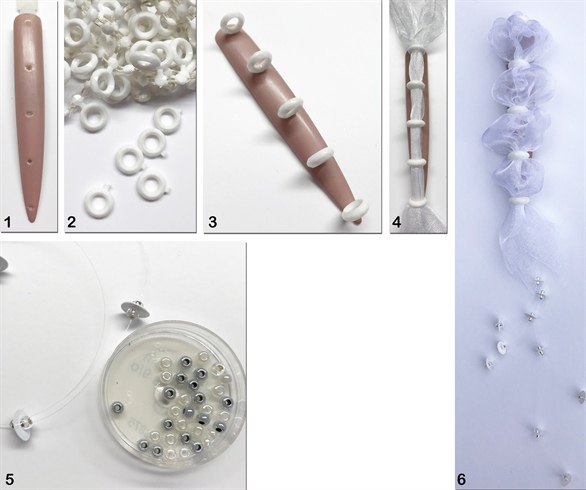
1. Coat your base tip with a natural colored gel polish and finish with Matte Top Coat. Drill 5 evenly spaced holes with the electric file. 2. Cut off 5 rings from the beading strip, maintaining a piece of the neck. 3. Insert and secure the rings with LED Clear Gel. 4. "Toile" may also be a translucent fabric, so I incorporated that into the design. Feed your translucent fabric through the rings. 5. Create floating beading by securing two beads around a sequin onto a transparent thread. Secure these at the bottom of the tip. These will create extra movement on the model as she walks. 6. Pull the translucent fabric evenly through the rings and open it out to create tufts of fabric.
2
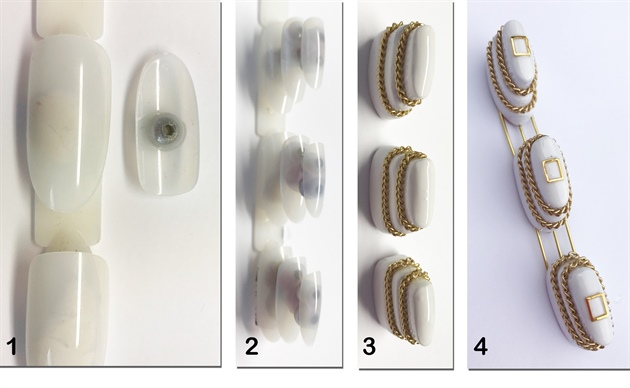
1. Select 3 tips size 1, 3 tips size 5, 3 tips size 9. 2. Place one of each of the tips on top of one another with a bead between each to create height. 3. Fill in between the tips with a clear polymer to create a layering effect. Coat with White LED Gel. 4. Enhance the layers with metal chain. Secure the tips into a straight line using metal wire attached with clear polymer.
3
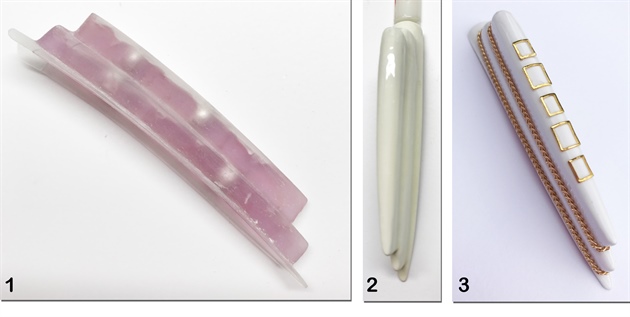
1. Using the same technique described above, create one large, layered tip. 2. Coat with White LED Gel. 3. Enhance with metal chains and embellishments.
4
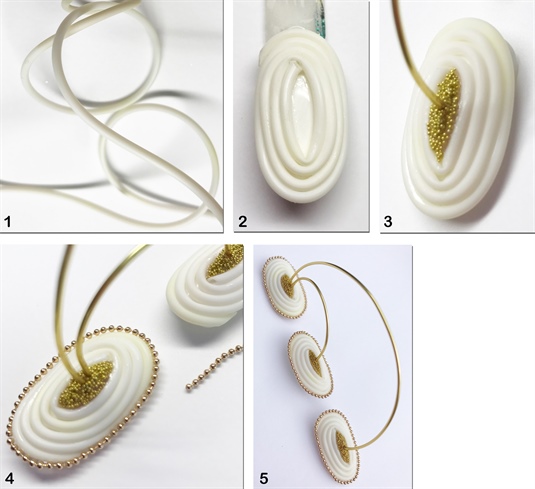
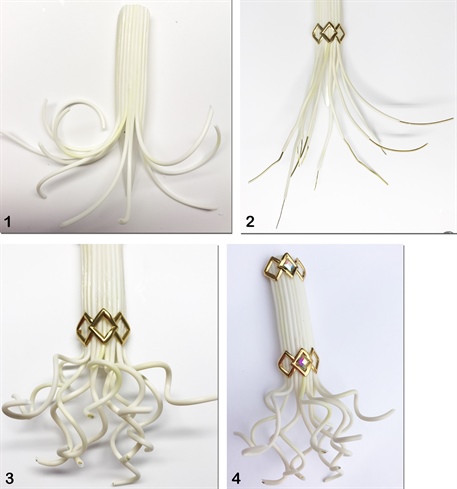
1. Continuing in the layering theme, I dug out some wacky wire to use in my next tip. 2. Using a shorter tip sealed with White LED Gel, I secured the wacky wire in a circular formation with Brush On Resin. 3. Hold the tips in place with metal wire, bent into arches and secured into place in the center of the tips with Clear Polymer. Fill the center of the tip with Clear LED Gel and fill with metal bullions. Cure. 4. Enhance the design with metal chain secured into place with Clear LED Gel. 5. Love these tips in motion as they bounce along as the model walks.
5
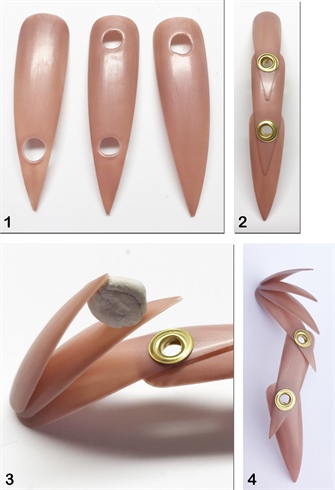
1. This particular design was inspired by Marian Newman. Using 3 medium stiletto tips, create holes with an electric file to insert metal eyelets. 2. Secure the tips to each other using the eyelet system. 3. Add some additional layering by placing 2 slightly smaller tips on top of the base tip. These are secured into place with Clear Polymer and positioned while polymerizing with Blue Tack. 4. This tip offers some layering and movement/flexibility.
6
1. Secure the wacky wire to a tip using Brush On Resin. Allow for extra length at the bottom of the tip. 2. Insert metal wire into the bottom of the wacky wire. 3. Using a pinch stick, twist/curl the wacky wire (with metal wire in it) into wavy shapes. The metal wire allows the wacky wire to maintain its shape when finally bent into shape. 4. Enhance the design using metal clasps with a rhinestone insert.
7
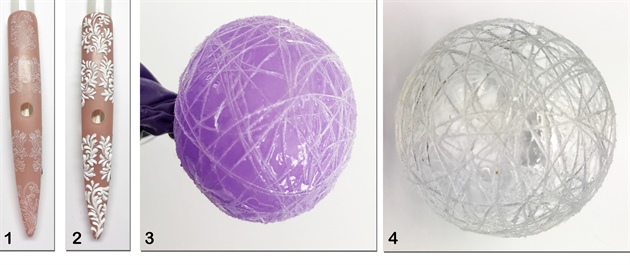
1. Using the nude gel polish, apply barok water decals to the surface and seal with a Matte Top Gel. I chose this look as another meaning for “toile” is a repetitive pattern, so I have incorporated it in this way into the design. 2. Using Gel Paste, create a 3D look to the barok decal. I have done this in two layers to create additional depth. The Gel Paste has a great consistency for 3D enhancement. Cure. 3. Blow up a balloon to use as the mold. Using white sewing cotton, dip the thread into Clear LED Gel and wrap it around the balloon continuously to create a weblike structure. 4. Cure the and remove the balloon, leaving you with a webbed ball. Cleanse.
8
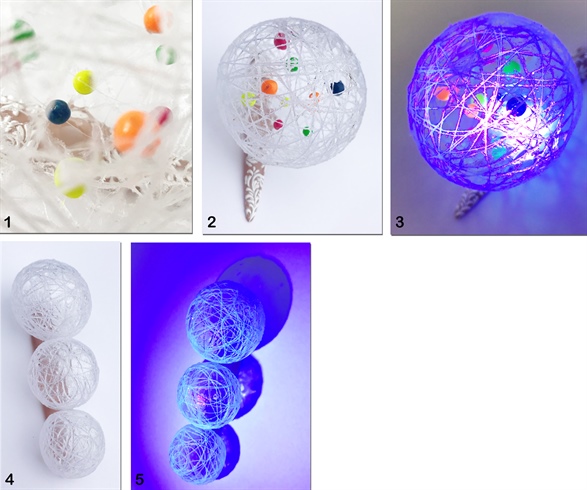
1. Coat multiple sized beads with neon gel paint and attach them to transparent sewing thread. Secure these inside the webbed ball. 2. Attach the ball to the tip and secure into place with Clear LED Gel. 3. The purpose of using the neon gel paint and white cotton is for the cool effect it creates with LED lights. 4. For the second tip, the balls were created in the same way. 5. With LED lighting. Another meaning for "toile" is weblike structure, so I decided to create these nails with that in mind.
9
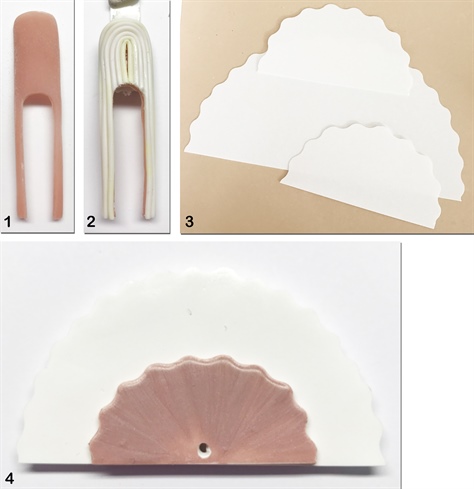
1. Cover a tip with Cover Peach Polymer. Using an electric file shorten the tip and create a “U” like insert in the tip. 2. Attach wacky wire to the tip using Brush On Resin. 3. Cut out one larger and two smaller semi-circles with Shrinking Plastic. Bear in mind when placed in the oven they become 3 times smaller and 9 times thicker. 4. Coat the smaller semi-circles with nude Gel Polish and finish them with Matte Top Gel. Secure one on each side of the larger semi-circle using Brush On Resin and drill a hole through the middle.
10
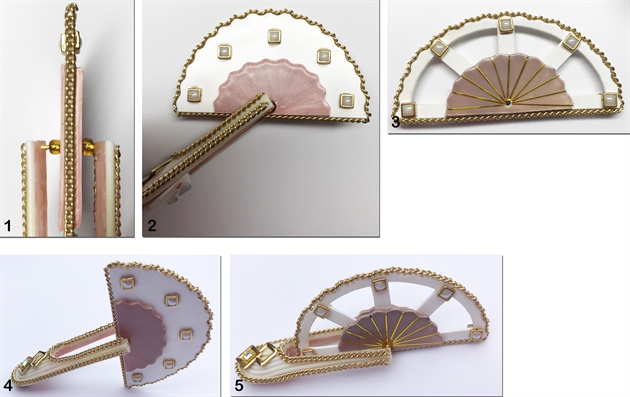
1. Insert a piece of metal wire through the semi-circles. Place a small bead on each side to allow for easy movement of the design. Secure the metal wire to the ends of the tip with Clear Polymer. 2. Enhance the design with metal wire and rhinestones. 3. This is the design created in a similar way for the second tip, with the addition of striping tape. 4-5. Both tips with a moving insert. These inserts will rotate as the model changes position of her hands.
2 Artists like this Photo
Write a Comment
Submit