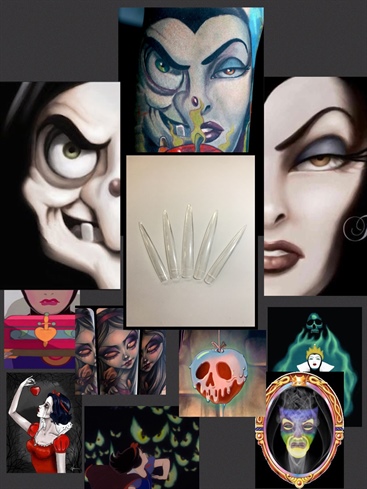
With Halloween approaching fast, Swarovski and Nails Magazine couldn’t have asked us to create a better project for Next Top Nail Artist Season 5 pre-challenge #1, Bewitching Hour. We were asked to create Halloween nail art based on our favorite witch using several techniques that included hand painting, 3D elements, and the beautiful crystals sent to us from our sponsor Swarovski. Being able to use a variety of techniques for the start of this season was definitely a great way to showcase all of our artistic abilities!
Step-by-Step Nail Art Tutorial
1
1) Get that creativity going and arrange the tips in a crown pattern\n2) Search the internet and Pinterest for inspiration photos\n
2
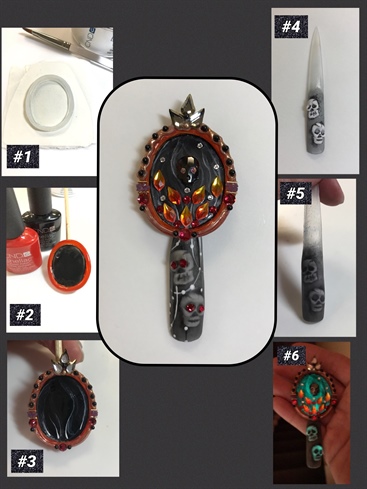
1) To begin the magic mirror creation, use builder gel to create the outline and backing of the mirror on the shiny side of a nail form. Cure. Use your e-file, handful, and a buffer to smooth out your 3d gel design.\n2) Use gel polish to paint your base colors, and cure.\n3) Using white gel polish, create a smokey marbled look by adding lines of white gel polish, and using some alcohol to bleed them out, and cure.\n4) Create a background using colored acrylic, and then sculpt 3d skulls using white acrylic. Hand paint some black accents around the skulls using black gel polish.\n5) Using a technique I saw from Naio Nails, add some black gel polish to your acrylic monomer and mix well. This will give your clear powder a smokey grey color when mixed together. Now encapsulate your 3d skulls with clear powder using the tinted monomer. Hand file or e-file and buff as needed.\n6) Add some glow in the dark gel polish to the skulls and magic mirror. Apply a matte finish top coat to the nail and mirror. Start adding your Swarovski crystals, I like to use builder gel to attach mine. Add in some linework, finished off with more matte finish top coat, and now check out your cool design in the dark!\n
3
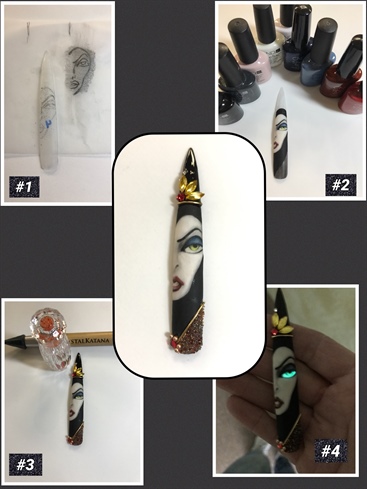
1) Etch the nail with a hand file. Create a transfer image by tracing your inspiration photo onto tracing paper, using pencil, color the backside of image you traced. Now apply tracing paper image to the top of the nail tip and retrace image onto the nail.\n2) Using gel polish, hand paint the Evil Queen’s face and surrounding black mask and gown. Cure in-between when you start to get desired affects. Apply gel top coat and lightly buff to a matte finish.\n3) Using a Crystal Katana, apply the Swarovski crystals and Swarovski crystal pixies.\n4) Don’t forget the glow in the dark gel polish on the Evil Queen’s eye!
4
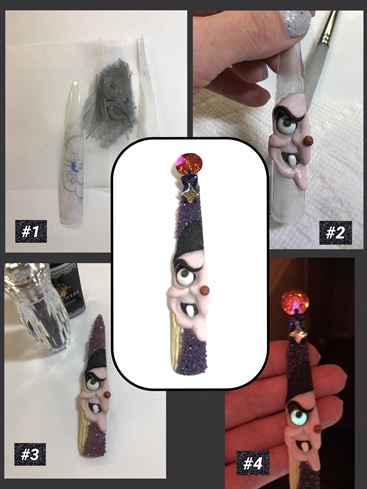
1) Use the same image transfer technique as stated for the Evil Queen’s face in Step 3.\n2) Using a variety of colored acrylic, start creating the 3d Old Hag.\n3) Add the beautiful Swarovski Crystal Pixies.\n4) Add glow in the dark polish to her eye, and finishing touches with MORE Swarovski crystals.\n
5
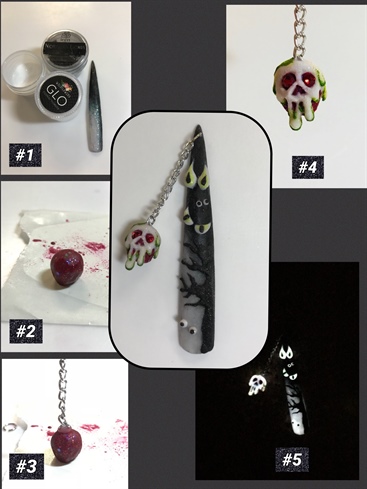
1) For the dark forest, create an ombre effect using a custom white glo acrylic and glittery black acrylic.\n2) Create and shape an apple using custom glitter acrylic.\n3) Attach a chain using clear acrylic.\n4) Create the poisoned apple by adding white glo acrylic using a small 3d acrylic brush. Carve out the details of a skull face and add some green acrylic around the edges.\n5) Make a 3d tree using black glitter acrylic, add in some acrylic 3d eyeballs, and don’t forget more glow in the dark polish on the eyeballs! Attach the poisoned apple to nail as a piercing, and add some Swarovski crystals for some finishing touches!\n
6
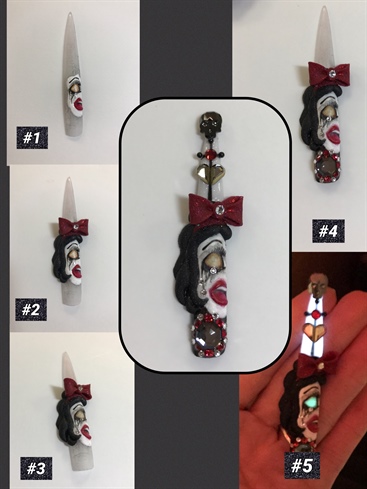
1) Use the image transfer method again to begin the creation of creepy Snow White. Begin hand painting her face, runny messy makeup, and creepy zombie eye using gel polish. Make the lips 3d by using builder gel.\n2) Using black glitter acrylic, create the 3d hair. Using custom red glitter acrylic, create a 4D bow on a nail form, apply a Swarovski crystal in the middle, and apply to the nail using some clear acrylic.\n3) Apply matte finish top coat. Add Swarovski crystals as tears running down her face.\n4) Add more Swarovski crystals to appear as if her heart is now hallow at the base of the nail.\n5) Add in some white glo acrylic at the top of the nail, along with some hand painted lines and Swarovski crystals to form the dagger which keeps the box locked to her heart after it is ripped out from eating the poisoned apple. (Remember, this is creepy, and she is NOT the star of this theme, hehe) Don’t forget the glow in the dark gel polish for her eye!\n
7
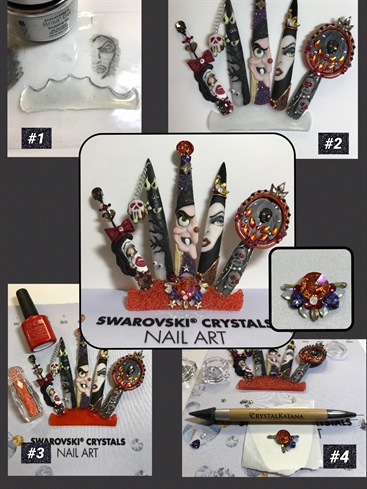
1) Create a base of a crown, which will hold all the nails and complete the Evil Queen's crown look, using builder gel. Draw a sketch of the crown on paper, put it a baggie, and use builder gel to build the piece. Cure. Shape and refine using your e-file and hand file.\n2) Attach the nails using clear acrylic.\n3) Paint the base using gel polish. Add the Swarovski crystal pixies to the entire base.\n4) Using a Crystal Katana, builder gel, and the shiny part of a nail form paper, start to build the jeweled center piece for the crown. Attach to the crown using clear acrylic
8
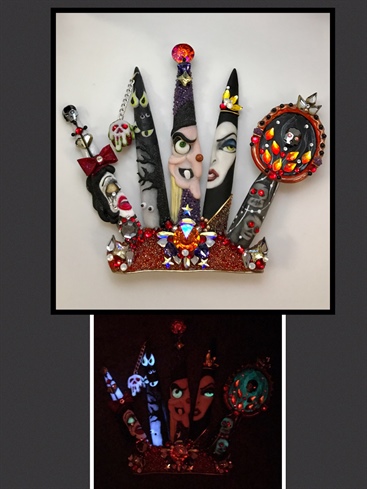
1) Add in some finishing touches with more Swarovski crystals. And don’t forget to get a picture of your glowing creepy masterpiece, after all, witches and Halloween are all about being creepy as well!
10 Artists like this Photo
Write a Comment
Submit