Welcome to the 1970s, where everything is groovy and out of sight! The seventies was a time that was full of peace-making amid war and individuals trying to gain rights in the United States. Disco was the popular music genre of the 1970s and that is what gave me the inspiration for my designs. I wasn’t able to experience this time in history, but some my of favorite movies and tv shows were released during this decade and the music totally draws me in. The bright lights and neon colors caught my eye and brought me into the psychedelic vibe, can you dig it? I would have been one of those people during the 70s traveling around in a Volkswagen Bus, going from music festival to music festival to unwind and have a good time. There is definitely enough room in this type of van to fill it with all of your favorite hippy friends and have a wild time. The 1970s was an important time for women’s rights, as we celebrated the 50th Anniversary of the Nineteenth Amendment to the United States Constitution, where women gained the right to vote. Women attained greater success in business, science and education during this decade due to more doors of opportunity being opened for women. I am grateful for the feminist movement during the seventies that has paved the way for me to be the business owner that I am today.
Step-by-Step Nail Art Tutorial
1
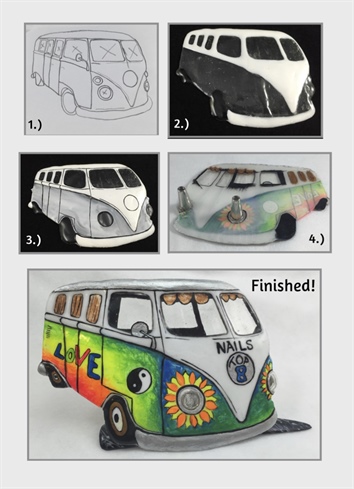
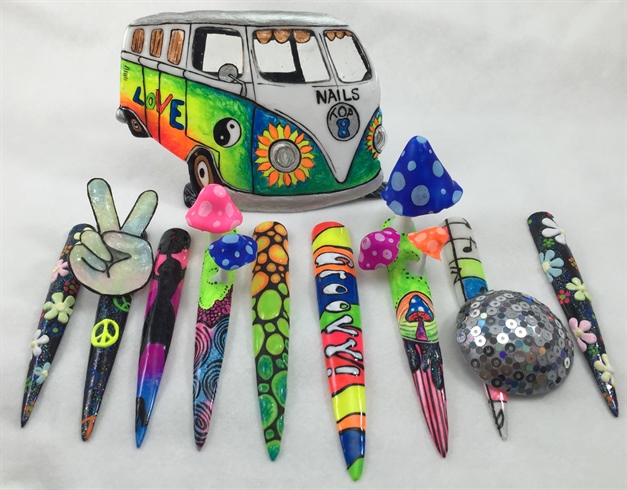
1.) Draw your "skeleton" of the disco bus. I made sure to mark the spots that needed to stay clear with an X, this technique helps give it a 3D effect. Place the sketch under a piece if plastic and cover in builder gel. Cure. 2.) Keeping your sketch underneath for a guide, use white and black gel to begin adding details. Cure. 3.) I added a very thin layer of white gel polish down the center to make sure there is contrast in the to white areas, cure this layer before adding lines. Using black gel paint and a very fine detail brush to add lines. 4.) Add color to the front, cure and flip. Adding the details on the back in the clear spots will make it look like it is on the inside of the van. Metal beads are added to keep the LED light contained so it only shines through the headlights on the front. The finished disco van is added to a nail tip to look likes its driving down the road.
2
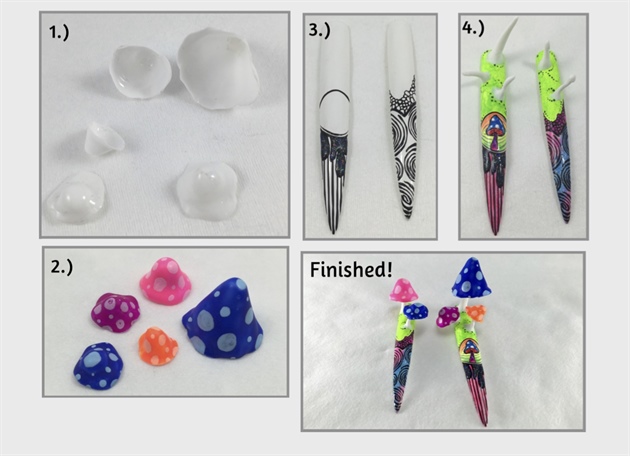
1.) Form modeling material into the mushroom cap shape and cover in white builder gel and cure. Cure and pop off the form. 2.) Paint the mushroom caps in psychedelic colors. 3.) Add a groovy design on the end of the nail tip with black gel and a fine detail brush. Cure. 4.) Paint the entire nail with different neon colors and using "lace paste" to form the mushroom stems. Can you dig it?
3
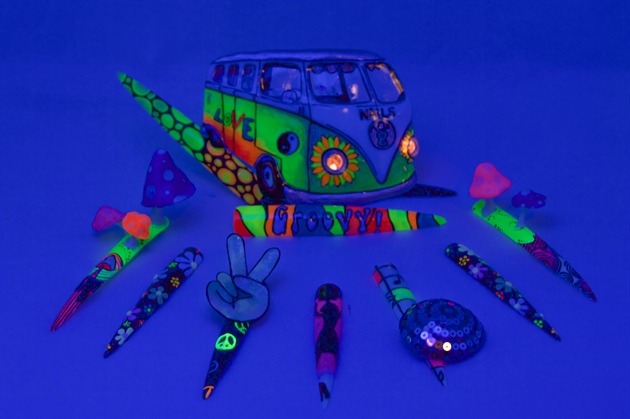
Cool man! Those mushrooms have me buggin' out. Walking in to the disco and seeing the color change under the ultraviolet light was probably beyond cool.
4
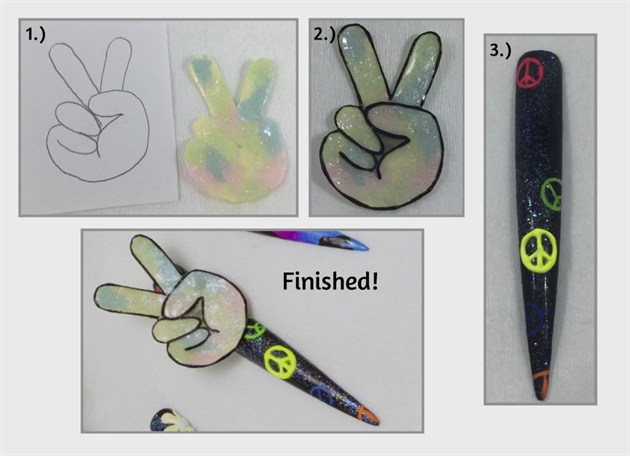
1.) Sketch a hand giving the peace sign, place it under plastic and cover in white gel and cure. Using different gel polishes, color the shape making it look tie-dyed. 2.) Using black gel paint and a fine detail brush add your lines. 3.) On a black, glitter nail, apply flat peace signs using acrylic paint and make one pop off the nail with pop-up gel. Peace!
5
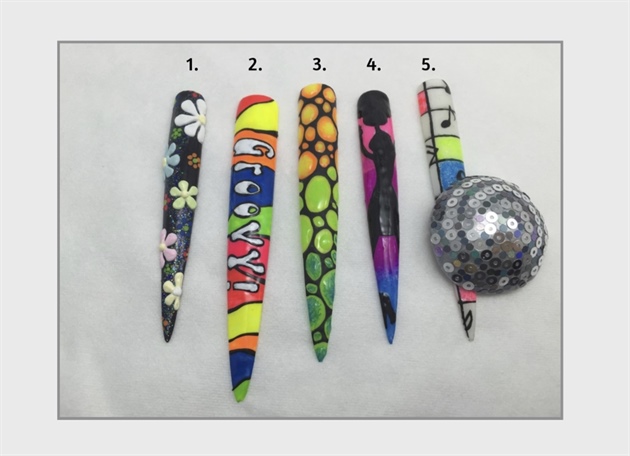
1.) A black, glitter nail with some dy-no-mite flowers. Using acrylic pant for the flat flowers and popup gel for the psychedelic flowers that are coming at you. 2.) GROOVY all painted with acrylic pant and black gel paint for detailed lines. 3.) To create a mind blowing brick road: On a white nail add small circles with black gel from top to bottom. Cure. Fill in all the circles with different neon colors and top with a matte gel topcoat. Cure. Adding a super shiny top coat to the colored part of the circle will give this nail a 3D look. 4.) The disco chick silhouette created with acrylic paint and black gel polish. 5.) Going to the disco. The nail is painted to look like the dance floor with acrylic paint and black gel polish for the details. The disco ball was created by covering half of a round bottle with builder gel, cure, then cot with silver gel polish then sticking sequins to the sticky inhibition layer.
6
Catch you on the flip side!
5 Artists like this Photo
Write a Comment
Submit