This week is sponsored by Gel II and they asked us, based on their product line “Skyscraper”, to recreate the Skyline of our favorite city. If your guessing that I picked my hometown Stockholm, you are absolutely right! I’ve lived here my whole life and I couldn’t imagine living somewhere else. We have a lot of history in our city with old buildings and places and it’s actually listed as one of the most beautiful cities in the world. This is definitely where my heart lies and I’m actually the third generation in my family that has been living here most of their lives. My favorite time of the year is fall when the sun is shining and the nature turn into these amazing colors. The air is fresh and clean and you just want to take a walk with a nice take away tea down by the water and the boats around Djurgården. If you haven’t been here, this is definitely a place to visit!
I chose to recreate some of the most famous buildings and that is usually portrayed in Stockholm skylines. I guess that only a hand full of you have actually been to Stockholm so my first collage contains the pictures of the buildings I’ve recreated.
Step-by-Step Nail Art Tutorial
1
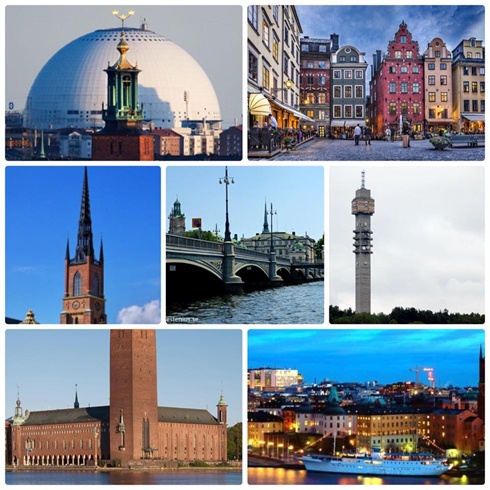
Here you have the different buildings that I decided to recreate (from upper corner left to right): Globe Arena and the City Hall Tower, the buildings in old town, Riddarholmskyrkan, the old town bridge, Kaknästornet, The City Hall (without the tower) and one of the classic boats around Nybrokajen.
2
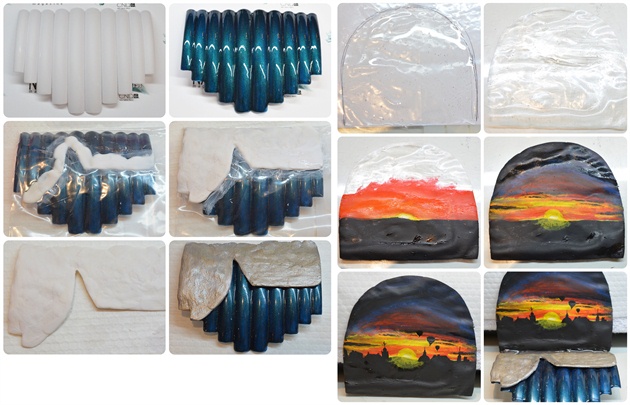
I started off by creating my base. I attached all my tips together and buffed them up and then I painted them with a dark blue shimmery gel color. To make the harbor landing I first did some markings on the tips and then placed them into a zipper bag. I used acrylic and slowly built up my landing piece by piece. I then finished it off by painting it with some grey, silver and brown acrylic paint.\n\nThe back piece was created with gel that I poured out on to a plastic bag and cured. Then I started to paint the sunset using acrylic paint. I also added some extra Stockholm buildings as a silhouette to add to the 3D effect and a typical Stockholm skyline always has a couple of air balloons in it. The last thing to do was to attach the back piece to the base with some acrylic.\n
3
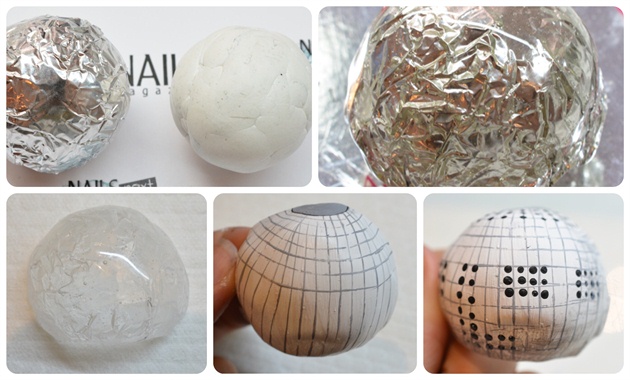
The first building I wanted to do was the famous “Globe Arena” where we’ve hosted everyone from Britney, Madonna, Justin Bieber and Beyonce to Dolly Parton and Bruce Springsteen. I started off with a ball of clay that I covered with some foil. I then dipped it in gel, cured it and scraped the clay out. I used acrylic paint to add color and details.
4
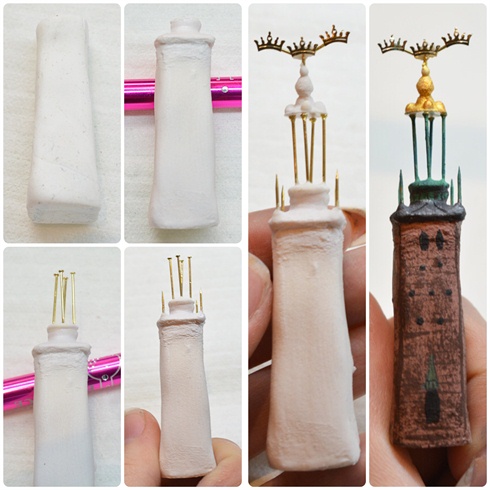
The next building had to be the Stockholm city hall of course! I used the same method as the Globe but used acrylic instead. I started off with a clay mold, covered it with acrylic and scraped the clay out when it was thick enough. I also built up the top of the building using layers of acrylic and then attached a couple of metallic pins that I found at a nail art supply store. Then I attached my crown decoration that I made earlier (see pic 8) and finished with some acrylic paint for the details.
5
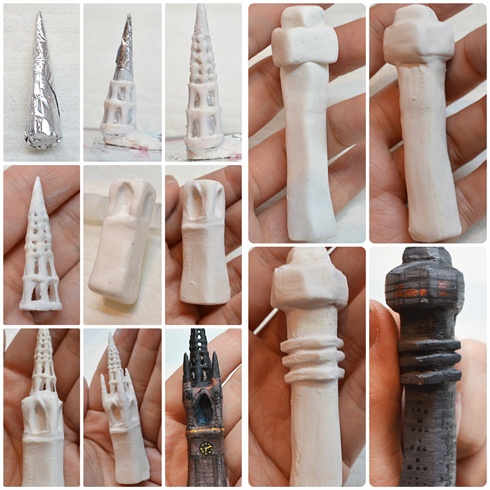
Two other famous buildings are the “Kaknästornet” (Kaknäs tower) and the “Riddarholmskyrkan” (Riddarholms church). Same procedure here as the previous buildings. Creating a clay mold, cover it with acrylic, scraping out the clay and adding color and details with acrylic paint. For the church tower I created a clay cone and covered it with foil, then I slowly built up the shape of the tower using a small acrylic brush and just placing the acrylic where I wanted it. When it was dry I took the clay and foil out and attached it to the church base using acrylic. The details on the tower sides were made with layers of acrylic.
6
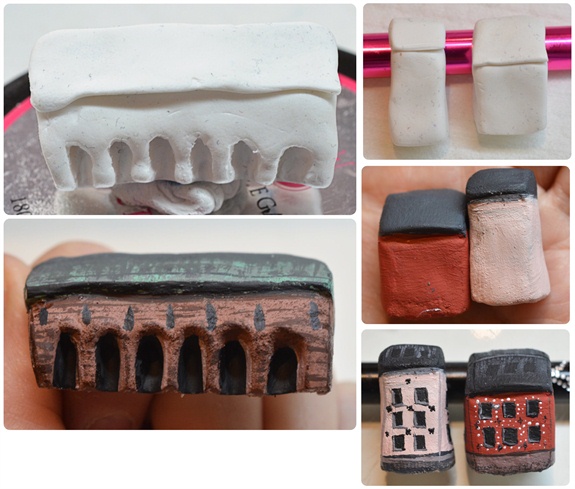
We definitely need some buildings and the second part of the city hall so here’s how I made them. Want to guess? ;) Clay mold, covering with acrylic, scrape the clay out and painting details with acrylic paint. Notice the details on the small houses! They are actual buildings from our old town. The small crosses are where the beams are attached.
7
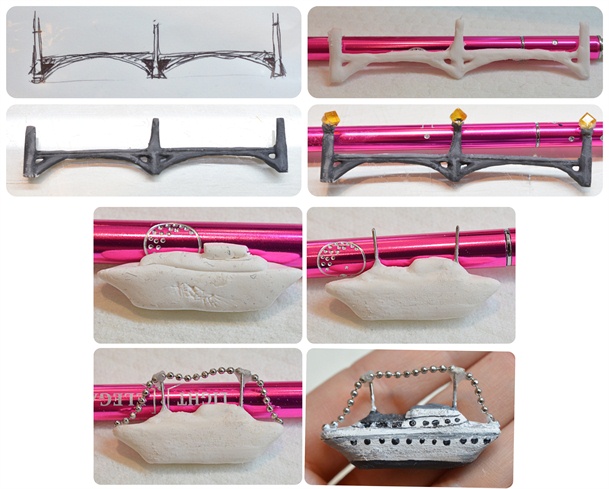
Time for the old city bridge and one of the classic boats from the “Nybrokajen” (Nybro dock), that can take you out into the beautiful islands of the Swedish archipelago. I drew my bridge on a piece of paper and placed it into a plastic bag. Then I used acrylic to sculpt the bridge and when it was dry I started to shape the sides. I painted it with some acrylic paint and attached three cube nail decorations on the lampposts to act as the lamppost lights. I also painted the back of the cube with some yellow acrylic paint to get the right color to shine through.\n\nThe boat was first born as a clay mold, then it grew up to become a hollow acrylic boat. I added two pieces of the same metallic pins as before with some acrylic and then attached a nail art bead chain to recreate the mini light strand. The finish was of course painted with some – yes you guessed it – acrylic paint!\n
8
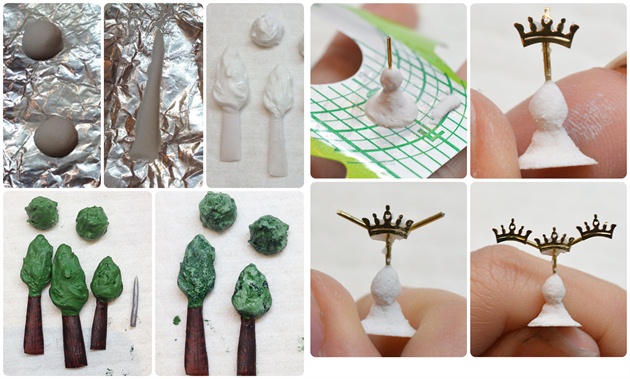
Confused about that crown piece at the beginning? Well here you have it! I created the base using acrylic, added small pieces of the metals pins with acrylic and attached three small crowns. And what is Stockholm – the green city – without some trees? I actually live quit close to the “Kaknästornet” and one thing I love about this part of town is that we have a lot of parks, fields and forests, which is perfect for us and our dog Martin. I created the base of the trees with some acrylic and then I added some white builder gel to create the tree crowns. When it was dry I added my acrylic paints and sponged on different shades of green to add more dimension. Same technique with the bushes.
9
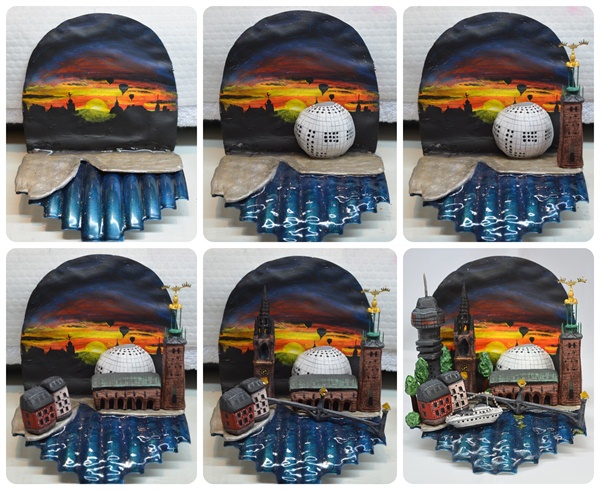
It is time to add all the pieces to my base and background! I also added A LOT of gel to the blue part to act as water and the pieces were attached one by one with some acrylic.
10

But we don’t really have a city without some light, right? That’s why I added a small lamp attached to a small battery on the back to add some awesomeness to the sunset.\n\nWelcome to my home town, Stockholm! :D\n
14 Artists like this Photo
Write a Comment
Submit