This challenge is sponsored by EzFlow and they asked us to create a fantasy set on one hand, taking inspiration from their latest colored acrylic collection Enchantment, which is all about the charm and fantasy of a mythical time and place. We could also be inspired by the color names like “Eternal Youth”, “Unearthed”, “Nature’s Kiss”, Whimsy”, “Forbidden Forest” and “Nymphs & Nomads”.
Up here in the north, we’re all about the myths and tales about the forest creatures and a lot of the stories have their starting point here. I’ve always had a huge fascination for it and as many of you might know, one of the best placed in the world for me is at our vacation house out in the Swedish archipelago. There’s something about the trees, water and forest that just fills me up with more energy than a one-month vacation on a sunny beach.
I decided that I wanted to create my own little mystical and magical forest. A place where I would like to lay down in the grass and just look at all the amazing things around me. My goal was to make it that much magical that you could almost hear the sound of sparkling glitter in the air. So welcome into my enchanted and magical forest! I hope that you’ll become friends with all of my forest creatures and that you’ll find yourself a favorite spot where you would like to sit or lay down and just inhale the soothing and magic energy. And don't forget to look take a closer look.... you might find things that you didn't see the first time.... ;) And don't forget to vote on; http://www.nailsmag.com/nexttopnailartist/2015/challenges/week-10-ezflow
Step-by-Step Nail Art Tutorial
1
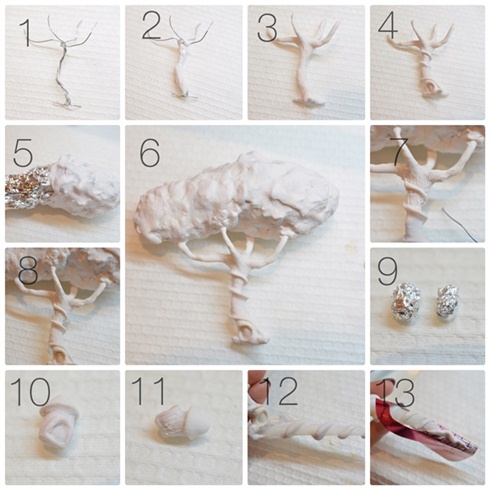
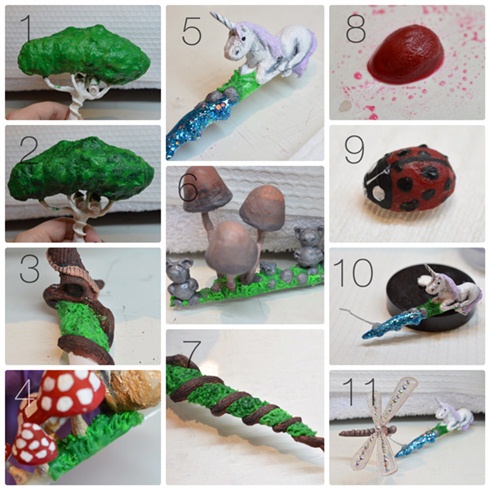
1.I started to build the tree by twisting four wire pieces to form the shape. 2. I then covered stem with acrylic. 3. And the branches. 4. After the whole tree was covered I started to form details like the door at the base and the staircase. 5. The tree crown was made of foil and then covered with acrylic. 6. When it was done I attached it to the stem. 7. To add some details I applied a super thin layer of acrylic and then used a piece of wire to carve out the tree texture. 8. And kept going like that until the entire tree had that same texture. 9. The tree houses were made with small pieces of foil. 10. Then I built them up using acrylic. 11. The texture was done with the previous method. 12. I then attached the tree to the nail tip and made the roots twist around it. 13. To make the roots stretch out past the tip, I used a form and sculpted on top of it.
2
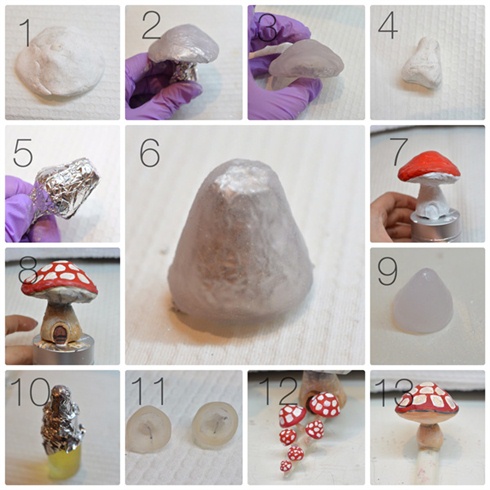
1.This is the top of the large mushroom. I started out with a clay mold. 2. Then I put foil on top of it and covered the top with acrylic. 3. I made the bottom piece of the top the same way, scraped out the clay (to make it as light as possible) and then attached them together using acrylic. 4. This is the foot as a clay mold. 5. Covered with foil. 6. And covered with acrylic. 7. I scraped out the clay and attached the top to the foot and also added a door using acrylic. I then started to add my base colors using acrylic paint. 8. Adding layer after layer to build up a realistic look. 9. The small mushrooms were made in two ways; building it up piece by piece on a form 10. And using the tip of a cuticle oil bottle covered with foil. 11. I attached wire to the hollow ones (bottle method) 12. And then I painted them using acrylic paint and attached them to the tip. 13. This is the second large mushroom created with the same method as the first one.
3
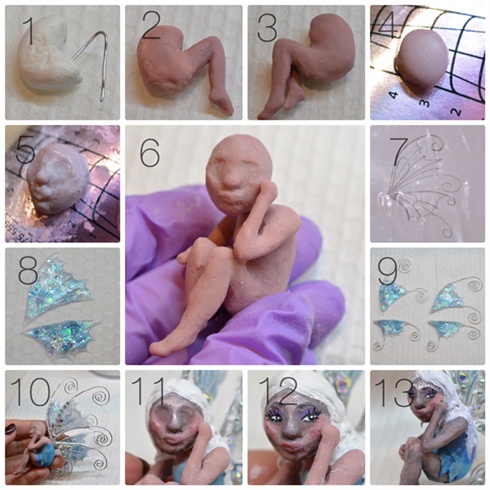
1.Here’s how a made the fairy. I started off with a small piece of clay to form the body and then attached one piece of wire for the leg. 2. I then covered it with some skin tone acrylic. 3. I attached another piece of wire and built up the second leg. 4. I started to build up the face on a form that I attached to my hand. That way the heat from my hand would help the acrylic to set a little bit faster while working. 5. Slowly building up the shape of the face. 6. And attaching it to the body and arms made the same way as the legs. 7. To create the wings I started off by drawing them on a piece of paper and put it in a plastic bag. 8. I then put acrylic on top and added some blue glitter and blue mylar flakes. 9. To add even more magic to the wings I used some wire that I bend to the shape I wanted and attached it to the wings. 10. The dress was made with three different shades of blue acrylic and then I attached the wings to the back. 11. The face is getting there and the hair was made with some white acrylic. 12. Face it done! 13. I finished it off by adding shadows and highlight to the whole piece and some extra facial details.
4

1.I stared to build the unicorn on some foil on top of a tip. That way I could remove it when it was done, shape it and then reattach it to the tip. 2. Building up the head. 3. Added a small piece of wire as the horn. 3. And finished the base with some hair made out of acrylic and cover the horn and then attached it to the tip. 5. The unicorn was brought to life thanks to some acrylic paint. 6. Here I’ve started to build up the stone troll using grey/silver acrylic. 7. Building up the body. 8. Head and nose. 9. And the ears, hands and eyebrows. 10. I then added more stones to the tip and some “hidden” stone trolls…. Can you find them? 11. The dragonfly was made out five acrylic pieces (the body and four wings). 12. Then attached together with some acrylic. 13. And then pimped up with A LOT of bling of course!
5
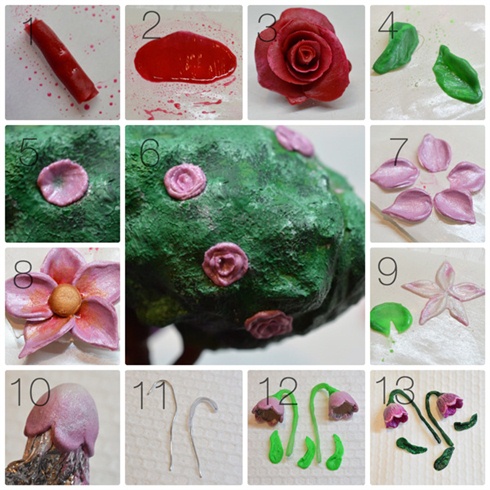
1.The large rose was made out of red acrylic. I first flatted out a rectangle and then rolled it up to create the middle part and then placed it on a form. 2. I then created numerous petals and attached them around the middle. 3. This is how it looked before I added some details with acrylic paint. 4. I then created the two leaves for the rose using two shades of green acrylic. 5. The small roses in the tree were made with small balls of pink acrylic that I pushed out to one large petal (one at a time). 6. Here I’ve added two or three more balls into the rose that I pushed out to the sides. 7. The large flower was created with some pink acrylic and when the acrylic was still a little bit wet I rolled the form and attached it with a small clip to make the petals bend. 8. I attached them using some clear acrylic and added the middle made out of gold acrylic. I also added gold and red acrylic to the middle and created an ombre effect on the petals. 9. This is the water lilly made out of two different shades of green for the leaf and pink together with some white acrylic for the flower. 10. I used the cuticle oil bottle for this flower and built it up with a mix of pink and white acrylic. 11. I then used two pieces of wire that I covered with acrylic. 12. Then covered with some green acrylic (the leaves where made of the same green acrylic) 13. And painted with some acrylic paint.\n
6
1. I painted the tree crown with some green acrylic paint. 2. Then I sponged on several layers of different green shades to add dimension. 3. I painted the whole tree with some acrylic paint and then added texture with some darker shades on top to make to texture appear more clearly. 4. I then started to add the grass to all the tips using two different shades of green acrylic. 5. And some more grass. 6. I added the water to the unicorn nail made of a clear acrylic and glitter mix. I also built up a couple of stones using grey acrylic. 6. Here I’ve attached a couple of mushrooms (created with the cuticle oil bottle method) and added the grass around them and the stone trolls. 7. To add more details and dimension to the grass, I brushed over the top with some dark green acrylic paint. Here you can see the difference (with and without the paint). 8. Here’s the base of the ladybug made out of some red acrylic. 9. And with some acrylic paint details. 11. I then attached a piece of wire to the water. 12 And the dragonfly to the other and to make it fly!
7
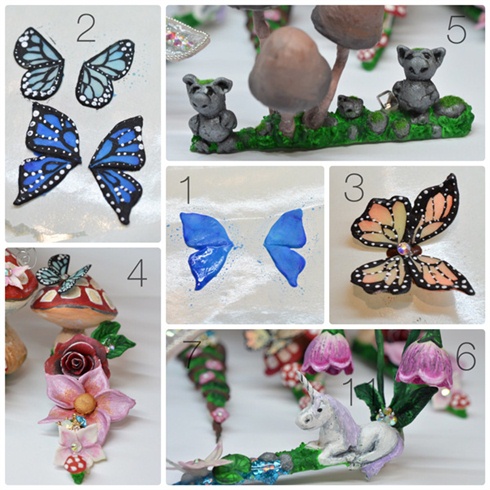
1.Here’s how I created the butterflies. I started of by creating the wings in two pieces using two different shades of acrylic (light blue + dark blue, orange + yellow, white + pink, etc.) 2. I then added details with some black and white acrylic paint. 3. And attached it together with a small piece of brown acrylic and then finished it with a Swarovski of course! 4. Here I’ve attached all the pieces to the thumb nail, painted the rose and the leaves and added a couple of Swarovski crystals. 5. The stone trolls needed some moss in form of green flocking powder (also used as moss hair) and a couple of mystical crystals (two more between the mushrooms). Cn you find the third troll? ;) 6. The two flowers and leaves were attached to the unicorn nail (his name is Steve btw), and he also got a couple of Swarovski crystals.\n
8
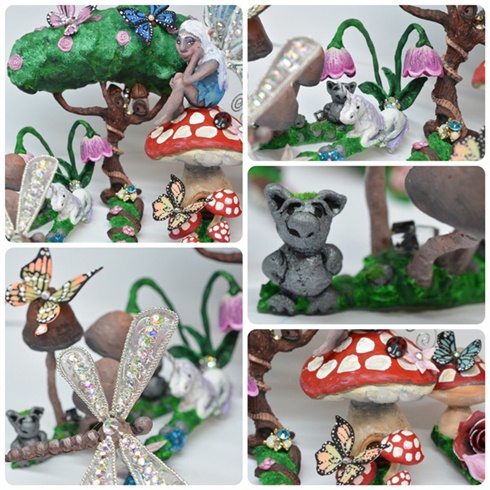
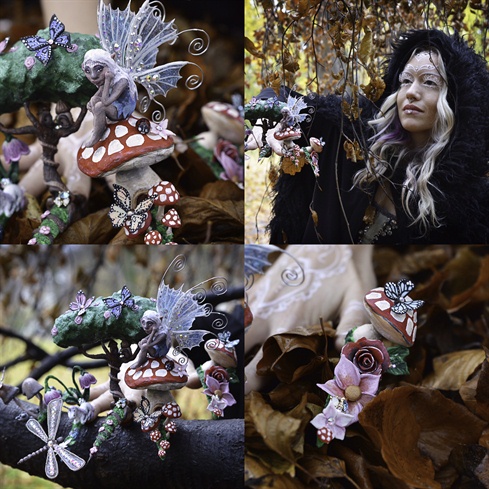
Here you have a couple of detail pictures! Just like the mysteries of the forest, you need to look closely to really see the secrets that lie just past that first glance. \n
9
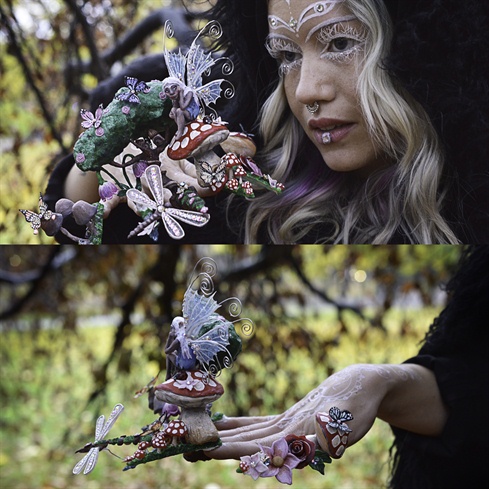
And just as in a real fantasy competition, I decided to go all the way and dress up my model in the same theme with clothes, hair and makeup.
10
I really hope you enjoyed this tutorial as much as I loved creating this set! This is something that I've always dreamt of doing and the feeling is really overwhelming now once I have the pictures in front of me. Thanks for checking it out and don't forget to vote! :D
23 Artists like this Photo
Write a Comment
Submit