Set 1 – What is beautiful to you?
For all my sets I’ve decided to go very personal and spiritual and I really want you to get to know me. The lace and the peacock colors are symbols for “beauty” and then I wanted to add some attitude into the collection, hence the gold metallic. The blue stone is featured through all sets and for me that symbolises my love to nature and even though the natural materials aren’t perfect, they are so beautiful and perfect in so many ways. When I was little my grandma had a fantastic stone/crystal collection and that was the most amazing thing I knew!
The love for stones and crystals has lived on and I still get amazed with all the breathtaking forms, colors and shapes nature is able to create. Also, you may know by know that my family got a house in the middle of the Swedish archipelago hidden in the woods and right next to the water. I love being out there more than anything and a lot of that is because you can really feel all the energy that the nature radiates. Nature has so much to give us if we only let it and you can see the love for stones and crystals on the pinkies in this set.
One other thing that I’m a strong believer in is “The Universe” and “The Law Of Attraction”. If you’re not familiar with it, it’s a way to think positively to attract positive events. To be able to be positive and that “The Universe” can help you with that is very beautiful to me.
On one nail you can find one of my tattoos called “Buddha’s Eyes”, which is a reminder that my dear grandpa is always with me. You can also find a mandala on middle finger, which is a symbol of creativity which is such a huge part of my life and which I’m very grateful for.
Then we have the two arrows that symbolise “chasing after your dreams” and setting up goals. It is something that has always been a huge part of me and I’ve always been that kind of person who loves to dream big.
Step-by-Step Nail Art Tutorial
1

1. Cover the entire nail with black gel/gel polish/acrylic or acrylic paint (I used acrylic paint because these are only tips but you should avoid doing that on a client because it will chip). 2. Use a sponge and add white in the shape you want your galaxy to be. 3. Cover the white with a light turquiose blue color. 4. Add small clusters of a darker shade in the middle. 5. Add a darker shade around the edges of the galaxy. 6. Add an almost black color to fade out the edges even more. 7. Add small clusters of white in the middle (be careful though not to overdo it!) 8. Add a couple of stars (a dotting tool and white acrylic paint). 9. Cover the nail with gel/gel polish with some glitter in it and start painting on your pattern. 10.(middle) Voila!
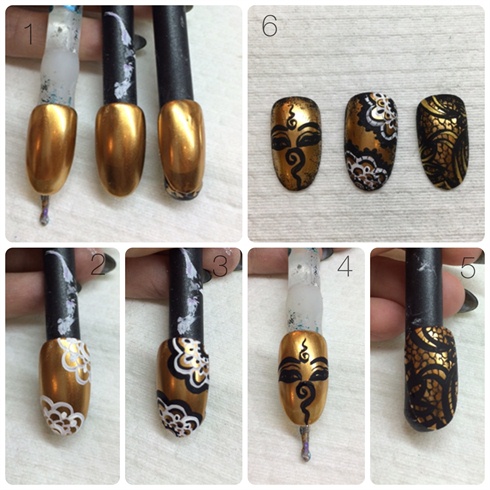
2
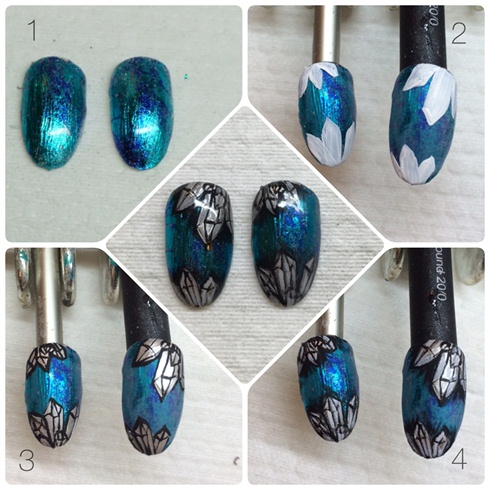
1.(upper left) Apply one layer of foil glue, let it dry for a couple of minutes until it becomes transparent and then add the foil. 2.(upper right) Paint the basic shapes with acrylic paint. 3.(down left) Add details to the crystals. 4.(down right) Add shadows behind the crystals. 5.(middle) Finish off with a top gloss.
3
1. Use a sponge and mix a couple of blue, green and white acrylic paint on to the nail as a base. 2. Add a darker shade around the edges. 3. Sponge on black around the edges. 4. Add small cracks going trough the nail using a small detail brush. 5.(upper right) Paint the pattern using acrylic paint (make sure that the base is completely dry first). 6.(upper left) Add gold chrome gel polish to the edges and cure.
4
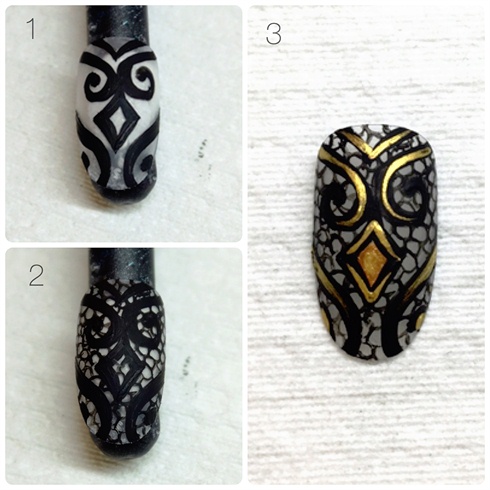
1. Let the nail be transparent and start painting on the basic shapes using black acrylic. 2. Fill it in empty spaces with small circular shapes. 3 Add gold details with some gold acrylic paint or gel polish.
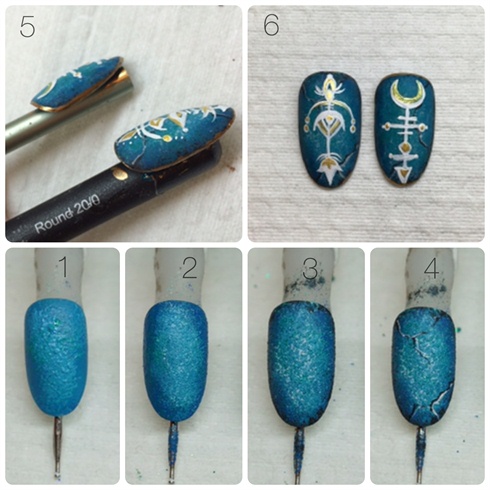
5
1.(upper left) Apply a chrome gel polish and cure. 2. Paint the mandala with white acrylic paint. 3. Add details with some black acrylic paint. 4. Paint the details with black acrylic paint. 5. (upper right) Sponge on some black acrylic paint around the edges to make it look old and worn out. Also add small gold details to the lace nail. Add top gloss if needed (I left it like this to keep the acrylic paint kind of matte on top of the gold metallic).
27 Artists like this Photo
Write a Comment
Submit