This weeks challenge is sponsored by Akzentz! They asked us to create a design on 5 nails based on a vintage fashion piece or period. We were previously sent a package of Akzentz products that they asked us to use for this challenge. However, other embellishments were allowed, but only on 10% of the overall design.
Since Akzentz sent us all of these amazing products, I decided to utilize as many as I could for my project. I had some product from last year I had received, and that helped too. To challenge myself, I first created a set of stiletto nails on myself with Trinity Pro-Performance Gel. All of the products used in this set, except the mesh, feather, and crystals, are from Akzentz
I chose to create my design based on the Edwardian period. An era that I have been enamored with for years and years. My grandfather was a jeweler, and I have inherited pieces of jewelry from family, that fit into this time period. So I have a huge love for the jewelry of this time, being as it was made of large colorful precious stones, surrounded by clusters of diamonds, and hugged by the most ornate filigree gold.
Just as the jewelry was fancy, so was the clothing. With the tight corsets cinching the wastes of ladies who were dressing for daily life in the most beautiful dresses. With so much detail, and sophistication. This carries over to their choice of hats. These amazing, wide, hats, with delicately placed flowers, fabric, bows, and feathers. Worn at a slight angle. Lastly, the shoes, most of which were boots. Leather. Lined with buttons as closure. So simple, yet so beautiful. Next was to choose a beautiful, handmade parasol and head out to the park to socialize.
The effort put into one's appearance in the Edwardian period is astounding. Something I try to emulate in this day and age. A quality of life is what they had, and they looked gorgeous living it.
Step-by-Step Nail Art Tutorial
1
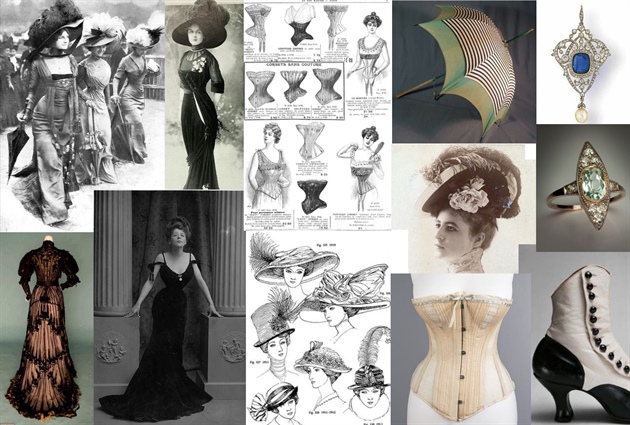
My inspiration. Edwardian fashion refers to the clothing that was in style between the late 1890s and 1914 or the beginning of the Great War (World War I). Also called La Belle Epoque (the Beautiful Era), and the Gilded Age, this was a time when women's fashions took on a new opulence and extravagance, inspired by the hedonistic lifestyle of Britain's King Edward VII.\n
2
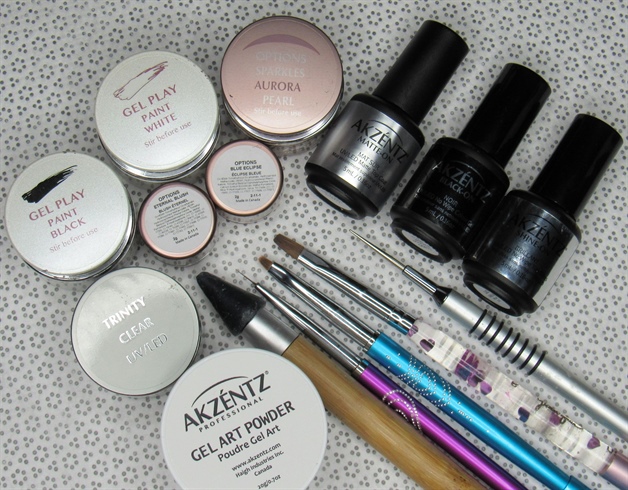
The main products used, along with the tools needed to complete the design.
3
Shoe Nail -Paint two coats of "Eternal Blush. -Wipe off sticky layer, and lightly buff to remove shine. -Using a pencil, sketch your shoe design. If there is any excess pencil markings, they will come off with a light wipe of alcohol. -Fill in your design beginning with the white area first, and the black areas last. Remember to cure for each color. -Drag a thin black line for the flap of the shoe, and blend with white. -Finish by dotting in your buttons, and painting the white area with the beautiful "Aurora" gel. -Topcoat using "Matte-On"
4
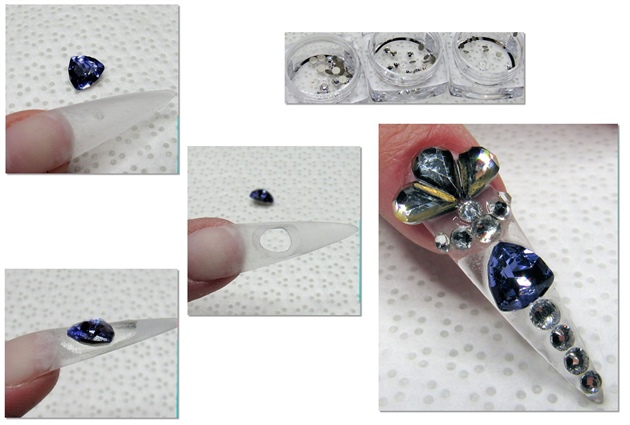
Jewelry Nail -Choose your crystal, and use a small bit to e-file out a hole in it's shape. Don't create the hole straight down. File it at an angle so your crystal sets nicely in place. -Line the hole with nail glue and place your crystal. -You can choose any size, shape or color for your jewelry nail. So have fun and place your crystals in any pattern you wish to.
5
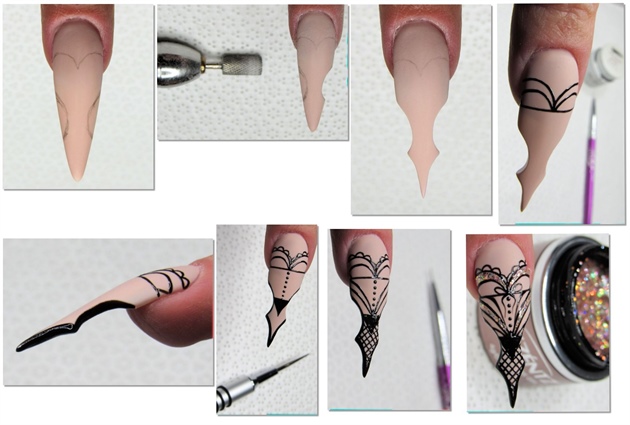
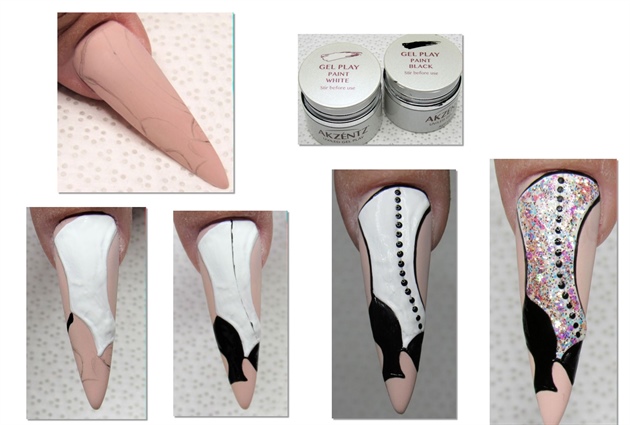
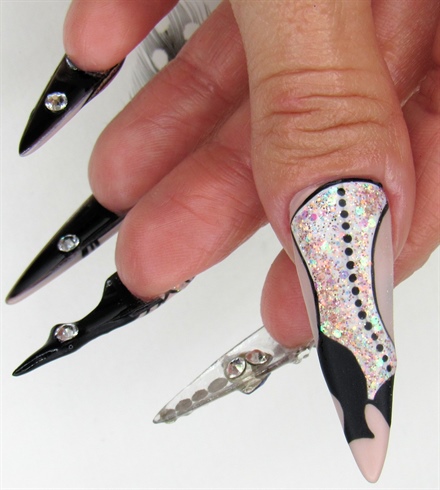
Corset Nail -Paint two coats of "Eternal Blush" -Remove sticky layer, buff lightly, and begin to sketch the shape of a corset. This will be your guide when filing out the design in the nail. -Use a barrel shaped bit to cut out the sides of the nail, and taper to a point. Lightly buff the edges to a smooth feel. -Begin your design with black gel play and a thin detail brush. Be sure to paint the edges black to make the design cohesive. -Use a minimal amount of paint on the brush, and a very light touch. Don't worry about a perfectly filled line on your first brush through. Use the first line as your guide, and fill it in on the second run. -Cure the design, and use "Aurora" to fill in a few sections for highlight. -Topcoat using "Matte-On"
6
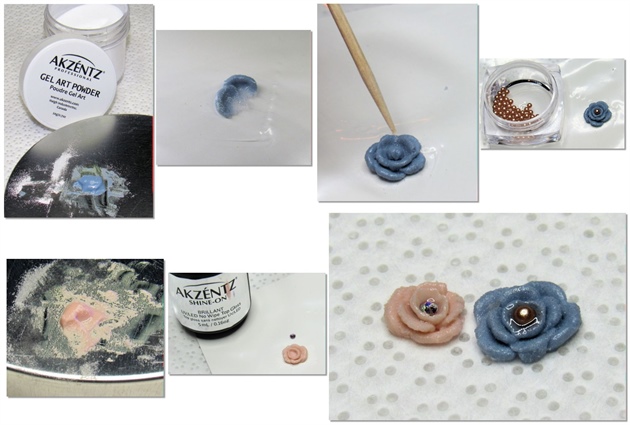
Creating 3D Flowers -Akzentz has an amazing product that lets you mix your choice of Options UV/LED Colour Gel and Gel Art Powder to create any 3D design you desire. -To create the flowers, you'll need a dab each of "Blue Eclipse" and "Eternal Blush" -Add the powder, and begin to mix with a spatula tool. The ratio for this mixture is 2 parts powder to 1 part gel. But you can get a feel for it as you go. Mix slowly, so you do not get air bubbles in the product. -Once the product holds it's shape, grab a small bead on a brush, and press out your first petal onto the outside of a ziploc baggie. Place a piece of cardstock inside the baggie for more strength when working. Cure EACH new petal you make. Continue until you reach the center, where you will place a small bead of product and swirl a dotting tool or toothpick in the center until it's as wide as you would like. I like to swirl until it's quite thin, then gently use the tool to pull at the sides a bit. -After your last cure, place a pearl, or crystal in the center using a dab of "Shine-On"
7
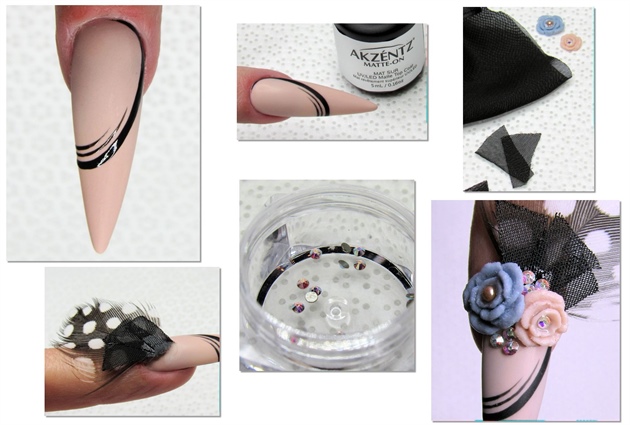
Hat Nail -Paint two coats of "Eternal Blush" Clean, & Lightly buff. -Paint your black lines in the shape of a round hat at an angle. Cure. -Use, "Matte-On" topcoat. -Cut very small pieces of a black mesh fabric in a tapered rectangular shape, and choose a feather of any color, but make sure it is small, and whispy. -Glue the feather to the nail using nail glue, and spray dry it into place. Gently lay the mesh into position, and place a dot or two of glue onto them It will soak in, and that is ok. Spray it dry. This may leave a pointy or lumped up area. Use a file to buff it flat enough to glue on your flowers next. -After the flowers, place the remaining crystals in place, and spray dry.
8
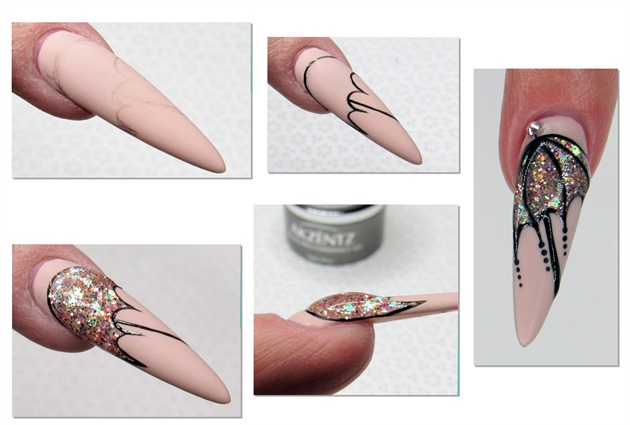
Parasol Nail -Paint two coats of "Eternal Blush" Cleanse, lightly buff. -Sketch your parasol design with pencil. -Detail your design using black gel play. -Fill in your parasol top with "Aurora" -For an added effect, use Trinity gel to puff the parasol up. Cure. -Use your black gel play to add the lines, and the hanging dots. -Topcoat using "Matte-On" -Go back through the parasol ONLY with "Shine-On"
9
Backside \n-Paint the backside of each nail, with exception of the index finger, with "Black-On"\n-Glue your crystals on
11 Artists like this Photo
Write a Comment
Submit