This weeks challenge (sponsored by Akzents) was a no brainer for me. I had been wanting to do a killer 90's set for awhile. The 90's is my favorite decade. I was a kid in the 90's and that's when all the best things happened.
I went from a girly girl to a rock fan it a year. I was listening to Spice Girl's and Aqua and rocking all the metallic shiny sparkly glory that was the 90's. Then one day I woke up and liked Korn and Limp Bizkit, I thought I was grown haha.
My fashion choices also changed. I shed my sparkly layers and rocked everything Tommy Hilfiger designed. And I mean everything! He got every dollar I had in those days! I had rings and socks and jeans and sweaters, All Tommy everything all the time!
The 90's birthed some of the greatest movies ever! But if I had to choose the most iconic movie from that decade I'd have to say Clueless. My whole grade was taking like Cher.
For some reason aliens were hugely popular in the 90's I'm not sure why but it was a must to have an inflatable alien for your room along with plenty of other unless inflatable items.
Anybody who was anybody had a Furby in the 90's and you and all your friends had to make play dates with your Furby's and if you didn't have a Furby then you can't sit with us! Just kidding we were nice girls!
Also your social standing was non- existent unless you were a Pokémon master. Similar to today in the 90's we also spent all our time staring into a tiny screen.
The 90's were the the funnest! I'm so pumped that they're huge again! Can someone point me in the direction of the Tommy store please!?
Step-by-Step Nail Art Tutorial
1
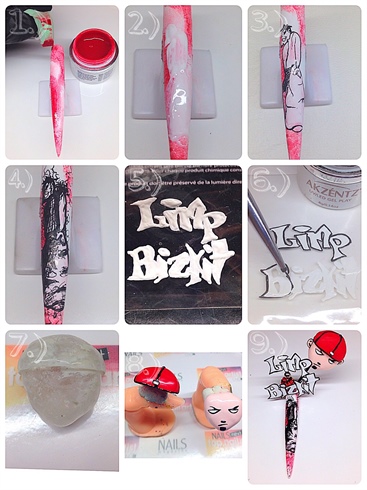
1.) Limp Bizkit. I start with a nail that's been painted with white gel polish. I often start with awhile background because it makes the colours more vibrant. I sponge on some red gel paint with a makeup sponge. 2.) I paint the white outline of the silhouette fellow from Limp Bizkit's first album "Three Dollar Bill Y'all" 3.) I add in some details with black acrylic paint. When I'm doing these really tiny fine details I water down my paint quite a bit so that I can create the thinnest of lines. 4.) I finish up the chicken scratchy fellow with my paint.5.) I paint the outline of the text from their first album with Akzents Gel Play. This is a very thick viscosity gel. It doesn't run and I can paint all the letters before having to cure. 6.) I cure the letters the go in and out line again with gel play and a tiny detail brush.7.) I create the bands front man in cartoon form of course! Using plasticine. I mold the clay into shape then apply gel over top and cure.8.) I paint the base colours of the face a hat using gel paints and cure. Gel paints are highly pigmented and a thin viscosity giving even coverage without added thickness. I add in the details with gel play and cure. I decide to give him a matte finish to contrast the shiny finish that I placed on the letters and nail. 9.) I adhere everything to the nail using Bling On. Which is Akzents jewelry gel. This gel is super thick and sticky. I can place things in gobs of this gel and cure them in the light without having them fall off or move. For the really large items like the head you may need to hold them in place while curing them in the light.
2
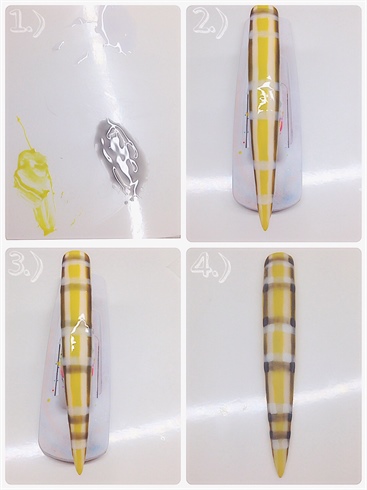
1.) The iconic Clueless plaid. I mix my gel play with some top coat to thin it out and create a sheer gel. When doing plaid you want you gel to be thin so that you can see a bit of the base colour through it. This makes the plaid more realistic. 2.) I paint on the thinned out gel curing after each colour. 3.) I add more of the horizontal lines in with the thinned out gel. 4.) I go in with some non thinned out gel play and paint little squares where the lines intersect. This gives the illusion that the pattern overlaps. I finish the nail with matte top coat to create a fabric appearance.
3
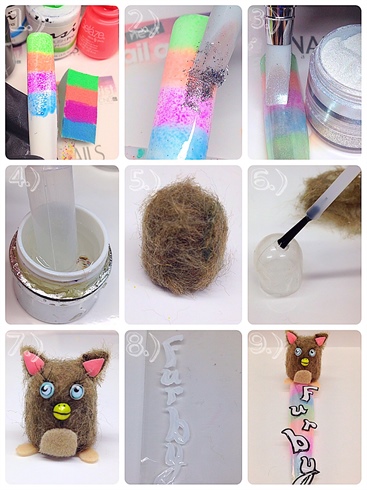
1.) The Furby nail. I sponge on a gel polish ombré, again starting with a white background so the colours pop. I cure the nail and DO NOT wipe because if you wipe you may remove some of the colour. I apply a tack free top coat. 2.) I proceed to chrome. I apply a very thin layer of chrome so that you can still see the colours underneath.3.) I apply more tack free top coat and add some blue powered sugar to give it even more of an iridescent metallic look. Then I add a glossy top coat to the nail. 4.) I dip my trusty eye dropper in some gel top coat. I use top coat because I really just want a shell and for the piece to not be bulky. Then I cure, remove the shell and wipe. I apply glue all over the shell. 5). I squish the fur into the glue and trim off any major fly always. 6.) I create some facial features out of gel, I also make some furry gel ears. I trim apart a false eyelash add glue it on along with the rest of the facial features. Real Furby's have the most envious eyelashes so I knew this was an important feature!7.) I trim a belly and some feet out of velvet and glue them on. And now the Furby is complete. 8.) I paint out the white lettering in gel play and cure, I add on the black outline in gel play and top with top gloss.9.) Then I glue the letters onto the nail.
4
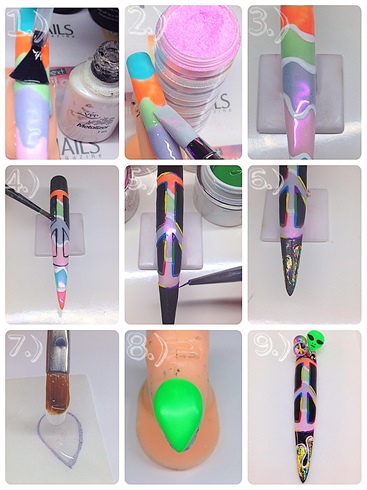
1.) The we come in peace nail. I paint a wavy coloured background in gel polish cure and apply a tack free top coat. 2.) I then apply a pink powdered sugar. Powdered sugar is a super fine nail glitter that when scrubbed into the nail creates a shimmery effect. 3.) I paint on some white lines in acrylic paint to give the background some depth. 4.) I preceded do a black out technique which has become a new favourite for me. I use gel play to cover most the nail except for a peace sign and cure.5.) I outline the peace sign with multiple colours of gel play to make it more psychedelic and cure. 6.) I top coat the nail and then buff it so I can do some foiling. Foiling works best with a buffed surface so that the foil doesn't stick where you don't want it to. I paint some paint drips with black gel play and cure. Then I squish on the foil. I outline it with white and cure. Then I apply a top gloss. 7.) I make an alien head outline and fill it in with thick builder gel so it doesn't run around on me. I cure it and wipe with alcohol. 8.) I paint him white and then neon green to get a super bright green. I paint his face with gel play and cure then I top him off with a matte top coat. 9.) I adhere everything with jewelry gel and cure.
5
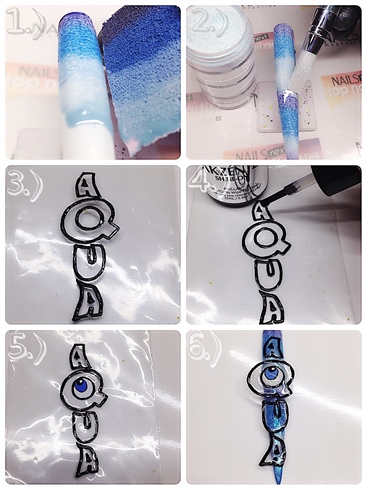
1.) Aqua, who brought us hits such as Barbie girl everyone on the planet knows this song whether they admit it or not. I start with a white gel polish base and sponge on a blue gel polish ombré and cure. 2.) I apply a tack free top coat and scrub on some blue powdered sugar. Then I apply top gloss. 3.) I paint the text outline with gel play and cure. Gel play is thick so I can create a raised edge so the top coat doesn't flood over it. 4.) I fill in the letters with Shine On, a super clear high gloss top coat. I thought it would be neat to have the letters clear so you could see the nail through them. 5.) I paint on the eye with gel play. Cure and build it up with clear gel to make it more 3D. 6.) I glue the letters on to the nail.
6
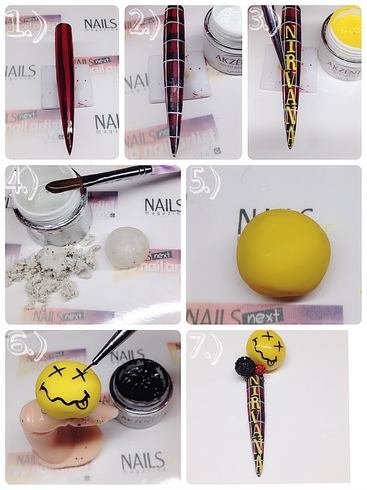
1.) Teen Spirt. I paint the nail red with gel paint and cure. I thin out some black gel play with top coat and begin painting a plaid. 2.) I add some white lines with gel play to make the pattern pop and cure. 3.) I paint the Nirvana script with yellow gel play and cure. Then I finish the nail off with matte top coat. 4.) I make a ball with clay and cover it with gel and cure. I forgot the cuticle oil this time so the clay came out very messy. I wipe the ball. 5.) I paint the ball yellow with gel play and cure it and wipe. 6.) I paint on the face with black gel play and cure. I finish the face with top gloss and cure. 7.) I adhere everything to the nail with jewellery gel and cure.
7
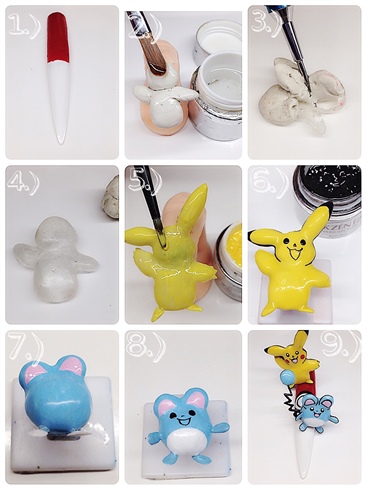
1.) Catch them all! Team blue forever! I start with a nail painted with white gel polish. Then I paint the other half with red gel paint and cure. 2.) I build the shape of Pikachu out of clay then I apply cuticle oil for easy removal and coat with gel. Cure. 3.) I can now remove clay in one piece, I use a metal stylus to dig it out. 4.) As you can see it comes out very clean. 5.) I add on some ears the same way and then paint him with yellow gel play. Cure. 6.) I stay outlining him with Gel Play and painting his face. 7.) I build Pikablu the same way and paint him with blue gel. I also make little feet and hand for him with gel. 8.) I paint his belly white and paint his face and glue on his tail. I finish the critters with top gloss. 9.) I finish up the details on the pokeball nail and top gloss it. Then I apply the Pokemon with jewelry gel and cure.
8
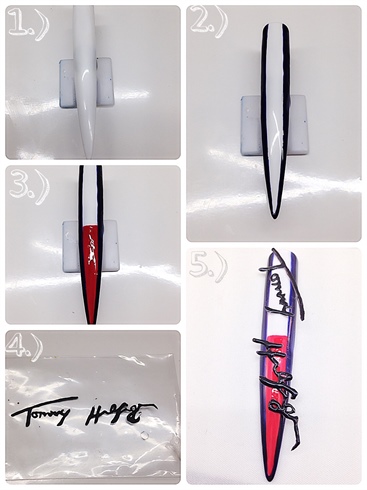
1.) Tommy girl. I start with a white painted with gel polish and cured. 2.) I paint the navy border with gel polish and cure. 3.) I paint half the nail with red gel paint and cure. 4.) I paint the Tommy Hilfiger script out on a flat surface so that when I peel it off and place it on the nail it will be 3D. 5.) I top gloss the nail and the script. And glue the script to the nail.
9
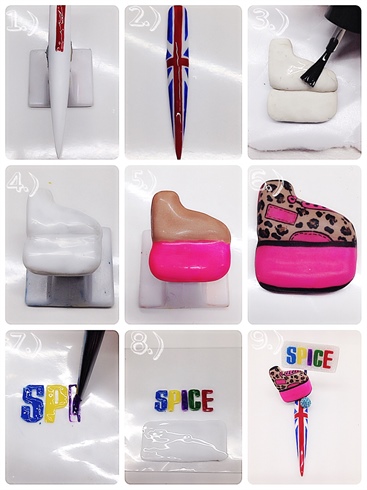
1.) The British are coming! I had so many pairs of Spice Girl shoes when I was a kid. I start with a white gel polished nail and I begin painting the British flag with gel play. 2.) I finish the flag and top gloss it. 3.) I form the platform runner out of clay and oil it up. I cover it with gel and cure. 4.) I paint the shoe white and cure. 5.) I paint half the shoe nude and half hot pink with gel polish and cure. 6.) I add some dark brown paint spots and outline them with acrylic paint. I add on some stitching with black acrylic paint and outline the shoe. I finish the shoe with matte top coat. 7.) I paint out the SPICE letters with gel play and I love this gel for lettering because I have so much control with it. I cure the letters. 8.) I make a sign out of white gel polish and cover it with iridescent glitter by dusting it into the dispersion layer. I place the letters on the sign and then apply top gloss. 9.) I fasten all the pieces to the nail with jewelry gel and cure.
10
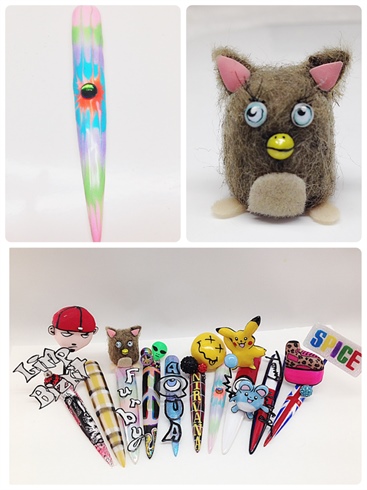
1.) I create a marble effect by dragging a stylus through wet gel polish and cure. I top gloss the nail and add a gem with glue to the middle. I put another shot of my Furby because he was my favourite piece from this challenge. And here's the final shot I hope you love this piece as much as I love the 90's!
6 Artists like this Photo
Write a Comment
Submit