This week EzFlow and Nails magazine wanted us to create a set of fantasy nails.
The designs are inspired by EzFlow's new collection of coloured acrylics named 'Enchanted' - with colour names such as 'Eternal youth' and 'Nymphs and Nomads' my first thought went to the classic Disney Movie Peter Pan, and the magical world 'Neverland' where you never have to grow old!
Fairies like Tinkerbell spend their days roaming enchanted forests making magical things happen.
My Fantasy nails start from the thumb, in London with Big Ben, where the rainbow can take you across to the forest of Neverland.
Tinkerbell is hovering around the forest, making magical flowers appear wherever she goes.
Sparkling Butterflies can be seen below every rainbow and mystical, magical doors can transport you to a different place and time.
I wanted this piece to represent and encompass my time so far in the competition, but also stay true to my style of being clean and simplistic.
I made each of the nails to have a similarity to other challenges I have done throughout the competition, to see how much growth and journey I have taken.
Before NTNA, I had never completed a fantasy piece, and the thought of it felt overwhelming! Especially to complete in one week.. But now I feel confident I can achieve anything I set my mind to.
Even though I have been a Nail Tech for a long time, this competition has taught me so much, and this is the culmination of my growth.
I hope you enjoy looking at my creation, and it sparks some magic in your day! xx
Step-by-Step Nail Art Tutorial
1
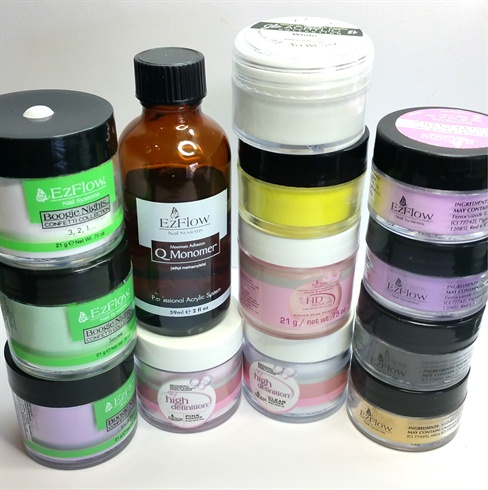
In this challenge I tried to use as much coloured acrylic as possible, EzFlow has such amazing colours, above is some of the products I used.
2
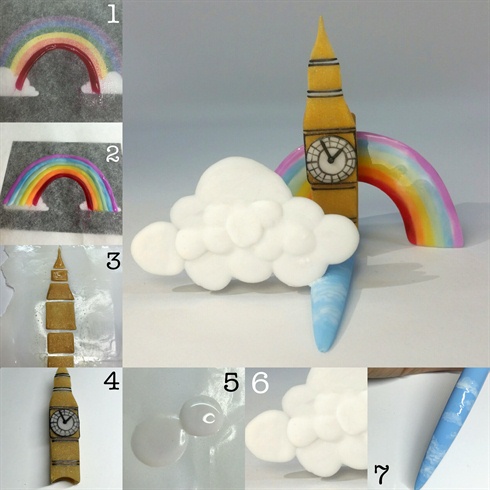
BIG BEN NAIL - 1. I created the rainbow with coloured acrylic on grease proof paper 2. I continued layering all the colours of the rainbow 3. To build Big Ben, I sculpted the basic shape with coloured acrylic 4. Once I built up the building I hand painted the clock details 5. To create the cloud I layered circles of white acrylic 6. I also painted the cloud with matte and glow in the dark top coat, for a cool night time effect 7. For the base tip, I painted it with blue gel polish, and marbled some white polish into the second layer to give it a realistic look
3
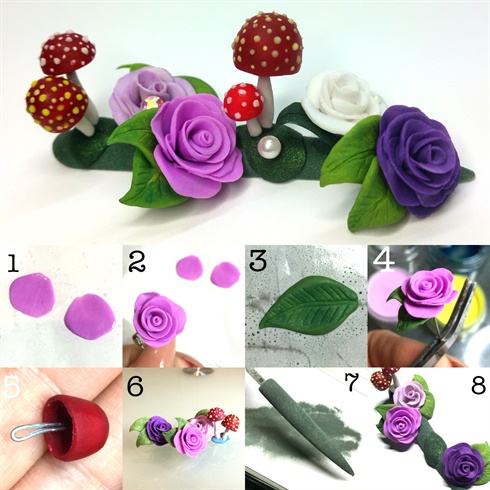
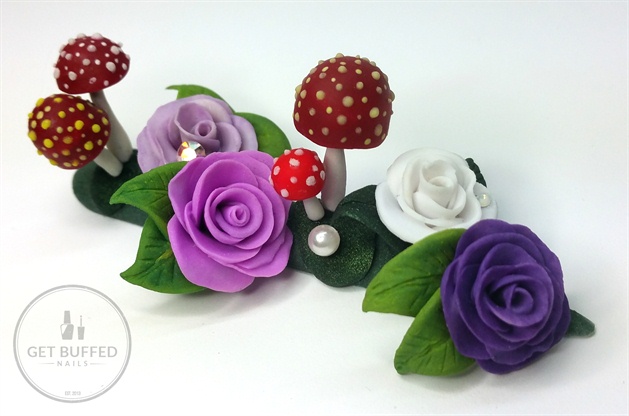
FOREST FLOOR - 1. I created my roses petal by petal 2. I twisted each petal around some wire before it is completely hard 3. I sculpted each leaf on a piece of grease proof paper 4. I added the leaves to the rose while they are still a little pliable 5. I make the mushroom tops with red acrylic on the end of a brush, I added some wire underneath and covered the stem with white acrylic 6. I continued making mushrooms and roses until I could cover the full nail tip 7. On the base of the tip I put one layer of gel polish, I coated it in a mix of green pigment and acrylic and then cured it (for a mossy look) 8. I attached all the pieces to the tip
4
I added a few swarovski's and pearls, to represent Tinkerbell's magic.
5
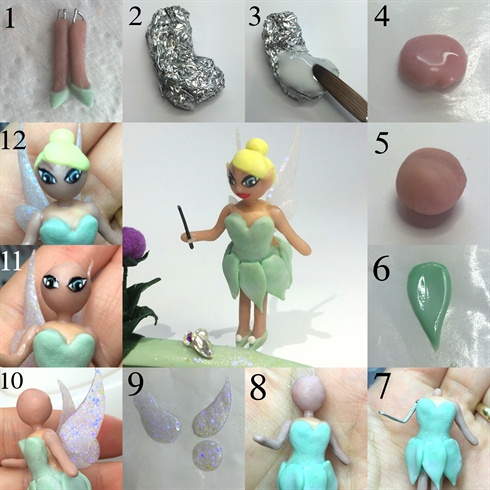
TINKERBELL - 1. To make her legs I used wire to get the initial shape, and covered them with cover pink acrylic, and added her shoes with green acrylic 2. To build the bulk of her body, i used tin foil 3. I covered the foil with white acrylic, and then a layer of cover pink acrylic 4. To make her head I place a large bead of cover pink on form paper 5. When it was pliable, I rolled it in my fingers to create the ball shape 6. I created green leaf shapes for her skirt 7. I added her body to the legs, covered her body with her green acrylic dress and added the skirt pieces one by one 8. I added a small ball of acrylic to make her neck, and secured the ball for her head 9. I sculpted her wings on some form paper 10. Attached them to her back with acrylic 11. I painted her face details with gel polish 12. I used yellow acrylic to create her hair
6
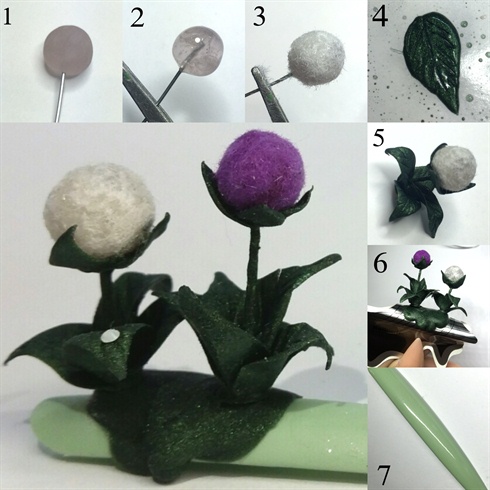
FURRY FLOWERS - 1. I made a ball of clear acrylic, and while it was still pliable i pushed some wire inside to make the stem 2. I covered it with top coat 3. I then dipped it into white flocking powder 4. I sculpted the leaves on some form paper 5. I coated the wire with the green acrylic and placed all the pieces together 6. I made a small green acrylic (for a moss effect) platform for the flowers to sit on 7. I painted my base tip with mint green gel polish
7

I attached all the pieces and Swarovski to the tip, added some glitter acrylic under Tinkerbell, and secured her feet.
8
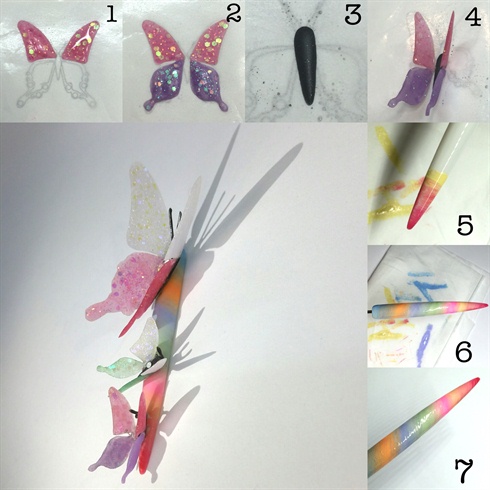
BUTTERFLY NAIL - 1. I placed some grease proof paper over a picture of a butterfly 2. I sculpted the wings with differing shades of EzFlow glitter acrylic 3. Here I sculpted the butterfly body 4. Once the acrylic dried, I attachd it to the body of the butterfly 5. I painted the base tip white, and then began to blend the colours of the rainbow 6. I wipe the polish brush in-between the colours to achieve a smooth fade 7. Finally I applied gel top coat
9
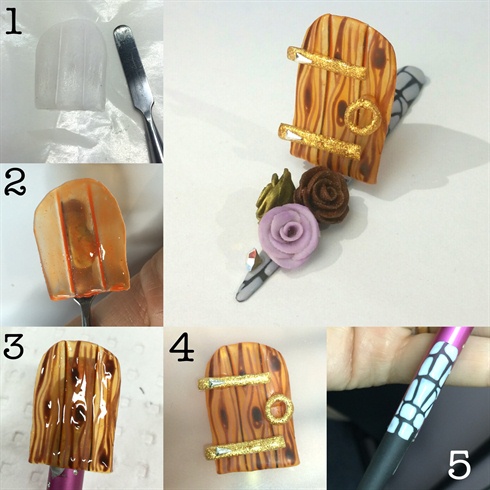
SECRET DOOR - 1. I sculpted the door shape with clear acrylic 2. I painted it with a sheer gel polish 3. I painted wood grain details with differing shades of brown gel polish 4. I made the door knob and hinges with acrylic and attached them 5. I painted the base tip with black and grey gel polish to look like a stone wall, and then I built up the grey colour to add texture
14 Artists like this Photo
Write a Comment
Submit