For NAILS Next Top Nail Artist, the top 24 were asked to create a look inspired by one of their magazine covers from the past 30 years! The challenge is named "Cover Artist" I chose February 1991 (my birth year and month) I always have some sort of connection with anything associated with my birthday, so with no delay I immediately looked up February 1991. There were plenty of easy themed covers to choose from, and although the cover I chose doesn't have much to go off of, I decided to go ahead and create something out of nothing! The model wore a trendy gold black and white brooch on her sleeve, she had pink nails, and BIG 90's hair! The background had a pink to black gradient effect! When I saw all of this, I thought of my mother (who is Korean, but still had big 90's hair when I was born) and it took me down memory lane. I used to rummage through her jewelry box, and she had multiple gold brooches. I decided to challenge myself by recreating something 90's and give it some 2015 flavor! This set will always hold a significant place in my heart and I am joyed to share it with all of you!
Step-by-Step Nail Art Tutorial
1
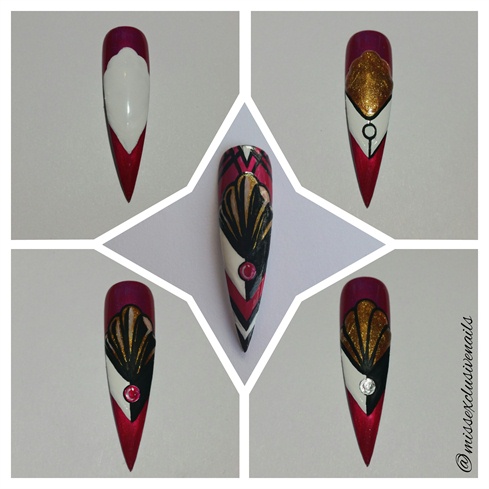
I'll start with the thumb, going clockwise from the top left to the center. I first applied a coat of OPI's Color Paints Silver Canvas Undercoat, followed by two coats of OPI's Color Paints Pen & Pink. Then, for the background of the brooch, I used white acrylic paint. Moving on to the next photo, using black acrylic paint, I carefully painted lines and a circle, followed by OPI's Goldeneye for the base color of the brooch. Next, paint lines like a flat seashell, fill in the right side of the brooch, and dot the center of the circle with the same silver. Then, I filled in the areas where there was a shadow on the gold, dotted pink in the center of the circle, and added some shine with white acrylic paint. For finishing touches, I added some lines with black and white acrylic paint, top coat with INM's Looks Wet !
2
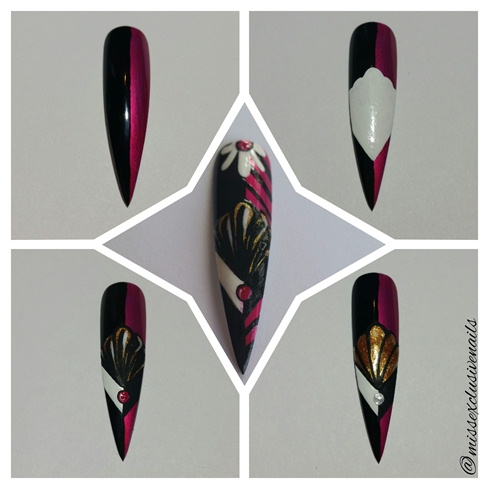
For the Index finger, I applied one coat of silver and two coats of pink, then painted half of the nail with Caption Polish's black. Following the same steps as the thumb, with the exception of the finishing details. I added some lines with black acrylic paint, and white at the top for some contrast.
3
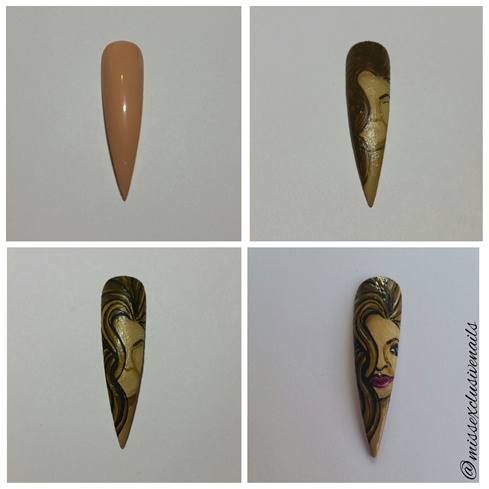
For the middle finger, I started out with a nude base color (OPI Samoan Sand) Then, with brown acrylic paint and a fine brush, I started applying fine lines to create the base of the hair. With a mixture of brown, white, and mustard yellow acrylic paint, I started blending in facial features. As the bottom left picture depicts, I went in with black acrylic paint to define where I wanted the eyebrow and movement of hair. Then, with a steady hand, I highlighted certain parts of her hair to create dimension. I applied a small amount of white acrylic paint to the eye, and dotted very carefully for the pupil and lashes. I used OPI's Color Paints Pen & Pink on her lips! Top coat with INM Looks Wet !
4
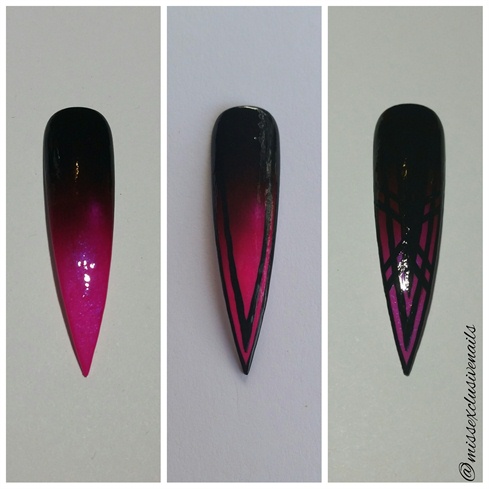
To capture the gradient effect portrayed in the magazine's background, I sponged on Caption Polish's Black, China Glaze Under The Boardwalk, and EverGlaze Adrenaline Rush. After it dried, I painted lines with black acrylic paint on the free edge of the nail, then parallel to those, I painted a triangle. I painted more lines into the gradient, Top Coat with INM Looks Wet !
5
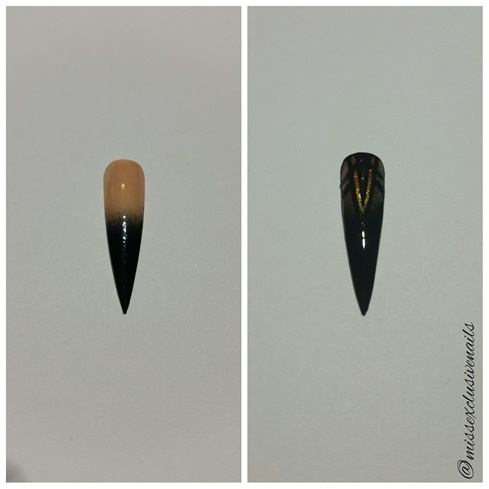
Okay, so on the pinky, I started out with a nude to black gradient. Things got carried away and I didn't like the nude with the whole set, so I sponged OPI Goldeneye over top of the nude. I then added a triangle and lines to complete the look! Top Coat with INM Looks Wet and you're all done!
6
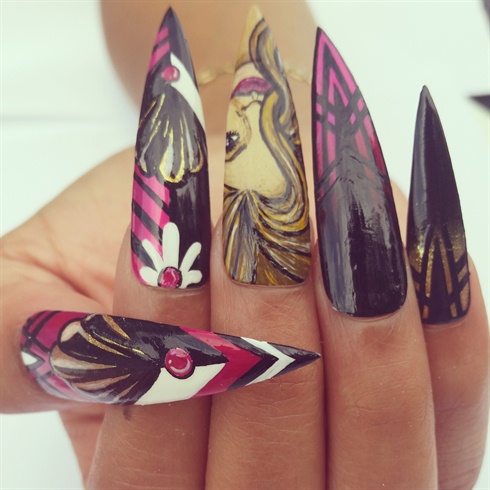
And there it is! When you're all finished, photograph and tag me on instagram @missexclusivenails so I can see your recreation!
7 Artists like this Photo
Write a Comment
Submit