This week’s challenge is to create a set of nails that was inspired by vintage fashion or time. When I think of vintage, my mind often goes directly to antique China because my mom loved collecting antique china when we used to live in New Zealand.
The one thing that I still absolutely love from her collection is Jasperware from Wedgewood. It was first created in late 16th century and the style became popular among with Rococo style in late 17th century in Western Europe. It’s also the same era when Marie Antoinette was queen of France, and even though her fashion became controversy, her fashion style influenced the Europe. So I have decided to incorporate these components into my design.
“Wedgewood blue” is one of the most iconic and distinctive color, and incorporating pastel lavender was to highlight Rococo style as well as gold chrome accent pieces on the free edges. Colors were custom mixed with Akzentz Gel Play paints, Options color gel and Luxio Gel polishes for consistency and to match the shades of what I wanted. Drapes, laces and bows were borrowed from the 17th century gowns like popular Marie Antoinette style. I missed Akzentz Gel Powder and Gel Play white to create 3D effects in different ratios for right consistency for each components. I wanted to add Rococo style leaf/feather designs for complement the overall design, then very minimal Swarovski pixie and crystals were added among the edges of gold decoration to accessorize nail design but not to overwhelm the overall look. For hand painted designs, Akzentz Gel Play was perfect medium to draw fine lines and to build up the thickness for different depth, and some designs were topped with Akzentz Matte On for texture. For the gold free edge accents, I build up Gel Play over thick clear builder gel, coated with Akzentz Black on to apply Gel Play Pearlescent Gold pigment to add chrome effect, and then topped with Akzentz Shine On.
Step-by-Step Nail Art Tutorial
1
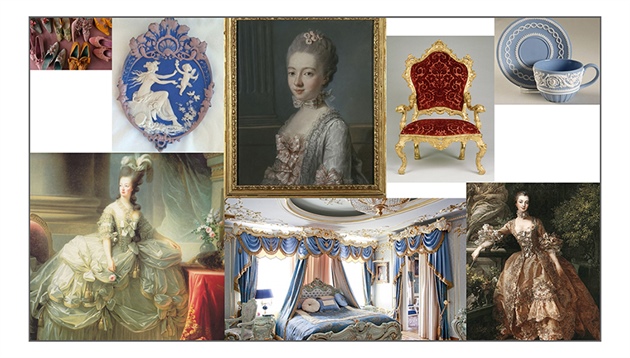
Inspiration Board - Inspired by late 17th Century Western Europe era. Dresses were decorated with ruffles, bows and laces with lots of drapes, and it was heavily influenced by rococo style.
2
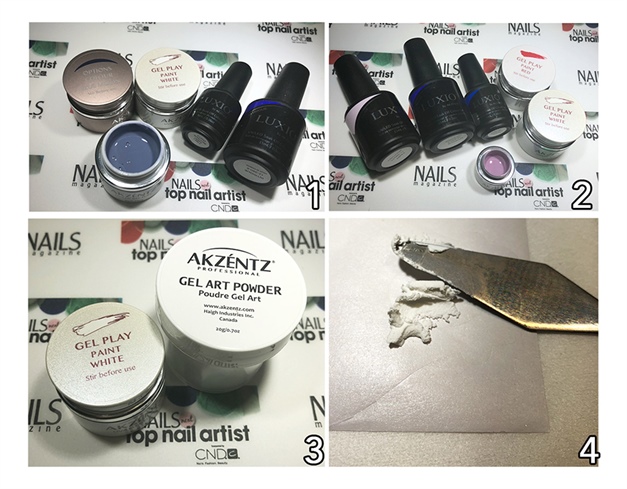
Prep - **(1,2)** Start with mixing colors. "Wedgewood blue" is mixed with Options in Midnight Blue, Luxio in Shadow and Intrigue, and Gel Play White Paint. Pastel Lavender is mixed with Gel Play Red and White, and Luxio Fairy, Intrigue and Lookout. Paint the nail tips with mixed colors, then top it with Akzentz Shine on. **(3,4)** Mix Akzentz Gel Art Powder and Gel Play white paint on a tile or form back using spatula in 1:1 ratio for thick paste-like consistency for 3D art. Add more powder or gel as necessary.
3
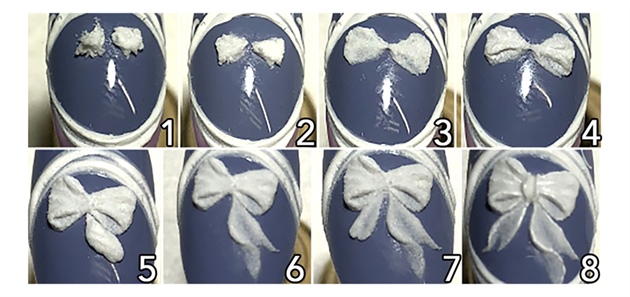
Making Bows - **(1)** Using spatula, roll small amount of 3D paste, about half of desired bow size is enough. **(2)** Using pointed silicone tool or size 2 sculpting brush, gently pat down to make each petals in triangular shapes. Lightly wet the brush with IPA to prevent the 3D paste sticking to the brush.\n **(3)** Using flat side of brush or silicone tool, make a light indentation while patting down parts of the 3D paste for depth effect. Cure in gel lamp when desired shape is achieved. **(4)** Add half of 3D paste from step 1 over each petals. Pat down the paste, and using tip of the tool to gently lift bottom part for loop-like depth. Then add desired textures if needed, and cure. **(5,6,7)** Add ribbons one at a time. Leave the ends very thin to add light lace-like look. Cure each ribbons before moving on to the next layer if additional step is necessary. **(8)** Cap the outer edges with Gel Play White paint for more definition.
4
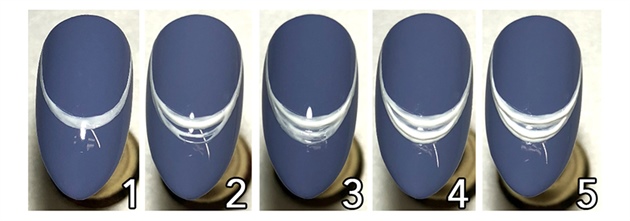
Drapes - **(1)** Using striping brush, draw a thin line using Akzentz Gel Play White. Then fully cure it. **(2)** Pick up generous amount of Gel Play with a brush, then string it over the line. Flash cure, then draw a finer line under it with higher curvature. Cure. **(3)** String Gel Play over each lines to add more volume and drape-like texture. Flash cure each layer before adding more string layer. **(4)** Repeat until desired look is achieved. Lastly, fully cure in lamp.
5
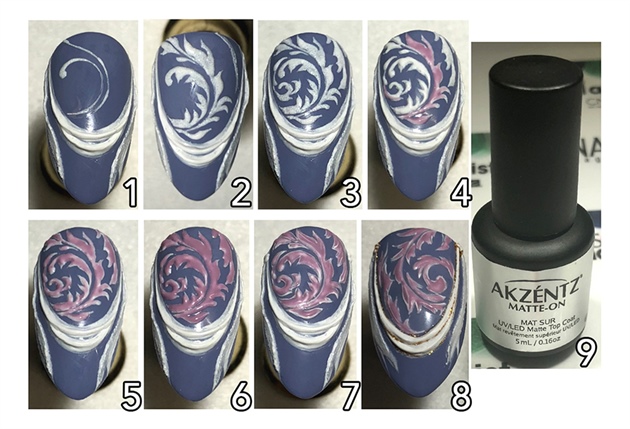
Leaf/Feather Patterns - **(1)** Start with a big swirl using Gel Play White and striping brush. Cure it. If necessary, mix Gel Powder and Gel Play in 1:10 ratio to make gel thicker. **(2,3)** Start adding leaves by little bit. Flash cure in between if needed. Fully cure the entire design before moving on to next layer. **(4,5)** After desired design is achieved, add layer of pre-mixed lavender color over white. Flash cure in between if needed. **(6)** Add second layer of color if needed. Fully cure in gel lamp before the next step. **(7)** Draw very fine white outline around the patterns for contrast. No need to draw tight, bold outline, but make sure the pointy parts are sharp. Then cure. **(8.9)** Top the entire pattern with Akzentz Matte-On.
6
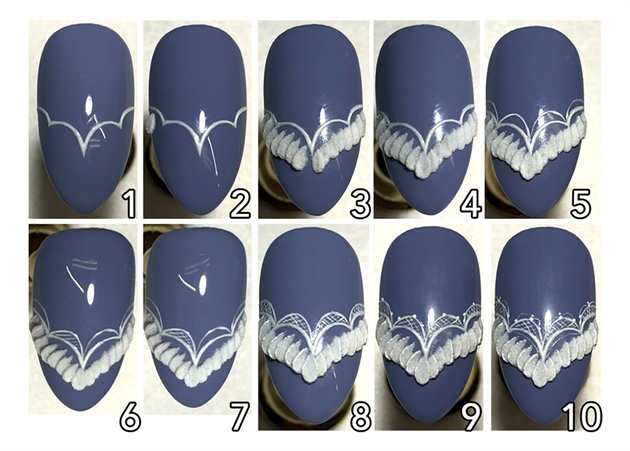
Ruffles and Lace - **(1)** Start with scallop border line using Gel Play White for lace design as a guideline for ruffles. **(2,3)** Start ruffle design from outer side using 3D gel paste. Using silicone tool or size 2 sculpting brush, make drop shape, then pat down one side thinner for next one. Flash cure each drops before add next one. **(4)** Add the last drop in the middle. then fully cure in gel lamp. **(5)** Draw little smaller scallops over the border. Flash cure. **(6)** Add tiny diagonal lines inside the scallop for lace pattern. Flash cure before next step. **(7,8)** Add diagonal lines over previous step in opposite direction. Flash cure. Then repeat until each scallops are filled with lace design. **(9)** Using small dotting tool, add 3 little dots on each outer lace border. Flash cure. **(10)** Add reverse scallop lines to connect each dots. Flash cure, then add outlines all over the edges of 3D ruffles for more definition. Fully cure the design.
7
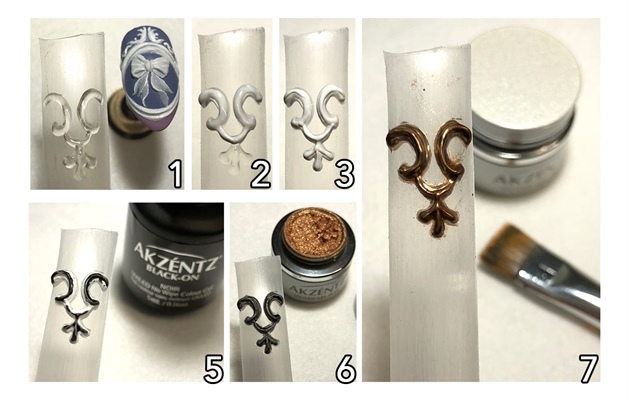
Gold Borders - **(1)** Grab a fantasy form slightly bigger than a nail tip. Use nail form over a nail tip if fantasy form isn't available. Use clear builder gel that is very thick viscosity, carefully draw designs over the fantasy form while checking the design of the designed nail. Flash cure each lines if needed. Fully cure when desired design is achieved. **(2)** Using Gel Play white, cover the entire design using gel brush. Cure in gel lamp. **(3)** Start adding strings of Gel Play for volume and texture. Flash cure each layers, then fully cure when desired look is achieved. **(5)** Apply Akzentz Black on thinly all over the design. Cure 30s in gel lamp. **(6,7)** Apply Gel Play Pearlescent Gold powder using dry brush. Make sure to get every corner. Burnish and dust the chrome, then top with Akzentz Shine on. \n
8
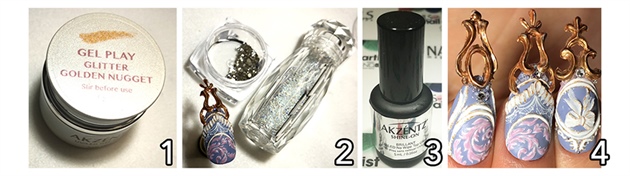
Finishing Touches - **(1)** Using Gel Play Glitter Golden Nugget and fine striping brush, cap white design edges then fully cure. (2) Glue the Gold borders onto each nail. Then apply Swarovski crystal and pixies around the borders around the free edges. Add additional glue on the back side if needed for more secure adhesion. Add Crystal Pixies where needed within the nail designs if desired. **(3)** After glue is fully dried, apply Akzentz Shine on around the edges of crystals and around the 3D designs using small brush. Be careful not to cover the matted designs and faucets of crystals. Flash cure by sections and areas if needed. Fully cure the entire nails. **(4)** Check and make sure each nail designs are beautiful and what you've wanted!
9
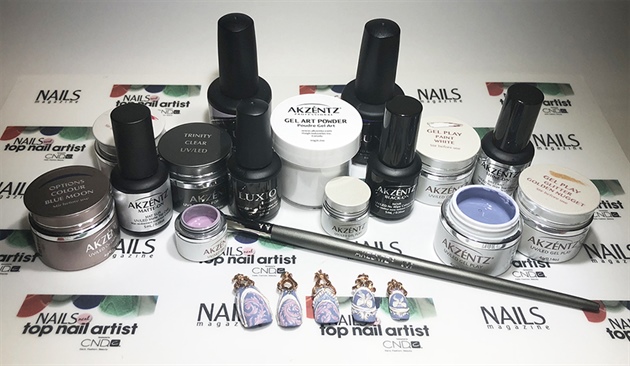
Products used in this tutorial.
6 Artists like this Photo
Write a Comment
Submit