I wanted to create a wearable design for a trendy streetgirl this week.
Steeetart reminds me of my very first boyfriend back in school. He was a skater and painted grafitti. Him and his best friend had nicknames and their own tags, which they illegally wrote everywhere they could get away with. He always had pastel colored posca markers and a spraycan in his backpocket of the baggy trousers. That’s why i used 4 nails on the right hand as a wall for me to throw my tags on and vandalise / continue on grafitti which were already there.
On the left hand you’re seing me and him whisper to eachother and his friend thinking “oh really?”
He died at a very young age, before he turned 30, so i made a flamingo skull on the thumbs in honor of him, with the neck still being alive, telling you he’s still alive in our memories.
Streetart is not just illegal or propaganda, it can also be used as decoration and commercials on buildings. The most beautiful streetart I have ever seen is found in Chicago and belong to The Flamingo Rum Club so that’s where I found some of my inspiration. Flamingo’s are so cute and special, and I like the fact that these pastel colored animals take color from what they eat.
I used a full pastel palette as well as dark grey and white. For some reason my nails turned a bit bright, but it was because the pastel pink was slightly darker than the rest of the pastel colors used.
Step-by-Step Nail Art Tutorial
1
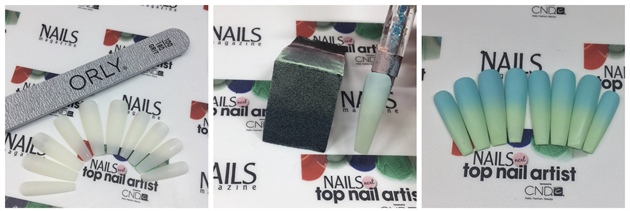
1: Shape the tips in a tapered square, using the 180 grit side of the ORLY file and refine with ORLY Buffer 2: Horisontal apply ORLY Nail Lacquer in the shades 'Forget Me Not' and 'Jealous, much?' on a makeup sponge and dap firm and fast onto the tip. Repeat 3 times depending on the color intensity wanted. Remember to let it airdry before repeating this step. 3: Once it's dried for 10 minutes, then coat and seal with ORLY Gel FX Topcoat, cure (1 minute in LED or 2 minutes in UV). Remove sticky layer using ORLY Gel FX Cleanser and buff with the
2
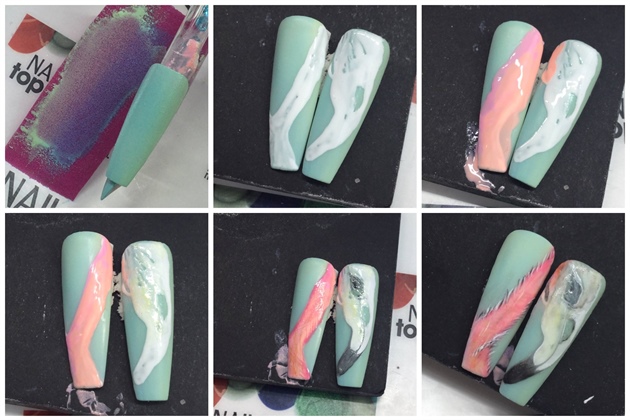
1: Vertical apply ORLY Nail Lacquer in the shades 'Forget Me Not' and 'Jealous, much?' on a makeup sponge and do the same procedure as in STEP1. Remember to seal with ORLY Gel FX Topcoat and cure as in STEP 1. 2: Draw a neck and flamingo-skull using ORLY Gel FX in the shade 'White Tips" on a detailer brush. Cure. 3: Paint a thin over the neck with ORLY Nail Lacquer in the shades 'Pink Noise' and \n'Happy and Healthy' 4: Rinse the excess product off the neck of the flamingo, using Genious Remover on an angled brush. Apply a very thin layer of ORLY Nail Lacquer in the shade 'Lemonade' over a part of the skull to add detail. 5: Outline and paint details on the skull skull using ORLY Nail Lacquer 'Mirror Mirror' and 'Decoded' on a fine liner. Paint an outline on the neck and stroke in towards the neck with tiny strokes using ORLY Nail Lacquer 'It's Mot Me It's You'. 6: Place the final details on the neck and beak using ORLY Nail Lacquer in the shade 'Decoded' on a fine detailer brush placing tiny strokes along the border of the neck. Once airdried apply tiny lines on top of the border using ORLY Gel FX in the shade 'White Tips" and then cure. Coat and seal with ORLY Gel FX Topcoat, Remove sticky layer using ORLY Gel FX Cleanser and buff with the ORLY Buffer.
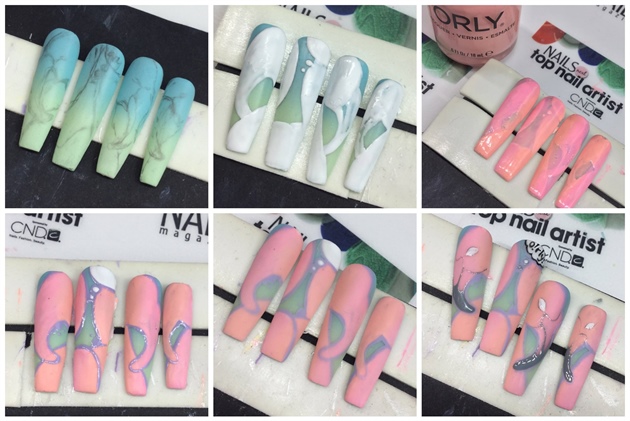
3

1: Sketch lines where you want your tag to be, using a pencil 2: Draw the NTNA tag with ORLY Gel FX in the shade 'White Tips"on a detailer brush. Cure. 3: Apply ORLY nail lacquer in the shades 'Pink Noise' and 'Lemonade' on a sponge and press onto the letters, just like you did in STEP 1. 4: Remove excess nailpolish using Genious Remover on an angled brush. Coat with ORLY Gel FX Topcoat and buff for a matte finish 5: Paint outline of the design using ORLY Nail Lacquer in the shade 'Lollipop' 6: Place the final details inside the border of the letters using ORLY Gel FX 'White Tips' and paint tiny stars with 3 thin lines and a dot in the middle. Cure. Coat and seal with ORLY Gel FX Topcoat. Cure. Remove sticky layer using ORLY Gel FX Cleanser and buff with the ORLY Buffer afterwards for a silksmooth matte finish.
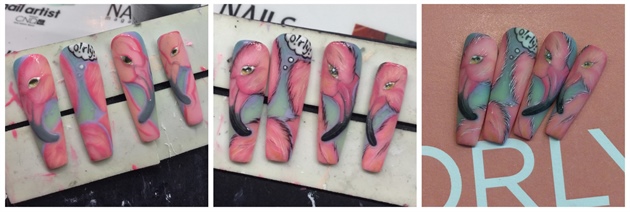
4
1: Sketch the flamingo design with a pencil 2: Paint on top of it with ORLY Gel FX in the shade 'White Tips". Cure. 3: Paint strokes of ORLY nail lacquer in the shades 'Pink Noise' and \n'Happy and Healthy' over the entire design. Before it dries, carefully rinse the excess product off with Genious Remover on an angled brush. 4: Draw the purple outline using ORLY Nail Lacquer in the shade 'Lollipop' and draw the thinking-bubble using ORLY Gel FX in the shade 'White Tips". Cure. 5: Coat and seal with ORLY Gel FX Topcoat. Cure. Remove sticky layer using ORLY Gel FX Cleanser and buff with the ORLY Buffer afterwards for a silksmooth matte finish. 6: Paint the white in the flamingo eyes using ORLY Gel FX in the shade 'White Tips". Cure. Draw the outline of the thinking- bubble as well as writing o!rly? with ORLY Nail Lacquer in the shade 'Decoded' and paint the beaks with the shade 'Mirror Mirror' on a fine detailer brush.
5
1: Apply detail strokes with a fine liner using ORLY Nail Laquer' It's Not Me It's You' over the entire body of the flamingos using the same tecnique as in STEP 2. Draw details in the eyes using ORLY Nail Lacquer in the shades 'Decoded' and 'Lemonade using the fine detailer brush. 2: Apply details to outline the body and shaping the feathers using 'Decoded' on a fine liner 3: Apply the very final details with ORLY Gel FX 'White Tips' inside the eyes and on top of the feathers using a fine detailer brush. Cure. Coat and seal with ORLY Gel FX Topcoat. Cure. Remove sticky layer using ORLY Gel FX Cleanser and buff with the ORLY Buffer afterwards for a silksmooth matte finish.
6
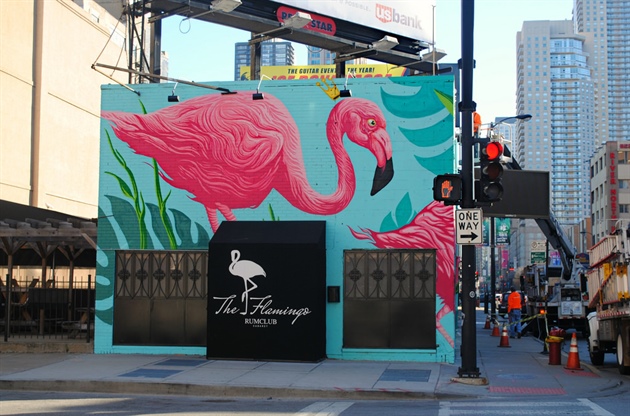
Thank you for watching my tutorial! I just wanted to show you a picture of The Flamingo Rum Club, which where a part of my inspiration for the design, when I saw the new ORLY shade 'PINK NOISE' i just knew it had to be a flamingo design. Feel free to write a comment if you need help recreating this design or just wanna tell me what you think. If you havn't started already I just wanted to let you know that you can also make all this, using ORLY Nail Laquer OR ORLY Gel FX for the entire design, as long as you still use the ORLY Gel FX Topcoat.
7 Artists like this Photo
Write a Comment
Submit