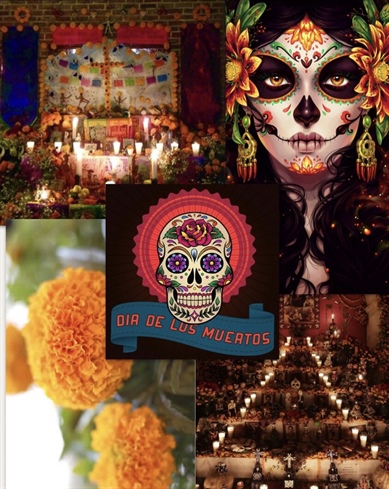
Dia de Los Meurtos, or the Day of the Dead is a Mexican Holiday that celebrates life and life after death. It is said to be the one day of the year where your family comes together again. This is a very colourful time with each colour having a meaning. You will see lots of red-blood of life, pink-celebration, white-purity and hope, orange-the sun, yellow-to light the way back to earth, and purple-which is mourning or sadness. In my piece there is barely any purple, the woman has come to terms with her relative’s death. I wanted this piece to portray contentment. Since this Holiday is to be the merging of life and death and celebration, I wanted the colours and the scene to show this. This challenge was to be bright!... but I couldn’t stay away from black. I don’t know if this is influenced by my Western background or maybe my own view of death, but the black, symbolizes the unknownness of death. During this time people set up altars of their loved ones, they put up photographs to help the spirits return and candles and marigolds- to guide the way. Skulls are very common during this holiday as a constant remembrance of the dead and everyone’s absolute fate. The cohesiveness of the Crystals and the hand painting was very important, I did not want one to over power the other. Each one is placed so that they would add sparkle where I wanted to highlight my design. The Swarovski skull has a headpiece of Crystals to reflect the woman’s. I always trust my creative mind and after receiving the challenge, this is the image that came to mind. This was so much fun! I love to capture the essence of something, and to tell a story!
Step-by-Step Nail Art Tutorial
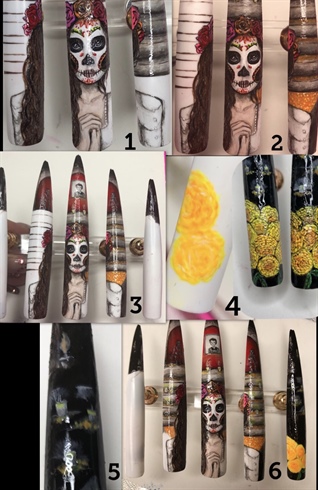
1
Step 1. Search Google for pictures that would compliment your vision. After reading the challenge guidelines, I wanted my piece to be enriched with the different symbols and colours of this beautiful Mexican Holiday but I did not want the beautiful Swarovski Crystals to get lost in the design. I wanted each element of this piece to be cohesive but also have its own unique eye catching elements.
2
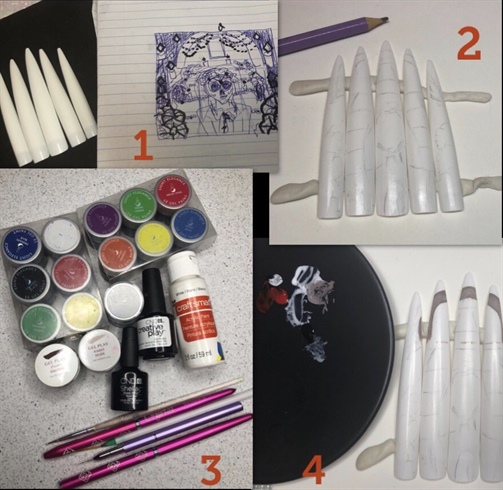
Step 2. My tips were already white, however, if they were not, this is where you would paint 2 coats of white so that your design really pops. \n\nSketch out the design with the Swarovski crystal placement that you would like to put onto the nails, align the tips the way that will compliment your design, and lightly sketch out the design onto the tips with pencil. I chose to have the tips upwards so that the bottom would have the most canvas for my woman. Buff the tips and wipe over the surface with acetone for a clean and smooth work surface. Gel and acrylic adhere better to a roughed up surface when painting. In my design I chose to use primarily gel paints, but also white acrylic paint (see in picture 3), every other colour variation that you will see has been mixed accordingly to make the desired colour or shade.\n\n
3
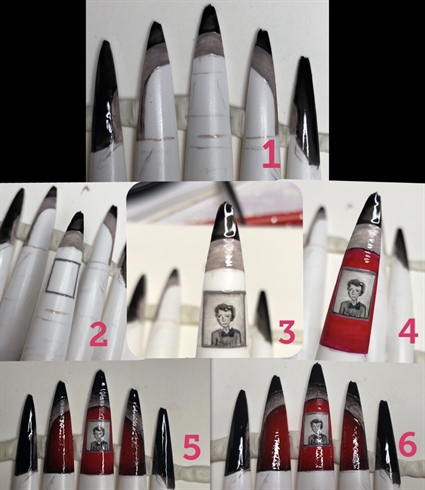
Step 3. Start to paint the back of the nails rather than the front so that you do not touch the sticky dispersion layer with your hand when working on your design. Note- I noticed that the tips out of the package were unfortunately broken, but I made them work. (Do not worry if the tips are damaged you can always make them work.) I started with the altar area with black, mixed grey, and red. I did not feel that it was right to copy a picture of a deceased relative from the internet, so I took elements of my own departed grandmother to make it more meaningful. \n\nTo make a more realistic painting, it is key to have highlights and shadows. The highlights were achieved by using a dry brush technique and carefully blending in the white, and the shadows were the same technique but with black. For all the shadows and highlights in my painting I chose to use CND, BlackPool and CND Creative Play, I Blanked Out. I found that these gels were quite transparent with one coat and extremely easy to blend. \n\n
4
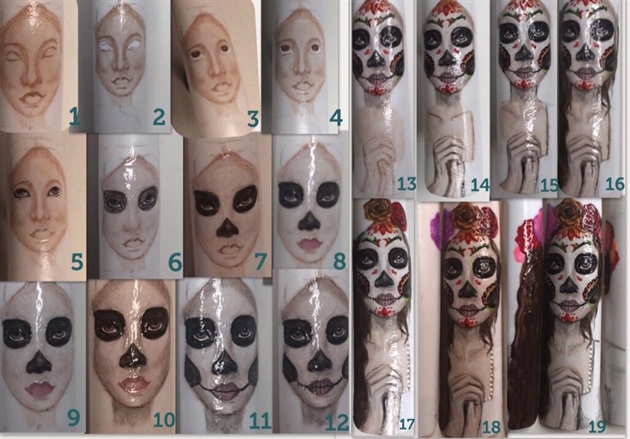
4.The woman at the front. I started out by drawing the face and adding the contours and highlights to make it more realistic. I wanted her looking upwards so I made her eyeballs in an upwards position. I then painted her face as you would with face paint for this holiday, typically variations of skulls. I added more contour and highlight, but this time with white and various shades of grey to really bring her face to life while keeping the look of the skull. I then added her neck, collar bones, chest, hands, dress, hair and a floral headpiece- highlighting and adding shadows accordingly to make it as realistic as I could.
5
5. I started to fill in the middle ground and sides. I drew stairs and shaded them in. When drawing objects that you want to look 3D, it is best to blend the highlight and shadows VERY well, it will create that illusion of depth. I find that when blending, it is best to blend both colours before curing. I added marigold petals cascading down the stairs and full bouquets on each side of the woman. In this holiday marigolds play a very important role, they are said to make a trail (along with the candles) so that the deceased relatives can find their way back. I drew a lot of candles on the steps and wanted them to trail off into the darkness, while still lighting the way. Skulls are often seen in this holiday as well, however, drawing large ones did not quite fit into my design, but I did add a few tiny ones scattered across the steps intermittently, and at the back, like often found on actual altars.
6
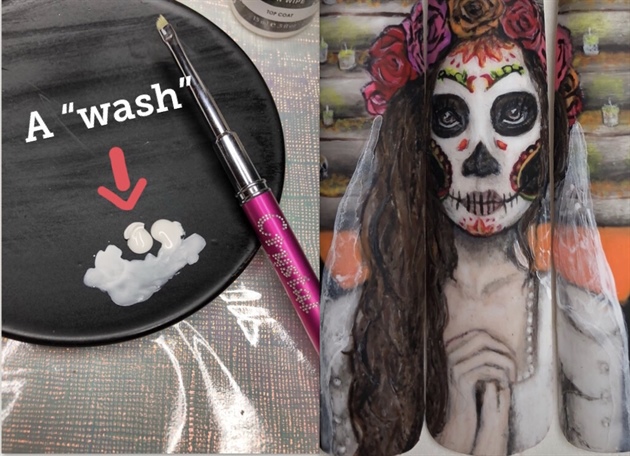
6. The veil. I completed the woman with a veil. This was symbolic because it is believed that when you die, you cross the ‘veil’ into death. This cool effect was achieved by making a “wash” with acrylic paint. This technique is when water is added to the paint to thin it out, the consistency should look similar to coloured water. I did not want to ruin my design, so I top coated it first, then did a “wash” of white to create the veil effect. I finished with matte topcoat.
7
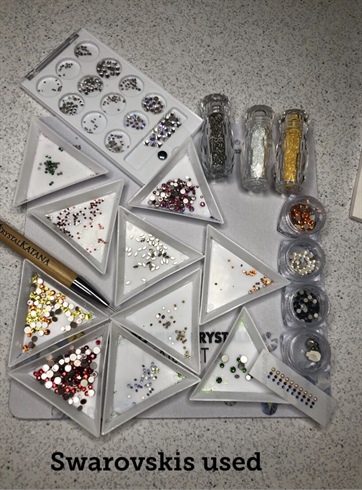
7. Part of our challenge was to add 30% (minimum) Swarovski Crystals and Crystal Pixies. As the final part of the design after top coat is on I used Schtick It Gel (nail glue would also work) and my Crystal Katana to apply the Swarovski crystals. If you do not have a Katana a wax pencil will also work. I chose to use multiple kinds of Crystal Pixies and Swarovski Crystals to add that right amount of sparkle but not have either element (hand painting and crystals) over power one another.\n\nThe crystals I used were: Navette Golden Shadow 2mm, Sun 5ss, Crystal Pixie Petite Deluxe Rush, Metallic Lt. Gold 5mm (2056), Jet ss12 (2088), Tangerine ss16 (2088) & ss12, Crystal Pixie Petite Cute Mood, Crystal ss3, Autumn (Gold) ss5, White Opal ss12 (2088), Crystal Pixie Petite Sunshine Kiss, Indian Siam 3ss, Dark Moss Green 5ss, Light Rose 5ss & 9ss, Light Siam ss12, Air Blue Opal ss5, Fern Green ss14 & ss16, and Citrine ss14 & ss16.\n\nEvery crystal can be seen where it has been utilized. However, I would like to note the Swarovski Skull at the top. Its head is adorned with crystals to make it look similar to the woman’s floral headpiece, to pay homage to Dia De Los Meurtos.\n\n
8
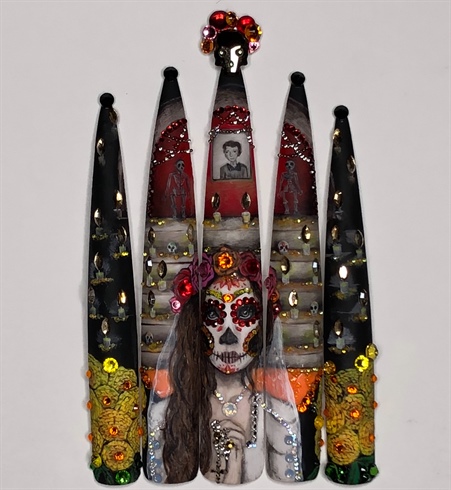
8. All finished.
9 Artists like this Photo
Write a Comment
Submit