For this weeks challenge, Akzentz requested that we recreate our favorite decade on 10 nail tips. They wanted to see what the popular colors were at that time as well as include some pop culture. Six of the nails had to include 3D art composed with gel only, and we had to incorporate something unconventional.
For this challenge, I've chosen to showcase the 1930's. Not the depression side of things, but the lightheartedness that can even be experienced in hard times. The number of working women actually doubled during this time. The fear of war and starvation was in nearly every household.
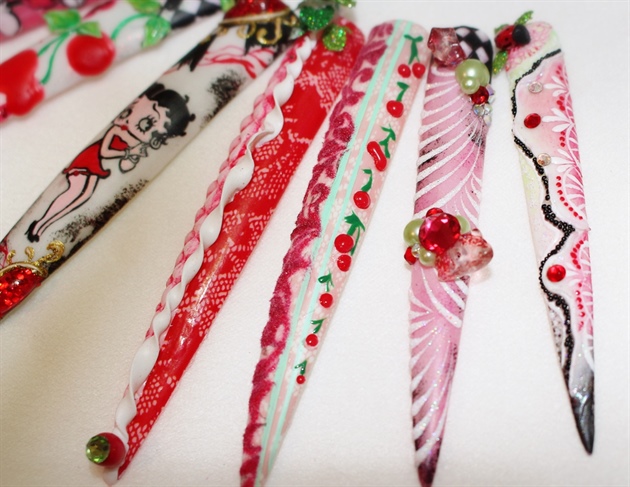
During the Great Depression of the 1930's there was a great revival of quilting & sewing and hard times brought a strong desire for women to socialize. This became a popular way for women to be creative and make practical household items, as well as earn a little extra money on the side or have items to barter with. Some of the most popular patterns were plaids, fancy filigree, & cherries.
Betty Boop made her first appearance on August 9, 1930, in the cartoon, Dizzy Dishes. Little did anyone know what an iconic figure she would become down through the decades.
Times were hard and most households had little to no toys for the children to play with...only hand made items such as wooden trains existed. That is until Mickey Mouse made his way on the scene. He'd been introduced in 1928 but by the mid 30's it's reported that nearly every household had at least one stuffed Mickey toy.
One of the delicacies of the times was cotton candy. Below, in the tutorial, you'll see how I've taken the most unconventional of items and created my very own cotton candy flocking powder.
I've recreated for you some of those beautiful patterns, the filigree, the cherries, and even added in a little of my own designing. I know in my own life, I've had to face some rough patches. In those times, no matter how hard they seemed, I had to hold my head up high and be strong...as a Pastor's wife, I had people watching me to see how I would react. Sometimes we have to show others we're not as weak as they think we are (or as WE think we are).
Step-by-Step Nail Art Tutorial
1
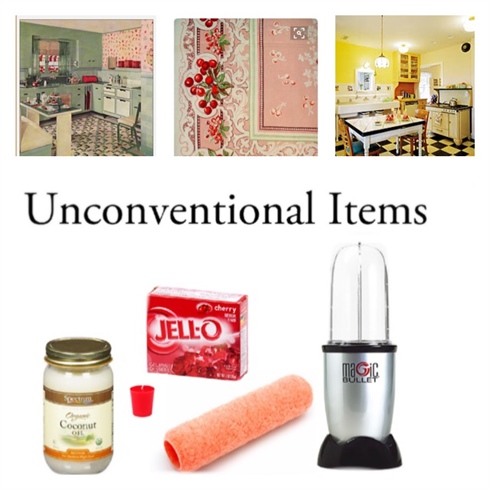
For this tutorial, you will need to have on hand the items shown in the "Unconventional Items". They are as follows:Three drops of melted coconut oil, 1/2 Tsp of dry red jello mix, the fuzz cut from a paint roller (about 1/2 the roller), magic bullet or blender to mix in. This will produce our cotton candy powder...an alternative product to use as flocking powder. You will also need to have the colors as shown in the inspirational photos, using various gel polishes / acrylic paints. The last item you'll need is a red candle.
2
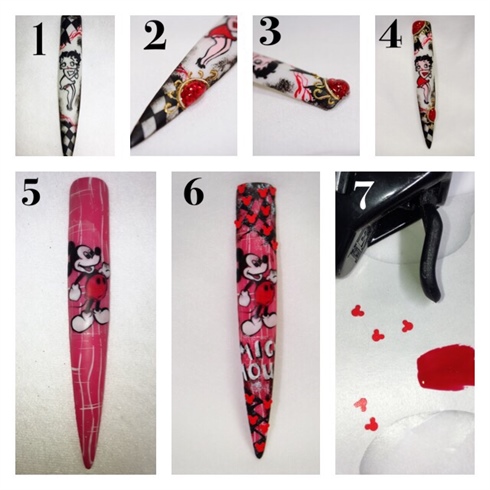
Let's tackle the two middle nails first. They're the largest surface area to cover. 1) Paint checkerboard with acrylic paints and outline Betty; matte top coat. 2) Color in Betty with acrylic paints, matte topcoat and add 3D "stones". (Stones are red gel polish sprinkled with red glitter & cure. Top with hard gel, cure.) 3) Add 3D gold gel around stones to mimic frames or scroll work. 4. Finished nail. 5) Paint Mickey onto a simple plaid background with acrylic paints, matte top coat. 6) Add the coordinating checkerboard around the edges with acrylic paint and the lettering, matte top coat. 7) Cure Red gel polish onto the backside of a nail form. Remove from form and punch out Mickey heads with a paper punch. Adhere to nail with matte top coat.
3
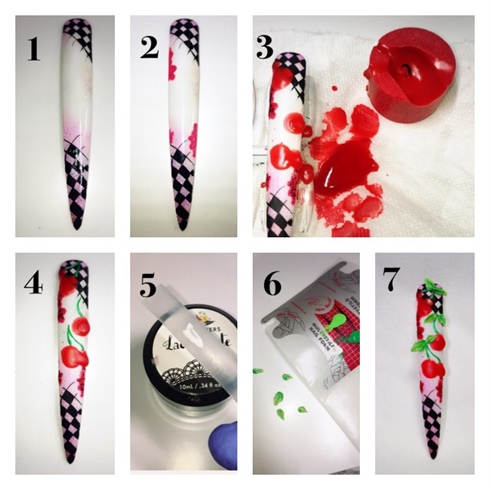
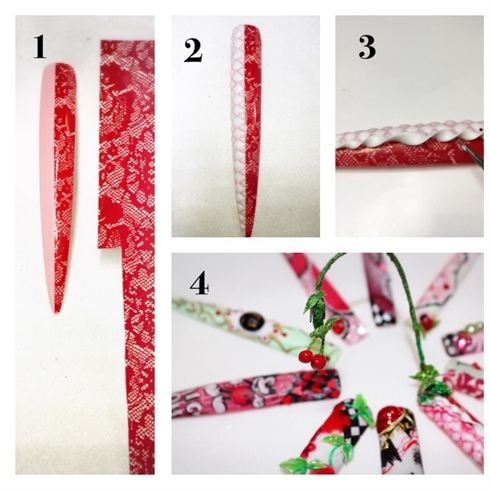
This was such a fun nail to create. You'll be using your first unconventional item, the red votive candle. As you can see from the pics above, I had to show you the messy part of this step. You'll need to protect your work surface and wear gloves to caution against the hot wax. 1) Add a bit of pink pigment and glitter to the perimeter of the nail with base gel. Cure and add a second coat of gel to smooth surface. Proceed with painting the checkerboard boarder as in the previous steps. 2) add cloud shapes in red gel and sprinkle with red glitter, cure & add a generous layer of matte top coat. Cure and wipe tacky layer. 3) Light candle and allow wax to drip on the paper towel several times before applying to the nail...you'll see a regularity in the "drips" and can better place them onto the nail. Let me caution you to have everything completed on the nail at this point. If you've forgotten a step and need to put the nail back into the lamp, your cherries are history! 4) Paint on cherry stems with acrylic paint. 5) Using 4D lace gel, make your cherry leaves on an aribella form. Cure for 60 seconds in LED. 6) Paint gel leaves with acrylic paint. Once dry, top coat with no cleanse gel, cure. 7) Attach leaves to nail with clear gel, cure.
4
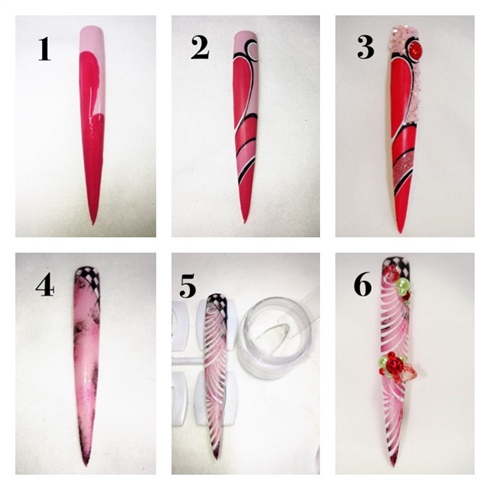
1) Add bright pink gel to pale pink base nail, cure & add matte top coat. Cure & cleanse. 2) Outline in 3D black and white gel. Curing with each color. 3) Add micro glitters to the center section by adhering with base coat, cure. Add chunky glitters in the same fashion to light pink portion of the nail. Do not top coat. 4) Using the same base color pink, add some pink pigments into the already cured tacky layer of gel. Matte top coat, cure & cleanse. Paint checkerboard pattern with acrylic paints. Once dry, matte top coat, cure & cleanse. 5) Add white 3D gel in a draping fashion. Before curing, sprinkle on some micro glitters into the wet gel. this is what is known as "sugaring" in the nail world. Cure for 60 seconds in LED. 6) add a few embellishments but use sparingly as not to overwhelm the delicacy of the nail.
5
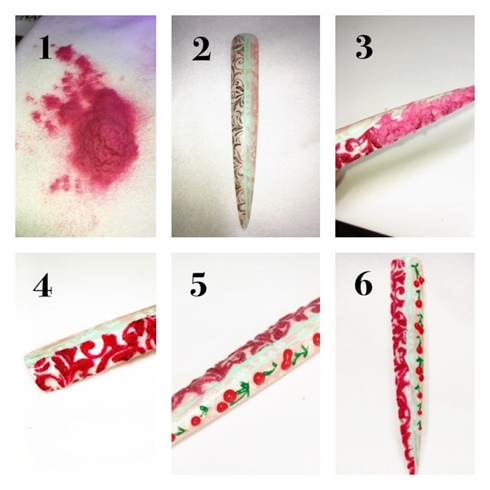
This is where you'll need to go to your kitchen and mix up your cotton candy powder. Refer to your recipe in STEP 1. Put all ingredients in magic bullet and give it three really quick pulses...like micro seconds. The result is AMAZING! 1) You now have your very own rosy-pink cotton candy powder. NOTE: it took me a couple of tries to get my coconut oil ratio just right. Start with one drop and move up from there until you get the right consistency. The oil is only there to activate the color in your jello...you don't want a wet powder. 2) Add mint striping down center of lace nail with acrylic paint. Once dry, stamp the filigree pattern on the left side of nail in BLACK POOL Shellac. Cure but don't cleanse. 3) using a black 3D gel, paint over the black pattern that you just stamped. Before curing sprinkle with a healthy dose of cotton candy powder. Tap off excess and cure. 4) Cotton candy texture revealed. 5) Paint 3D cherries on the opposite side of nail with 3D gel, cure. 6) Finished nail. What could be better than cherries & cotton candy?
6
1) Using an Empower nail art film, cover half of nail. 2) With white builder gel add tiny diamond patterns down the solid side of nail. You will need to do a flash cure after EVERY diamond to keep the gel from falling. This makes a pretty "puffed" pattern all the way down the nail. 3) Using 3D lace gel, form a long rope, flatten it out, and twist it like you would a crepe paper streamer. If you find you're having trouble with this gel being to sticky for you, keep a bit of cornstarch near by. Put a little on your hands and tools and it'll work like a dream...I promise. 4) Using a tiny piece of wire, cover in gel and green flock, cure. Add cherries made from gel and the glitter leaves. By placing a bit of white builder gel on a nail form you can easily make your leaf shapes and glitter them before curing. Attach to the nail with clear gel so that it extends overtop of your candle wax cherries.
7
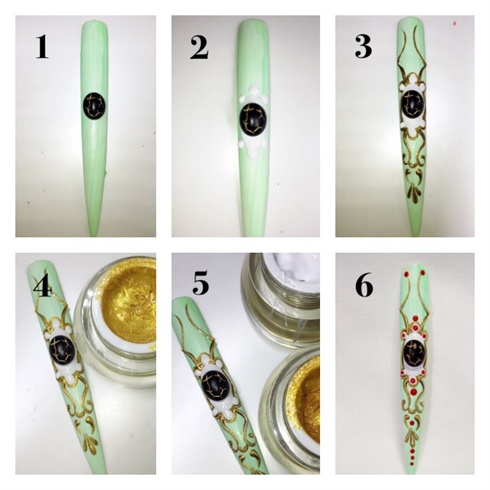
What a gorgeous nail! 1) Start by curing a piece of black 4D lace gel in the center 2) Add 3D white gel around the faux stone, cure 3) Using dark bronze 3D gel, free-hand filigree work, cure 4) Going over top of the dark bronze with a bright gold will not only give a higher dimension to the design, but also adds depth of color. Cure when done. 5) Mix two parts white and one part bright gold gel and add a third layer of gel for the highlight, cure. 6) Add red gel dots as accent, cure.
8

1) When applying 4D lace gel, roll it like play-do between your fingers. It works best to apply in small amounts. 2) On the right side of the 4D lace gel, apply white builder. 3) Add 3D gel painting and embellishments. *Don't forget to find the ladybug. 4) Apply gel paint, cure. 5) This nail contains no embellishments. This is done all by placing dots of gel polish, curing and then adding clear builder gel over top the beads of color. It gives a beautiful effect. 6) Finished nail.
9
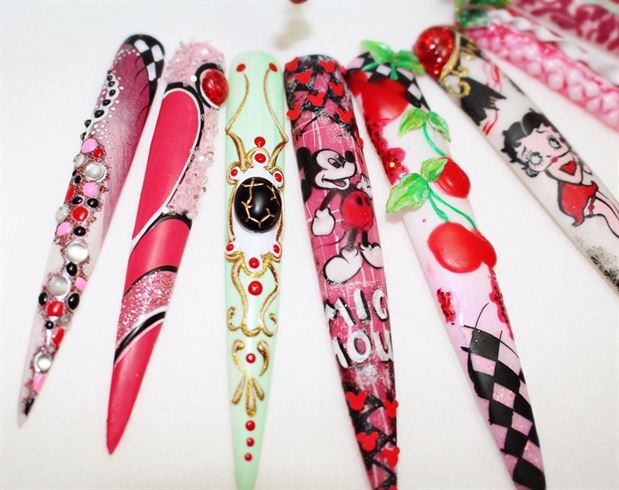
Close up of left side of nails.
10
Close up of right side of nails.
5 Artists like this Photo
Write a Comment
Submit