This is my entry into Nails Next Top Nail Artist Season 5 Pre-challenge #1, Bewitching Hour! for this challenge i wanted to do my three favorite witches of all time, The Sanderson sisters! Follow along and you can recreate this look too!
Step-by-Step Nail Art Tutorial
1
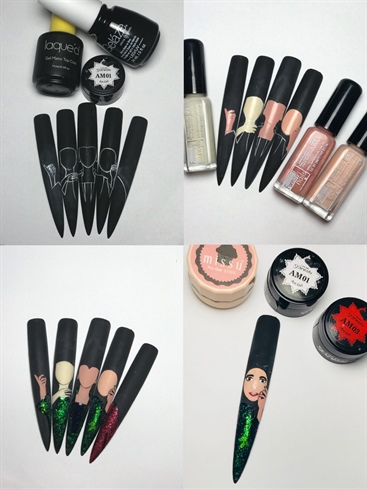
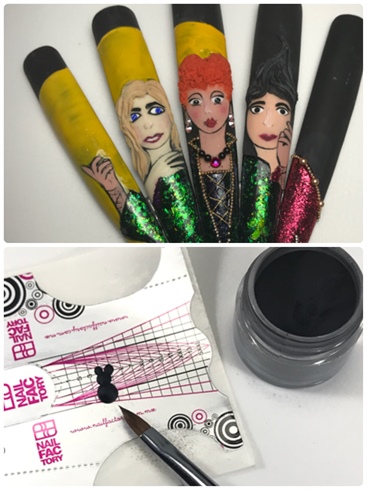
Using a black gel polish, I painted all five fingers black. Once cured I topped them off with matte top coat. once cured I wiped off the tacky layer and lightly buffed the surface of the nails to create a canvas like finish to the nails to be able to paint on them, kind of like a portrait. I then proceeded to outline the design of my nails in white gel polish with a detailing brush. the outline will help you visualize where your design will be. once the outline is complete proceed to fill in the parts that require flesh toned colors. in this case I used regular polish as it was the most pigmented flesh color I had available. Allow them to completely dry anywhere from 10-20 minutes. moving on, I filled in their dresses with gel colors and added different types of glitters to add a different affect to each dress. once you have finished filling in your outline, go ahead and paint on their faces, adding eyes, lips, eyebrows, noses, and some lightly colored blushes.
2
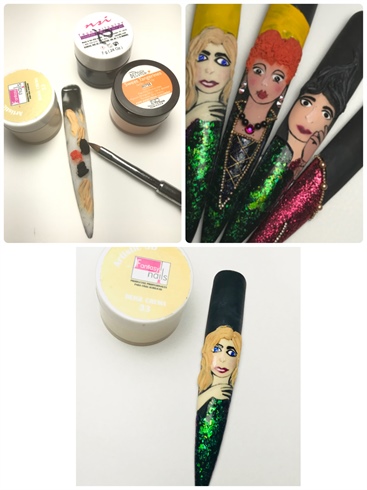
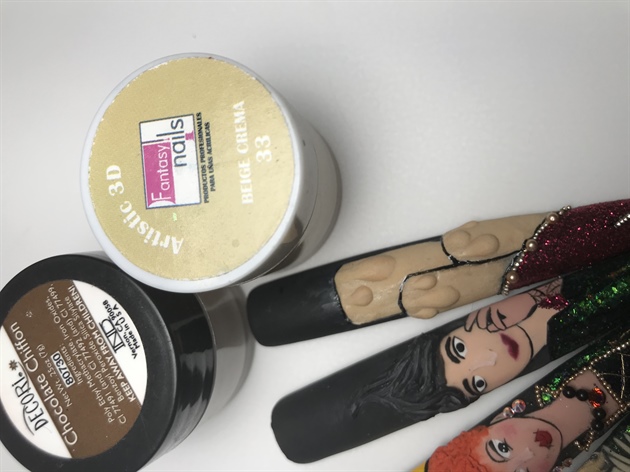
After I drew on their faces I moved on to design their hair. because their hair was designed to be in 3D I had to practice the different textures of each of the sisters hair before actually taking the acrylic into my outlined nails. for Winnie I used the metal part of the crystal katana dipped in acrylic to create the curled looking texture to the red head on a wet bead of orange acrylic. For Sarah I used a blonde color and worked the waves into her hair whit a size 4 acrylic brush while the acrylic was still wet, adding movement to her hair to make it more realistic. and for Marys hair I ended up using a 3D gel to play a little more with her hair, since her hair had more movement in it than the other two.
3

once their hair was done I moved on to adding details to their clothes , specially Winnie since her dress was front and center. I used caviar beads to outline her dress, cut up gold strings to create the front corset, and then used pears and Swarovski crystals to create her earrings and her necklace. for Martha, I outlined her cape with caviar beads and pearls.
4
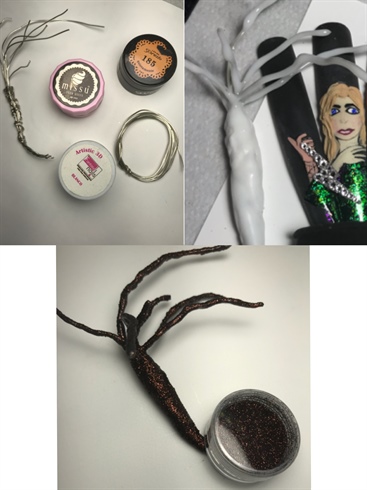
once the sisters were done I moved on to making the additional pieces that would accompany them. I started with the tree. Using jewelry wire I scalped a tree with branches. By using 3D gel and hard gel I covered the wire, making some parts thicker than others to give the tree and its branches a touch of realism. once I covered it in the hard gel I took beads of black and brown acrylic and began to cover the tree, once it was fully covered in acrylic I added a gel topcoat all over and sugared brown glitter all over it so that it would pop out from the black background.
5
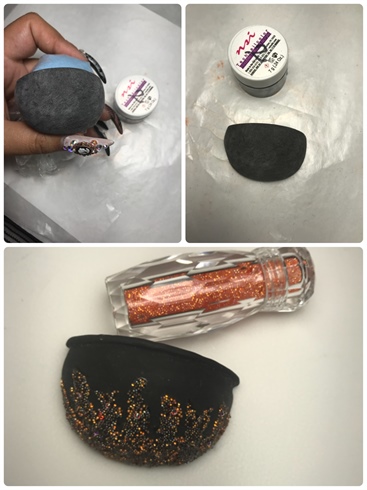
I then proceeded to create the cauldron that would hold it all together. I took two napkins and made a ball out of them which I then placed in a plastic bag, measuring how big I would want the cauldron I held the bag tight to the ball of napkins and used it as a mold for my acrylic. First I made the initial mold with clear acrylic, adding one bead of acrylic at a time, adding some thickness to the cauldron, making sure that when it was time to take away from the bag it wouldn't brake. Once it was dry I took it off of the mold, shaped it a little bit more, then covered it with black acrylic. After it was dry I filed and buffed, added the edge to the cauldron, and top coated with matte top coat. Using hard gel I shaped some flames at the base of the cauldron and sprinkling on Crystal pixie with some orange caviar beads and some randomly placed size 5 Swarovski's.
6
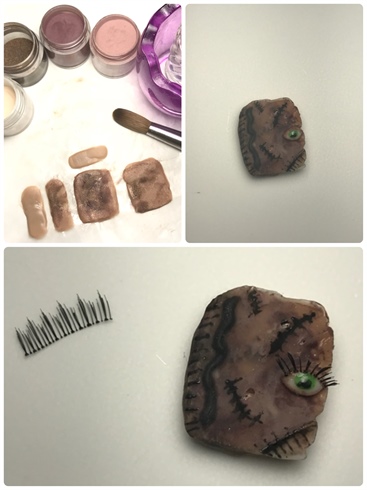
moving on to the book. I used 4 different browns to create this book. Because in the movie the book is made out of human flesh, I used a nude brown first to make the base of the book, once my squares where done, I added a shimmering brown, a dark brown, and some more of the nude brown to randomly marble them onto the base of the book. once dry I used some hard gel to create the creases in the book by applying a semi thick layer on top of the front square. before I put into the lamp to sure I used a plastic bag, placed it on top of the front of the book, and wrinkled it to give creases to the book. put into the lamp and sure with the bag on top of it, when you take it out the bag should pop right off. take some black gel paint and draw on the stitching effect . with acrylic I added some detailing to the book and also did its one eye. to finish the book off I topped it off with matte, and added a strand of lashes to the eye.
7
before putting it all together I realized my design was missing some stuff, so I decided to add some candles and the moon. the moon was just outlined across three nails and filled in with yellow polish, I let that dry and then covered with a shinny top coat. once it was cure I decided to line the moon with size 12 and size 7 Crystal AB Swarovski's. next using two beads of black acrylic I shaped the body of a cat, who will represent Binx! before the bottom bead dries I added a little piece of wire to make his tail, and just like with the tree I added acrylic around it to match the black acrylic of the cat. I shaped his ears and let him dry for later use.
8
on the fifth nail I decided to add some candles with some acrylic, making three square like shapes. outlining then with black detail polish to make a distinction between the three. I added some wet beads of the same acrylics onto the candles and dragged them to give them a melting affect. I finished them by using two flame like Swarovski crystals in orange, and the top one was finished with a Black tear drop crystal to resemble their famous black candle.
9

Now all our pieces are finished I used a hot glue gun to hold it all together, I placed the nail tips side by side and then used resin to hold the tips together side by side, once dry I carefully picked it up and hot glued them together from the back. I then placed the tips in between the branches and glues the tree to the left side of the design. I then grabbed the one eyed book and placed him at an angle in front of Winnie so that he wouldn't block her dress so much. once the book was on, I took the cauldron and glued everything together making sure it was all secure, and wouldn't fall apart, I let dry for 10 minutes.
10
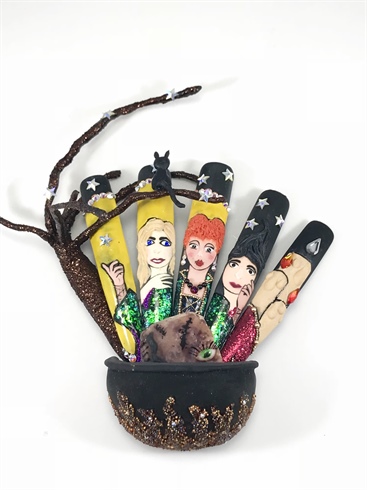
Once our design is put together I decided to add some finishing touches, I Places our cat sitting in one of the branches and added star shaped crystals in the branches of the tree and also all around the top part of the design . Our design is Finished!
5 Artists like this Photo
Write a Comment
Submit