The theme for this challenge was Northern Light, and one of the main challenges I faced was incorporating a light component onto the nail.
Although research on the Northern Light showed it appears in both the Northern and Southern Hemisphere, it's spectacle is predominantly situated in the North. The Northern Lights appear at certain time of the year with a kaleidoscope of wonderful colours in the sky. The most northerly place that I felt would show the lights in all their glory was Alaska, so for this challenge I want to recreate the northern light Alaskan sky line.
When talking about Alaska, You cannot go past mentioning the Eskimo people. I find them fascinating, how they live under such extreme condition and yet with simple lifestyle but still happy, therefore I felt it imperative to have this this form a key part of my design.
I wanted to create an igloo as this is a perfect element for challenging my creative skills. I wanted to really bring my igloo to life - what better way but to (Norther) light it up!!
I also wanted to include the snow mountains In Alaska because the natural ice formation always fascinate me and how pristine they look. They glisten and shine in the skyline and spare against the radiant backdrop of the sky.
A northern light sky is not complete without a reflection on the water, and I included this as part of my design.
Since INM is the sponsor of this challenge, i thought I'd create swans which resemble a snow goose. To me, this a perfect fit as it reflects INN logo and also having them appear on the water.
Eskimo People must have a wonderful view when watching the Northern Lights - and I wonder if they know the star constellations and cosmos? I'm sure they do - so, my Eskimo is looking at the sky with his constellation map. I'm sure he'll be telling his children all about the wonderful Lights he sees.
So all these elements complete my design for the northern light theme. I hope you enjoy my creative journey.
Step-by-Step Nail Art Tutorial
1
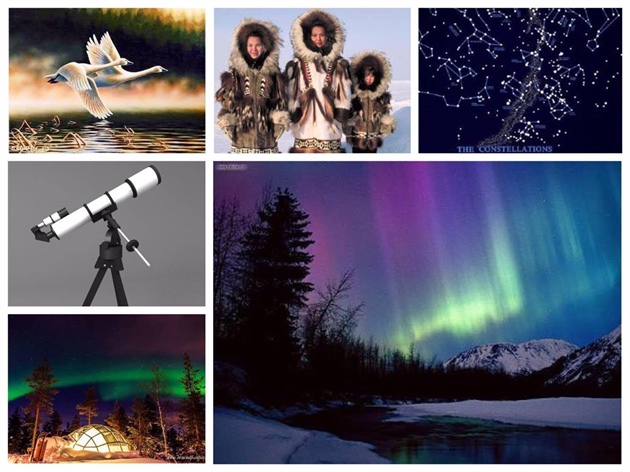
Here are some pictures behind my inspiration for this week challenge.
2
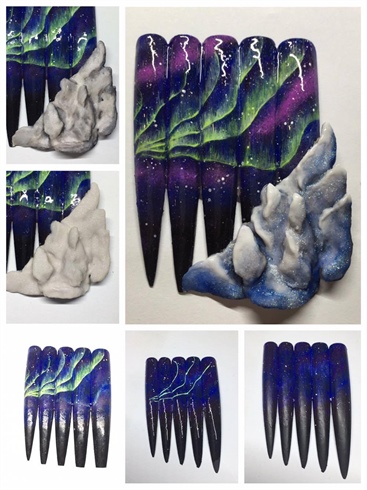
To create the northern light sky line, I used gel polishes and acrylic paint. I buffed and painted five nails tips in black gel polish and cured it for 30 secs. I then added different shade of purple, blue and pink to create the magical night sky. \nFor the aurora that glows in the sky, I blended white, fluorescent green and yellow gel to the background . \nI also made the snow mountain with beige, white, grey, light blue and dark blue acrylic and CND additives to give it the snow effect. I applied different layers of acrylic and moulded it to give dimension follow by shading it with blue, grey and white acrylic for definition .
3
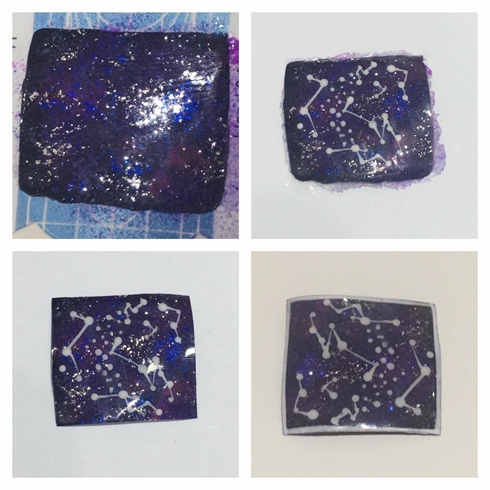
The constellation map was made out of gel. I painted several layers of black gel polish onto a piece of form paper and cured in between for 30 seconds. I then shaded the map with with blue, purple gel and glitter to add depth. To complete the constellation map, I used a small amount of white gel and a dotting tool. I carefully plotted the dot to create the galaxy and then connected the line together, and finished it off with a gel top coat.
4
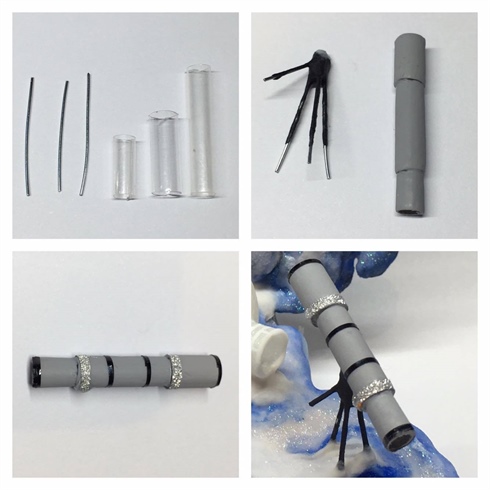
The telescope was made of using 3 different sizes of small tube, wire, acrylic, gel polish and striping tapes. I started with 3 small plastic tubes, cut them into size and attached them together. I then painted it with a grey gel polish. I added the border using black and silver striping tape. To complete the telescope, I created a 3 little leg stand out of wire and black acrylic, and attached it to the telescope.
5
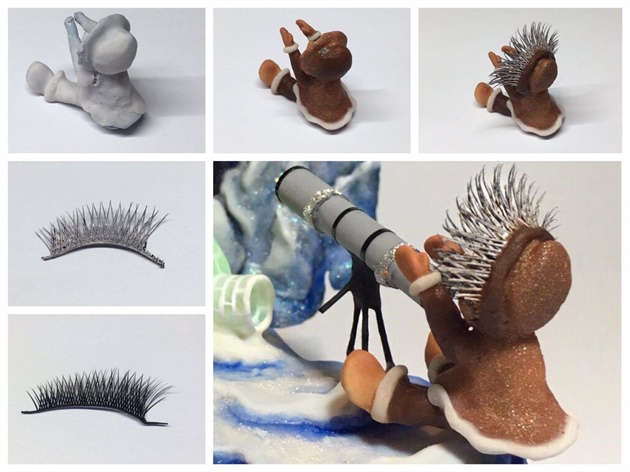
The Eskimo was created by using blu tac, gel polish and acrylic. I started with creating a small figure using blu tac, follow by coating it in gel and curing for 30 seconds. I then applied white acrylic for structure and different shade of brown acrylic to resemble the clothing that is worn by the Eskimo. For the fur hat, i used couple of eyelashes strips and painted them with cream gel polish, then attached it to the hat with nail glue and acrylic .\nI then removed the majority of the blu tac to keep the Eskimo nice and light.
6
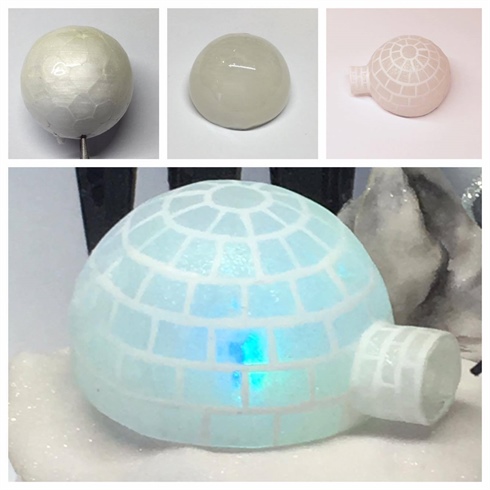
I used a mini foam ball and hard gel to make the igloo. I dipped half of the foam ball into hard gel and cured it for 3 minutes. I wiped off the sticky layer with isopropyl alcohol and filed it into shape. This is followed by painting the igloo with a sheer white gel polish and pearlescent pigment, then I cured for 30 seconds, I then drew a block of ice with white gel polish and finishedit off with a matte top coat.
7
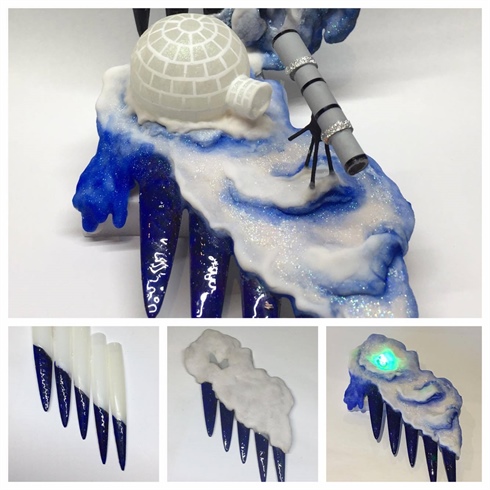
For the base of the nails, I painted one third of the tip with black gel polish, and sponged on several shades of purple, blue and pink gel polishes to create the water at night. I then applied several layers of beige, white and blue acrylic to the remaining part the nails and added CND additive to achieve a snow effect.
8
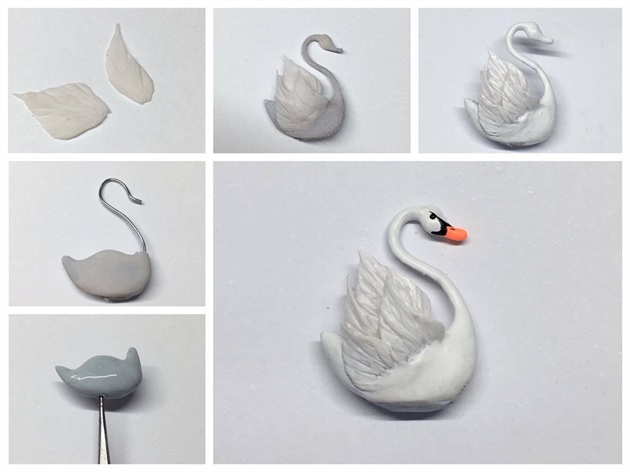
The Swan was created by using a small amount of blu tac, white acrylic and gel several polishes. \nI started off by moulding the blu tac to form the body of a swan. I then use a wire to create the neck and coated it with gel and white acrylic. \nI followed this by creating tiny little feathers and attached them individually onto the swan. To complete the swan, I painted it with white gel polish, cured for 30secs and followed by detailing the swans' eyes and beak using black and orange gel polish.
6 Artists like this Photo
Write a Comment
Submit