This week we were asked by EZFlow to create a fantasy piece over 5 tips to help people get excited about the new acrylic collection: Enchantment!
Fantasy nail art is something I have always wanted to attempt, so I was delighted to find out the details of this week’s challenge! When I hear Enchantment, I immediately think of a fairytale. So I decided to write my own story and make them come alive on these nails:
A village is being terrorized by an evil dragon. It is said that the only way to defeat the evil dragon is to get a WHIMSY flower from the Keeper of Time and space. So to take the matters into his own hands, the wizard sets out to the forbidden kingdom to seek help. On his way to the kingdom, he came across a fairy. He explained his situation and the fairy felt obligated to help! So she decided to give him a hand by granting him the power of ETERNAL YOUTH using her crystals. She then gave him directions on how to find the Keeper and wished him well, the wizard thanks her for her kind hospitality and went on his way. After days of trekking, he finally found the Keeper. Excitedly, he told the story one more time in hopes that she would offer him the Whimsy flower. The Keeper smiled and said "all you need is love" Then she rapidly wrapped herself in vines and vanished. Then it all clicked. ALL YOU NEED IS LOVE! So the wizard went back to the village and yelled out "I AM HERE FOR YOU DRAGON!" He then created an orb containing powers from a special part of his heart and sends it towards the beast. When it touched the dragon, he was at peace. Because, like the keeper said, All you need is LOVE! As it turns our, all the dragon really wanted was a friend, and he was just frustrated at the fact that all the gnomes ran away as they saw him...so the village invited the dragon to stay and this will go into the story book as THEY LIVED HAPPILY EVER AFTER!
To say that this is my favourite set of nails to date would be an understatement. I sincerely hope you enjoyed the story and the nails as much as I did creating it!
Step-by-Step Nail Art Tutorial
1
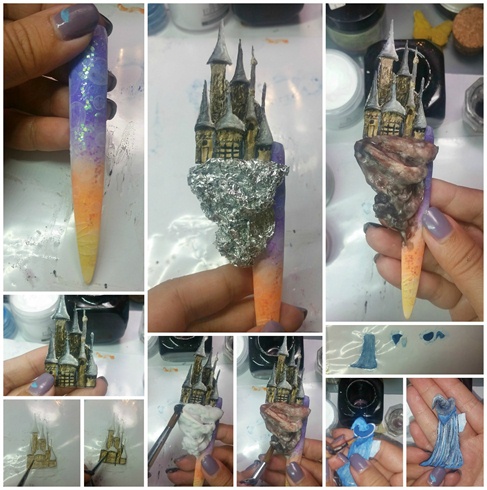
THE JOURNEY: 1-Use 4 different gel polish to create gradient. Apply iridescent glitter and water colouring (the bubbles) 2- Build castle using white acrylic, colour and add shading details accordingly 3- adhere tin foil to nail to build structure to mimic cliff 4-Colour the cliff using 3 different coloured acrylics to create dimension 5-sculpt out the wizard and assemble.
2
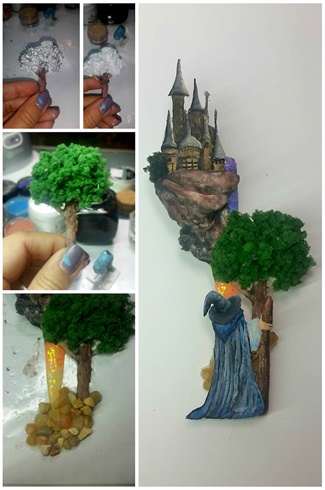
THE JOURNEY: 1- cover tin foil with white acrylic, create texture and colour using 2 shades of coloured acrylic 2-sculpt out branches and attach to the tree 3- adhere coloured sponges to create tree 4- adhere stones to create the "pathway" the wizard will be travelling on
3
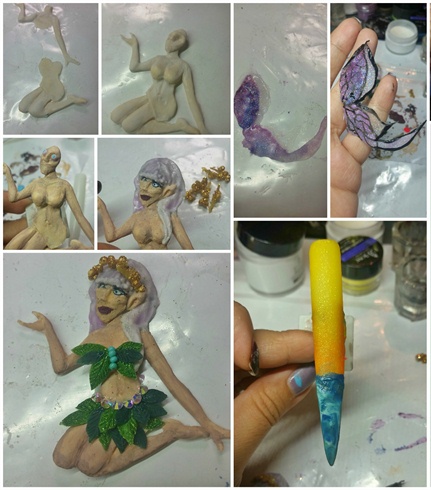
FAIRY of ETERNAL YOUTH: 1- use white acrylic to sculpt out the basic structure of fairy 2- assemble and add in details such as facial features 3- draw in eyes and add shading 4-sculpt leaves using shades of colour acrylic, apply to cover body 5- adhere embellishment 6- sculpt out wings and add details using coloured and glitter acrylics 6- create a gradient on the actual nail to mimic sunset. Add blue and white acrylics using marbeling technique to mimic water
4
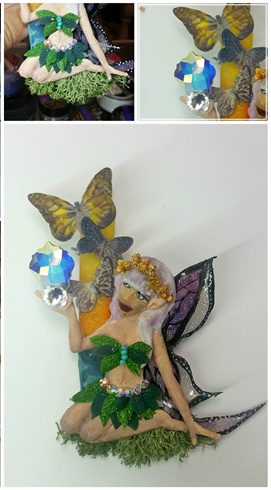
FAIRY of ETERNAL YOUTH: 1- adhere "moss" to where the fairy is sitting 2- assemble nail including butterflies and large Swarovski stones to symbolize Eternal Youth
5
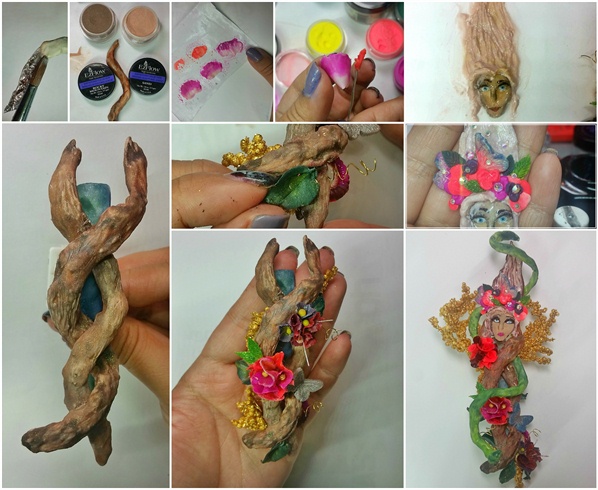
KEEPER OF TIME AND SPACE: 1- Use rolled up tin foil as the structure of the twigs, shape accordingly 2- Cover with acrylic and add texture 3- Colour the branches using EZFlow Rocky Mountain and Sand 4- Using colour acrylics, build pedals individually. Apply same technique to create leaves 5- Assemble on wires 6- Create the "Keeper" using white acrylic 7- Building facial structures using small beads. Colour and add details 8- attach sculpted flowers and embellishment onto the hair 9- Assemble and complete
6
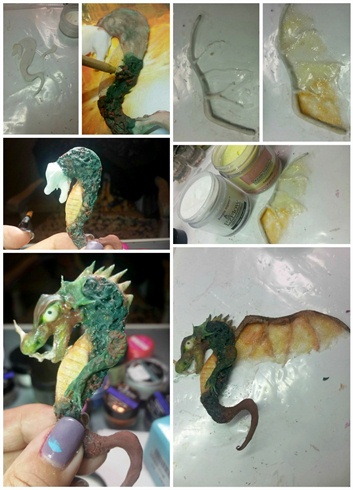
LOVE: 1-sculpt out basic structure of dragon including tail and arms 2- using an orange wood stick, push the semi cured mixed coloured acrylics around to create texture 3-add in a lighter colour onto the textured body to create dimension 4-shape wire to create the wings, cover with white acrylic 5-fill the rest of the wing up using glitter acrylic 6- colour the wing using different shades of brown coloured acrylic 7- add in final details such as spikes, and eyes etc
7
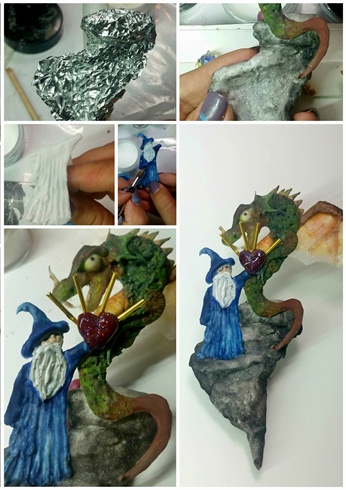
LOVE- 1-use tin foil to create shape of the hill, cover with white acrylic 2-create texture using coloured acrylics to add shading 3-using the same technique as the wizard in step 1, sculpt out wizard in an offering pose 4-sculpt out heart using EZFlow Natures Kiss and attach gold spike 5- assemble nail and complete
8
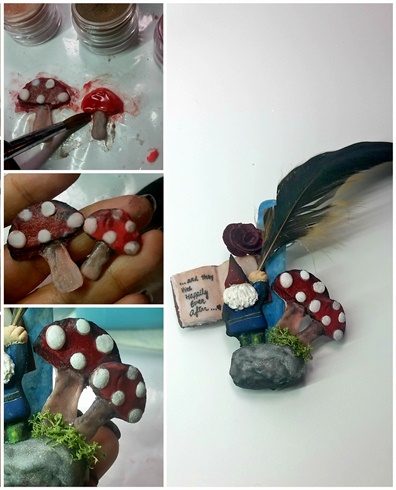
HAPPILY EVER AFTER: 1-Over a tin foiled tube, create two rectangular shapes using white acrylic. This would make the "pages" in the book 2-pick up a larger bead to create a third rectangle to go on the side of the "pages" 3-using orange wood stick, create lines to mimic the thickness of the story book 4-create 2 more rectangles using EZFlow Unearthed. This makes the cover of the book 5-assemble and add in details such as shading, the texts in the book, etc. 6- sculpt out the parts for the gnome individually and assemble. 7-build with colour acrylics 8-add shading and adhere to stone
9
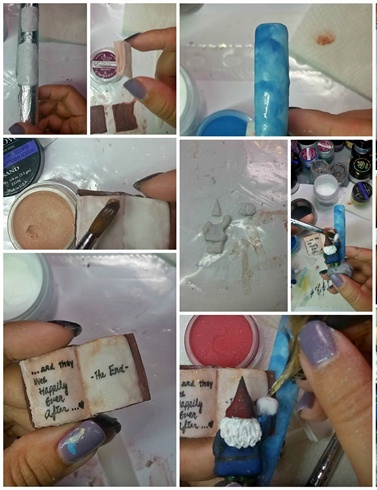
HAPPILY EVER AFTER: 1-Using EZFlow Ruby, sculpt out the head of the mushroom 2- add white beads 3-mixing EZFlow Rocky mountain and white acrylic, create the stem of the mushrooms. 3-add shading and final details to mushroom 4-adhere to stone 5- adhere moss at the base of the mushrooms and complete
10
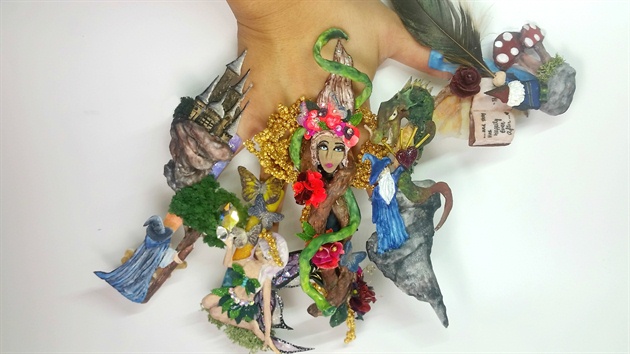
Apply completed tips on hand ET VOILA! Here is the final product, ENJOY!
7 Artists like this Photo
Write a Comment
Submit