This was an exciting Challenge as we were able to create art ontop and underneath!
My inspiration this week comes from Melli Mello. Melli Mello is a bold and exciting mix of different styles such as: Graphic, Romantic, Ethnic, and Floral. It is a brand based on cross cultural blend. This was perfect for Minx as Minx had recently launched its layering kits which encourages mixing of styles.
Step-by-Step Nail Art Tutorial
1
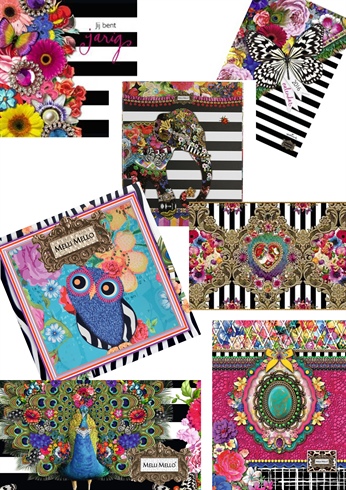
My inspiration for this design - Melli Mello. Melli Mello is a bold and exciting mix of different styles such as: Graphic, Romantic, Ethnic, and Floral. It is a brand based on cross cultural blend. This was perfect for Minx as Minx had recently launched its layering kits which encourages mixing of styles.
2
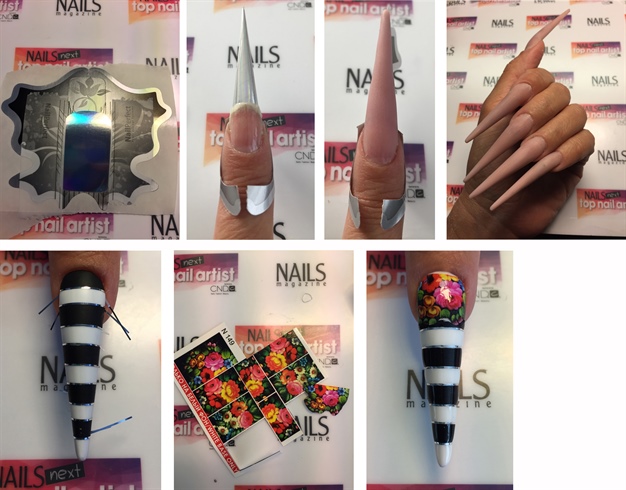
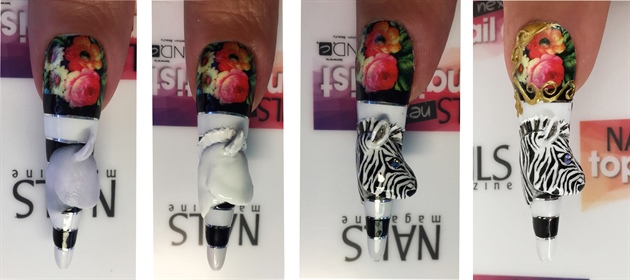
Apply Minxlusion with the tacky side up onto a form and keep in place with tape.\nSculpt out the nail with camoflague acrylic polymer and monomer.\nFile nails into shape.\nApply a white gel polish to the entire nail, cure and cap with Matte Top Gel. Cure and cleanse.\nApply silver striping tape and using black acrylic paint add in black lines.\nIn order to create some layering, cut out a portion of the water decals and apply to your design. Seal with Top Gel and cure.
3

Create butterfly bodies using black acrylic polymer and monomer. During the setting process insert two pieces of metal wire for the feelers.\nUsing Minxlusion and clear acrylic polymer and monomer, create butterfly wings. Cut wing shape out. \nAs the acrylic starts to set, bend the wings into shape.\nUsing aquarelle paint, create ombre color patters on the nail and finish the detailing off with black acrylic paint. Seal both sides with Top Gel. Cure.
4

Create a rhinestone shape using white builder gel. Cure.\nUsing turquoise acrylic paint, create the base of the rhinestone and then sponge in yellow and green. Create fine lines on the stone using black acrylic paint.\nUsing color gel create some colorful designs around the rhinestone. \nSeal with Top Gel and place the gold chain around the rhinestone.\nCreate barok curls around the design using gel paste. Cure and finish with gold gel polish.\nUsing Minx Gold Lightning, cut out the shape of a bow. Cap with clear acrylic polymer and monomer and during set time, bend it into shape and finish with a rhinestone in the center.
5
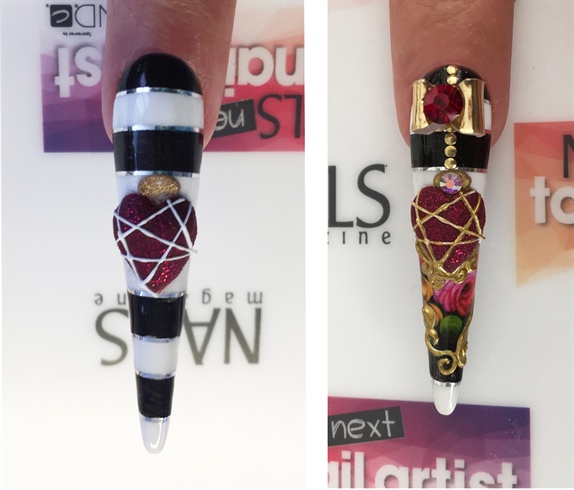
Create an acrylic 3D heart using red glitter acrylic polymer and monomer. Create chains across the heart using white builder gel. Cure and color the chains with gold color gel. \nCreate the bow in the same was as in step 4. Detail with barok curls in gel.
6
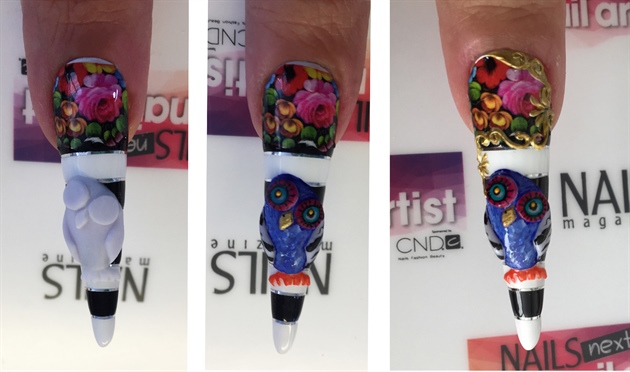
Create the Melli Mello owl using white acrylic polymer and monomer.\nDefine and detail with acrylic paint.\nComplete the nail with barok curls in gel.
7
The zebra is created using a base of white acrylic polymer and monomer. Once the basic shape is created, add a layer of white builder gel to smoothen and gel paste to create the mane. Cure.\nUsing black acrylic paint bring the zebra to life using a fine detailed painting brush.
8
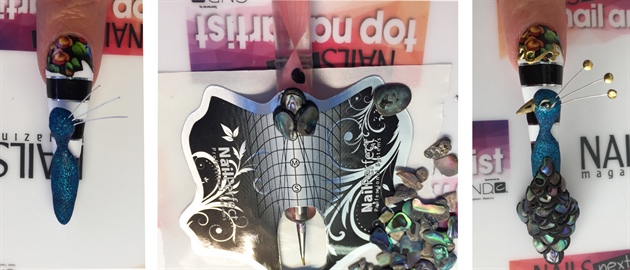
The peacock is created using blue glitter acrylic polymer and monomer. \nDuring set time, insert the three metal wires into the head. \nCreate the tail on a curled up form using black acrylic polymer and monomer. Place a bead and press it into an oval shape. Add a paua shell into each bead once it is flattened. This mirrors the magical colors of the peacock.\nAttach the tail to the body.
9
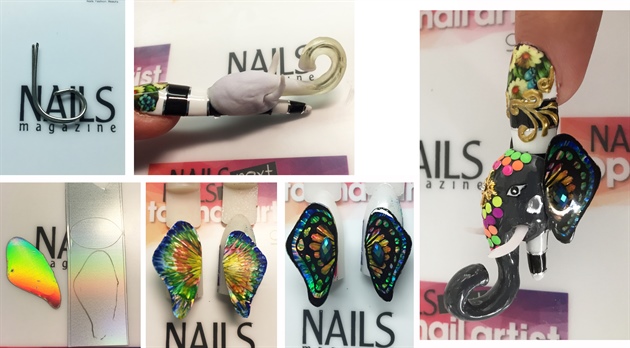
Using a piece of wire dipped into clear LED gel, create the trunk of the elephant.\nCreate the basic shape of the elephant head using white acrylic polymer and monomer and insert the trunk into place during this process.\nCreate the ears using Minlusion with an aquarelle base - like in the butterfly wings of step 3. \nDetail with black acrylic paint. Seal with Top Gel.\nFinish the elephant in grey acrylic paint and neon studs. Bright, interesting shapes and sizes as in all Melli Mello creations.
10
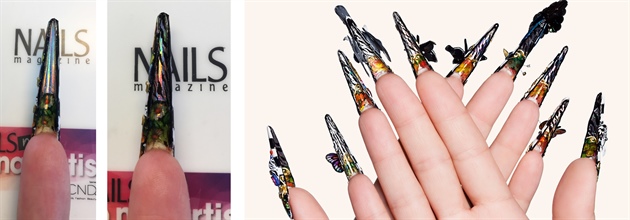
Cut out a portion of the floral water decal and add these at the hyponichium. It could be called hyponichuim art! \nUsing black acrylic paint add some zebra stripes ontop of the Minxlusion. Seal with Top Gel and finish with golden barok curls in gel to compliment the top of the nails.
8 Artists like this Photo
Write a Comment
Submit