What an exciting challenge this week thanks to INM and its best seller Northern Lights Top Coat.
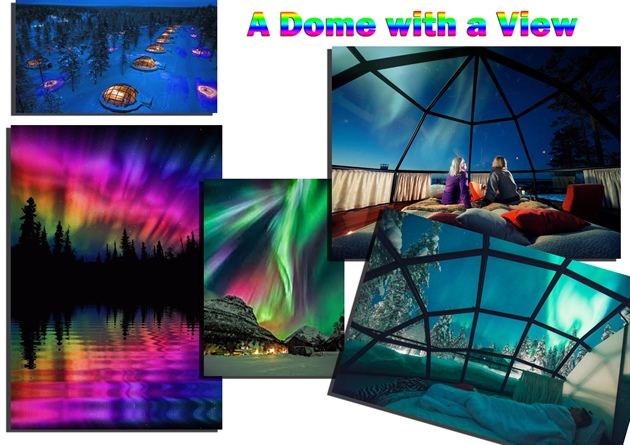
When viewing images of Northern Lights on internet, the scenes are breath-taking, the colors are magical and each and every view is so different from the other. It was for this reason that I chose to do two different backgrounds for my design – every single day is different, every single scene is different. The Northern Lights are mainly pale green and pink however a multitude of colors have been reported. I wanted to share both with you.
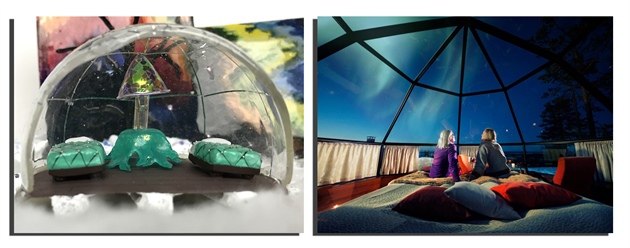
I have created a hotel based close to the Northern Lights where visitors have the possibility to soak up these majestic scenes from the dome of their hotel room. They literally sleep under the stars and under the Northern Lights. It is from this room that they are able to view the changing of the night sky.
We were asked to include a light element in the design. I used two actual lights as explained below, however took the request even more literally and used an old light bulb to shape and create the dome of my hotel room.
There is a little LED night light on in the hotel room, it is a small stained glass table light as not to detract from the bigger show outside.
As you look outside of the hotel, you see the silhouette of a tree against the background of the changing night sky. I have created two different night skies with two different Aurora Borealis backgrounds using aquarelle paint techniques to allow for a transparent effect. Just behind this you see some mountain ranges with the sun peeping through. The sun has been created with a second LED light and this also functions to enhance the colors on my backgrounds as they pass along via a mechanical arm.
Please take a look at the short video that I have included to show the piece while it is working and to show you the effect of the backgrounds changing.
In my tutorial I have included another picture with a closer view of the hotel room so that one can see what a potential resident would see. After doing this challenge, I want to go there! I want to sleep under these magical skies.
I hope this inspires you to book too!
Step-by-Step Nail Art Tutorial
1
The inspiration behind my design this week! Northern Lights – Room with a View.
2
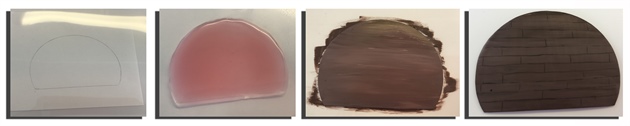
Hotel Room Floor\nCreate the wooden floor of the hotel room with a template inserted into a plastic folder for easy removal of the gel.\n\nUsing Sculpting LED Gel create a smooth half moon base. Cure. File and buff to smoothen.\n\nApply brown Nail Art Paint to create the base of the floor.\n\nUsing a fan brush with a combination of brown and beige Nail Art Paint, fan a grained texture into the floor.\n\nUsing black Nail Art Paint and a ultra fine application brush, create fine lines to mimic the grainy structure of the wooden floor.\n\nSeal with Matte Top Gel for a real wooden floor look.
3
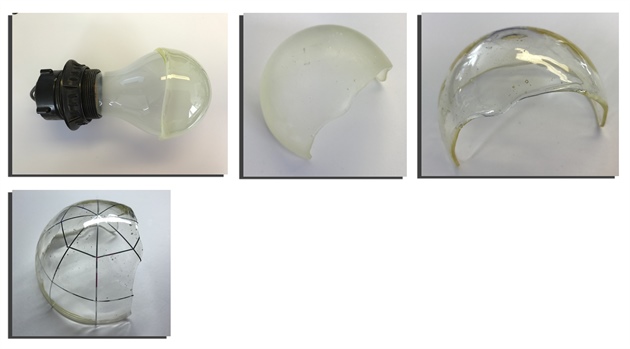
The Dome\nOur assignment was to add a light element to the creation, I took this really literally and created the dome for my hotel room using an old light bulb.\n\nThe light bulb lent itself nicely to the shape of the dome. Apply clear Sculpting LED gel, cure and remove.\n\nAfter filing it into shape and sealing it, create the dome’s metal support structure with silver striping tape.
4
The beds\nCreate the base of the beds by folding a box into a rectangular shape.\n\nCoat with cuticle oil for easy removal.\n\nFill with Sculpting LED Gel, cure, remove and file into shape.\n\nPaint the base of the bed with brown Acrylic Nail Art Paint.\n\nCreate legs for the bed using beads of brown glitter polymer.\n\nAdd a sheet on the top of the bed using white LED gel.\n\nCreate a pillow on each bed by using white polymer applied slightly drier in order to create a great 3D puffed pillow.\n\nThe Duvet cover is created using a turquoise Nail Art Paint as the base. \n\nThe quilted look is created by applying thin lines with using black Nail Art Paint in a crisscross design. Fill these cubes with Clear Sculpting LED gel in order to create a cushioned finish. \n\nSeal the entire duvet with No-Cleanse Top Gel and apply mini beads at the intersections of the criss-crosses as extra decoration or beading. Cure.
5
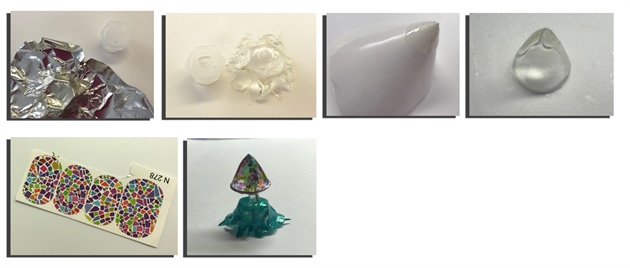
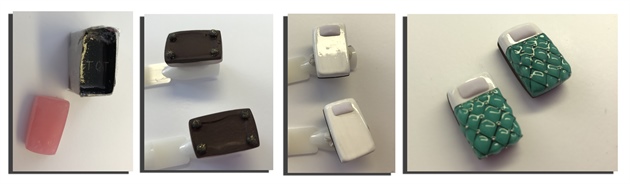
Table Lamp\nThe base of the table lamp is created from a brush holder cap.\n\nThe table cloth is then created using this as a base, covered with aluminium foil to create a flowing look to the table cloth.\n\nCoat the aluminium foil with acrylic paint and apply clear LED Sculpting gel over the aluminium foil.\n\nCure remove and cleanse. The structure of the table cloth is made.\n\nAdd color to the table cloth by coating it with nail lacquer and a layer of glitter lacquer.\n\nFold a form backing into a cone shape and create the top of the lamp using clear LED Sculpting Gel.\n\nCure, file and apply Water Decals to create a stained glass look to the lamp.\n\nSeal and cure.\n\nDrill a hole through the “table” and insert a lamp from under the table.\n\nSecure the lampshade ontop of the LED light with gel. Cure.
6
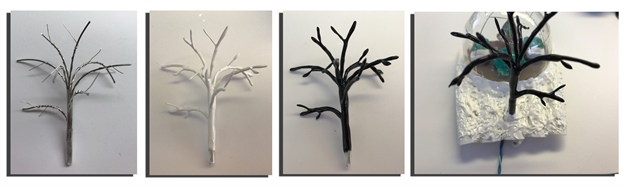
Trees\nWe see many silhouttes against the gorgeous night sky, so I created a tree as a silhouette.\n\nThe tree structure is made from different thicknesses of wire intertwined to create branches.\n\nCoat the tree with a layer of white Sculpting LED Gel to create the bulk.\n\nAfter curing paint the tree with a black color gel to create a silhouette.\n\nSecure these onto the tips by drilling a whole through the base tips.
7
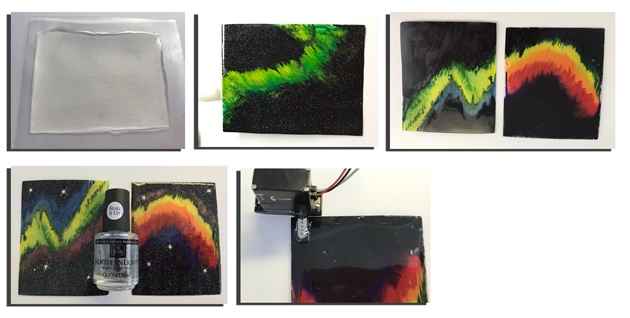
Time for the highlight of the design – Northern Lights\nI have seen some gorgeous pictures of different Northern Lights. It was difficult to choose so I decided on two backgrounds which would interchange.\n\nUsing a plastic sleeve for easy removal of the gel, create two squares in clear Sculpting LED Gel.\n\nFile both into the same shape.\n\nUsing aquarelle paint for a transparent finish I faded several different colors into one another. The aquarelle paints are great as they can also be reworked by adding water even after they have dried.\n\nFinish the rest of the background with black Nail Art Paint to add full coverage.\n\nSeal the entire design with INM Northern Lights Top Coat for a shimmer that represents the vast galaxies beyond.\n\nCreate a magical glow around the Northern Lights Aquarelle design by sponging some blue, green and gold chrome powders.\n\nCreate some feature stars using a drop of white color gel applied with a dotting tool. From the inside of the bead, using a fine application brush, feather lightly to the outside of the bead, creating the rays of the star. Place a rhinestone in the center of the star. Cure.\nSeal the entire gel card with Top Gel.\n\nAttach each of these sheets to a mechanical arm.
8

Snowy Mountain ranges\nThe background is created by attaching the other 5 tips together and painting them white with white color gel.\n\nCreate the snowcapped peaks and base with a LED Gel Paste which through patting randomly generates a lovely structured surface. Cure.\n\nTo hide the mechanical arms, create a gel base to place over them. Attach the tips to them and once again create a snow-like finish to the base too.\n\nCreate the sun in the background by drilling a whole through the tips, sponging orange and yellow around the hole with Nail Art Paint and inserting and securing a yellow LED light.
9
A Room With a View
2 Artists like this Photo
Write a Comment
Submit