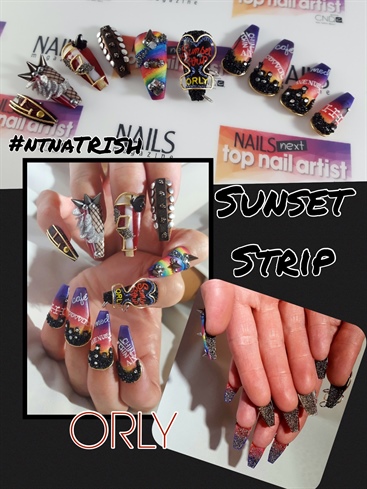
VIP treatment please! Orly asked us to create a wearable nail look on two hands that would get us VIP treatment behind the ropes on the Sunset Strip in LA, using only lacquer, gel polish, acrylic paints and embellishments, as an ode to their new holiday collection. Let's take a look at how I created this star studded set!
My inspiration began right in the heart of LA, when I contacted a close childhood friend that lives there, and asked her favorite hot spots! The list was long, but I searched what would be my favorite places and what gave me nail eyes!
Step-by-Step Nail Art Tutorial
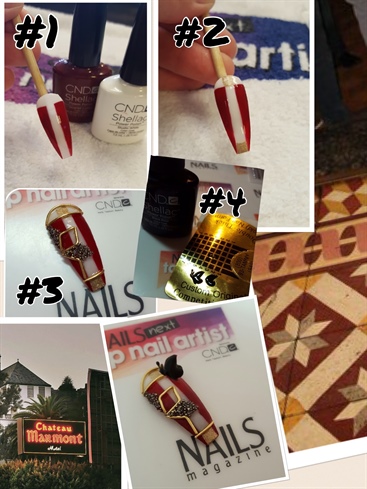
1
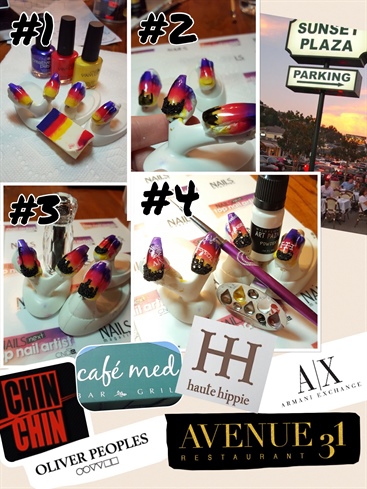
1: Sponge lacquer colors to create a sunset across 4 nails, then gel top coat, cure. 2: Start the skyline by painting it with black gel polish, cure. Gel top coat those areas, leave uncured, and add swarovski Crystal Pixie, then cure. Add in some more Swarovski crystals to create the lights in the heart of the city. 3: Using acrylic paints, pick some of the hottest boutiques and restaurants at the Sunset Plaza shopping strip, that you'd love to be seen at, and paint them in the sunset! 4: Matte finish top coat the ombré sunset area ONLY, so the crystal pixies really shine!
2
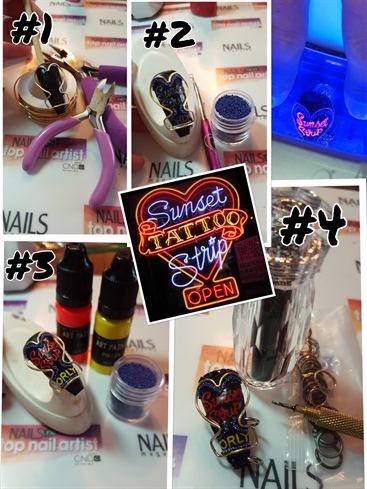
1: Start with 2 coats of black gel polish on the nail, cured. Shape gold wire, (I used 20 gauge craft wire), into a heart with an "open sign" area, but in our case "ORLY", at the bottom, and add to the nail with nail glue. 2: Add bright blue caviar beads as part of the neon sign. Using a lighter gel polish, paint in Sunset Strip and ORLY, cure. The lighter color first makes the bright colors show up! 3: Using acrylic paints, make the lettering really stand out! Don't forget to gel top coat! 4: Can't forget some piercings when visiting the Sunset Strip Tattoo shop! And of course we need to tie in the Swarovski Crystal Pixies! Glitz and glam for LA! Check out the neon sign under the LED gel light!
3
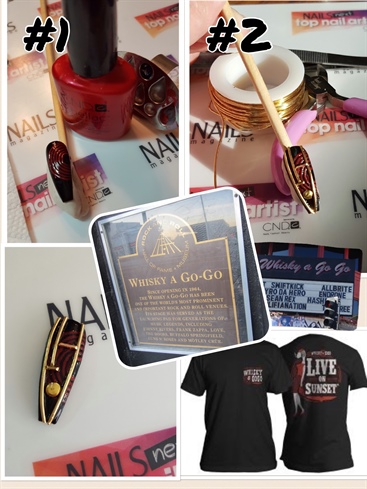
1: Start with 2 coats of black gel polish on the nail, cured. Then start painting circles, to resemble a record, using red gel polish, (of course I used Hollywood from CND), cure, then gel top coat, and cure. 2: Cut and shape gold wire, (again, 20 gauge craft wire), to resemble the guitar strings on the Rock aNd Roll Hall of Fame + Museum plaque, attach with nail glue, and add a gold stud! 3: Now let's get our Rock aNd Roll on at the Whiskey a GoGo with the likes of The Doors, Guns N' Roses, and Mötley Cruë!
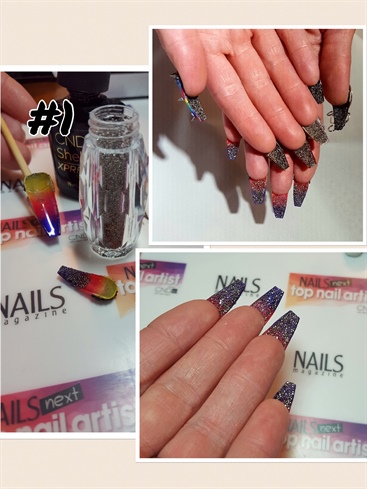
4
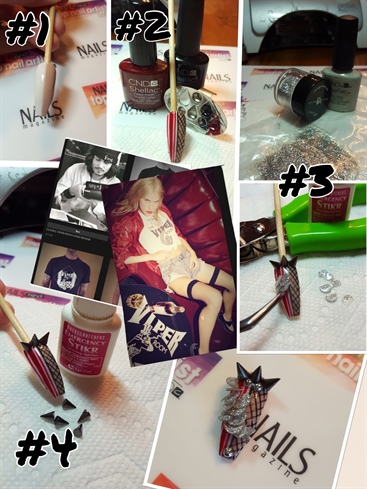
1: Here comes some sexiness, and to add to that was Johnny Depp, and the Viper Room! Pick our favorite nude and cream gel polishes, paint each half using both colors, cure. 2: On the nude, make a fishnet pattern using black gel polish, to resemble the sexiness on the red leather couches! On the cream, using red gel polish, paint stripes to resemble the logo on the t-shirts you'll find for sale! 3: To add tot he logo and sexiness, I added glittered mermaid/snake scales, by curing glitter gel polish, gel top coated & cured, on a plastic bag. Peel off and use a hole punch to cut out the shapes, and attach to the nail with nail glue! 4: Add some rock and roll spikes and studs with nail glue, and now you'll be ready to be seen by the hottest stars!
5
1: At this very beautiful and posh, famous Hollywood hotel called Chateau Marmont, where John Belushi unfortunately died, you'll find a very cool and detailed place, called Bar Marmont... SO GET YOUR NAIL EYES READY! Using your favorite red and cream gel polishes, paint the pattern shown and cure. 2: Using a gold paint, put on 2 small squares, one at the top and one at the bottom. Gel top coat and cure. 3:Using the 20 gauge craft wire again,shape and outline the areas shown to resemble the super cool detailed flooring at this hotel/bar, and attach with nail glue. Don't forget to tie in some more Swarovski Crystal Pixies! 4: Since we had nail eyes with the flooring, we couldn't forget about the amazing 3D black butterflies on the ceiling! I created this by painting separate butterfly wings on a nail form with black gel polish, cured, gel top coated, cured, attached wings with nail glue, and attached to the nail with nail glue, for the perfect finish! Now just to visit and get my picture taken here!
6
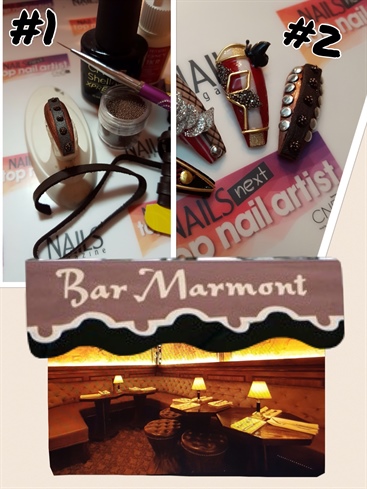
1: NAIL EYES, again! Still at the Bar Marmont, I couldn't help but notice the super cool, swanky, studded leather chairs! Start with 2 coats Leather Satchel CND Shellac, cured, gel top coated, and cured. Add in some real leather by glueing a strip down the middle of the nail, and adding a ball of rustic gold caviar beads with gel top coat, and cure. 2: Don't forget the silver studs, added with nail glue!
7
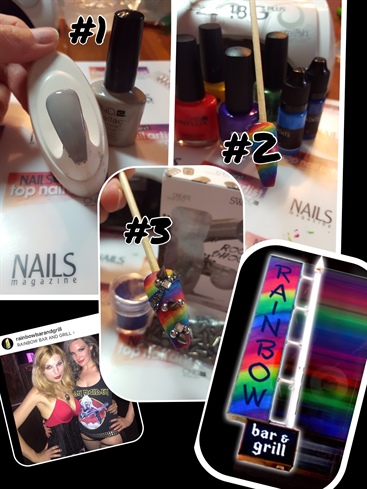
1: Start with 2 coats of a lighter gel polish, cured. 2: Using a sponge, put stripes of lacquer and acrylic paints on it, to create a rainbow, and sponge the nail, then add matte finish top coat. 3: Add in some rock and roll studs and spikes, and don't forget about the Swarovski Crystal Pixie tie in!
8
1: To really gain VIP status, we can't leave anything bare, every detail needs to be displayed, so lets' add some more glam to the backside of these Sunset Strip beauties! Apply Swarovski Crystal Pixie to the undersides of all 10 nails!
9
Add in some finishing touches with more gold wire, beads, and studs, wherever you feel needs to be seen the most!
4 Artists like this Photo
Write a Comment
Submit