dry marble nailsPhotos
2787
0
13
Posted on 01-27-2015
Cold Flags, Warm World
by Cr8tive1
Posted on Apr 24, 2024
12 Views | 0 Likes 0 Comments
Spring Thermal
by NinaB
Posted on Apr 21, 2024
14 Views | 0 Likes 0 Comments
Cold Flags, Warm World--Toes
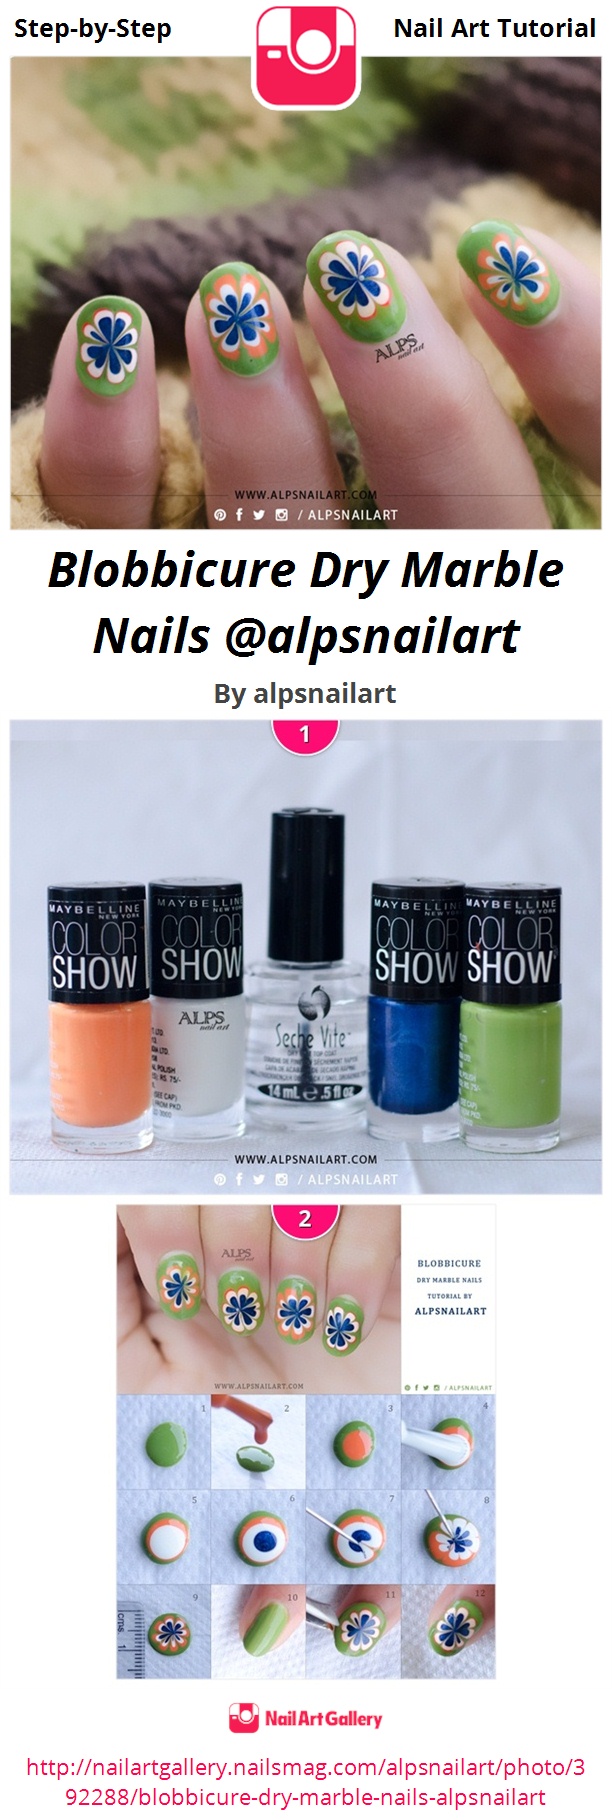
<a href='http://nailartgallery.nailsmag.com/alpsnailart/photo/392288/blobbicure-dry-marble-nails-alpsnailart?ref=side-embed'><img src='http://s3photo.nailartgallery.nailsmag.com/72fd6256-28c1-4a7e-9065-893c3688b9a1_set.jpg' alt='Blobbicure Dry Marble Nails @alpsnailart - Nail Art Gallery' /></a> Copy and paste the embed code above to put this step-by-step nail art tutorial on your web site.
Products Used: Nail polish colors of your choice, Top coat, Needle, Tweezer.
Steps:\n1. Drop the first color on plastic bag. Since this will form the base we want it to spread well. So put the drop from 2-3 inch distance (height wise).\n\n2-6. Put next colors drop by drop right in the middle of the first layer. With every next drop go on reducing height of drop. So distance for the next drops will be closer then first layer i.e. 1.5 inches, 1 inch and so on.\n\n7-8. With the help of a needle create a floral design like we do in water marble nails.\n\n9. Let the decal dry for 4-5 hours.\n\n10. Apply base nail color on nails.\n\n11. When the base is semi wet, apply the decal over nails.\n\n12. Press decal from sides to fix on nails and give finishing.